


Get Laundry to Dry Faster by Learning How to Clean a Dryer Vent

By Erin Lindholm
Dryer lint—it’s a fact of life. No matter how regularly you clean your drying machine’s lint filter (which should be with every dryer cycle, hint, hint) you can’t forget about cleaning the dryer vent, too. Neglecting to clean your dryer vent decreases your machine’s performance, which adds to household energy costs. And most significantly, a clogged dryer vent is a fire hazard—household dryers are the source of ignition in thousands of home structure fires every year.
Rest assured, even if you’ve never before tackled this home maintenance task, this step-by-step guide will teach you how to clean a dryer vent for optimal performance and safety and give you preventive maintenance tips you can use all year.
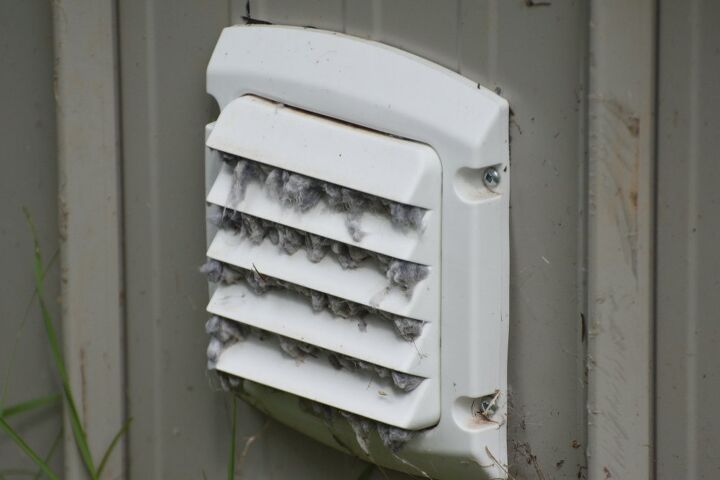
Photo via Shutterstock
Signs You Should Clean Your Dryer Vent
It’s easy to neglect (or simply forget about) this cleaning chore, especially if your dryer seems to be running per usual. Whether you’re a longtime homeowner, recently moved into a home that came with its own washer/dryer setup, or just purchased a new dryer, it’s important to watch for these telltale signs of clogged dryer vent ducts:
- Laundry seems to be taking longer to dry than usual and the dryer might have to be run more than once to fully dry clothes
- The dryer feels hot to the touch during or after running a cycle
- You detect a burning smell when the dryer is running, or have seen scorched/burn marks on laundry
How to Prepare for Cleaning a Dryer Vent
Before you get started doing the actual labor of tidying out your vent, there are a few steps you need to take to prepare your machine and its vent.
Step 1: Locate Where the Dryer Vent Begins and Ends
Gently move the drying machine away from the wall so you can fully inspect where the dryer vent hose connects to the back of the machine and to the wall. Then, take a minute to locate the output of your dryer vent outside your home. It might be located on the roof—if it’s not and it’s accessible, remove the exterior duct cover.
Step 2: Disconnect Dryer
Unplug the dryer and shut off the gas/propane supply valve, if necessary. (Note: For gas-powered dryers, you’ll need to take extra care to not disturb the gas line while you clean the dryer vent or move the machine around. Call in a professional if you have any uncertainties.)

Photo via Shutterstock
How to Clean a Dryer Vent from Inside
The most logical method for how to clean a dryer vent? Follow the lint! There are opportunities for dryer lint buildup at nearly every step along the way.
Tools and Materials Needed
- Screwdriver/power drill
- Vacuum cleaner with hose attachment
- Dryer vent brush kit (optional)
- Bucket or trash can
- Work/safety gloves (optional)
Step 1: Deep Clean Lint Trap Housing
For all of the lint and fuzz bits that escape the lint trap in your dryer, this is their first stop on the journey towards clogging your dryer vent. Use a screwdriver or power drill to remove the lint trap housing (keep the hardware in a safe place!) and clean this section thoroughly by picking up lint with your hands and sucking it up using the hose attachment on your vacuum.
Step 2: Disconnect Dryer Vent Hose
Remove any brackets or metal tape holding the dryer vent hose at the back of the dryer. For easier cleaning, also detach the dryer vent hose from its input into the wall if possible.
Step 3: Clean Dryer Vent Hose
If the dryer vent hose is fully detached, first give it a gentle shake over a bucket or trash can to release debris—you may be surprised at how much falls out! Using your vacuum or the large brush from your dryer vent kit, gently clean out the inside of the hose.
Use a Dryer Vent Kit for a Shortcut
Step 4: Clean Dryer Vent Ductwork
If you can see through to the exterior output of your dryer vent, a vacuum with a hose extension will make quick work sucking up any other lodged debris (or you can clean the vent with a leaf blower, which we’ll detail below). For dryer vents that have longer pipes, pipes with angles, or are in hard-to-reach places, a specialized brush from a dryer vent kit will help dislodge other debris.
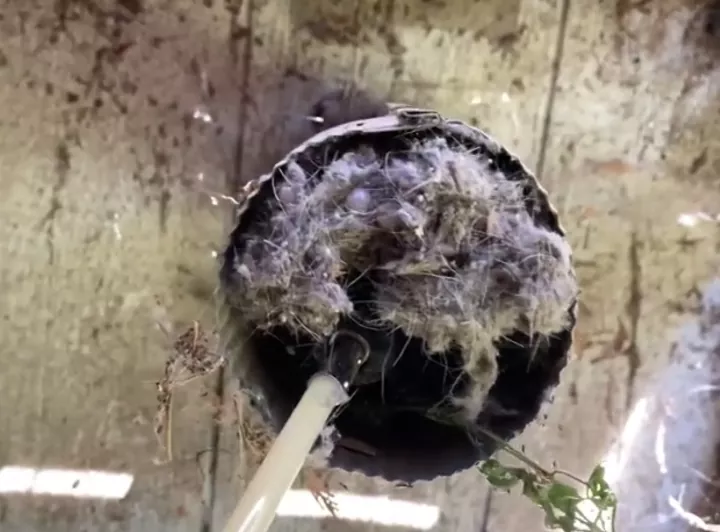
Photo via Adrienne Carrie Hubbard | Crafty Little Gnome
How to Clean a Dryer Vent from Outside
Depending on how much buildup and debris is clogging your dryer vent output, you might want to repeat the cleaning process with the tools in the dryer vent kit from the exterior access point. Be aware, though, if your dryer vent output is elevated (say, if your laundry is in the basement) debris loosened by the brush will send grimy particles falling down into the laundry area. (Thanks, gravity!) In this case, lay out a tarp or drop cloth at the opposite end’s access point to catch the debris and have a vacuum on hand to clean up.
Can You Clean a Dryer Vent with a Leaf Blower?
Although it may sound more efficient than old-fashioned elbow grease, it’s not always practical to clean a dryer vent with a leaf blower. It’s a hack that works best on short, straight dryer vents that are not made from any sort of ribbed or accordion-style ducting that could tear or rip or that can catch lint particles in the folds.
The premise of this DIY hack is to follow all of the prep steps above, including disconnecting the dryer vent hose and making sure the exterior access point is open and clear of any obstructions. For the actual cleaning process, insert a leaf blower (electric powered only, since you’re working inside) into the open ductwork and wrap tightly with duct tape, creating a seal between the tube of the leaf blower and the opening to the ductwork in the wall. Turn on the blower and let it run for around 30 seconds, putting everything back in place when you’re done.
How to Clean a Dryer Vent on the Roof
Some homes’ dryer vents are on the roof, and cleaning a dryer vent on the roof has its own set of challenges. Follow all of the prep steps above, as well as the steps for cleaning a dryer event from inside. Because of gravity, you may want to wear a surgical mask and/or safety goggles—expect lint and dust to shower down as you clean. Vacuum up any mess when you’re done.
To clean the dryer vent from the outside, it’s probably best to call a professional. We do not recommend climbing onto the roof to troubleshoot any challenging clogs; an additional risk is that the rods of the dryer vent brush could disconnect or get lodged and stuck “up there.”
Inspect and Reconnect Dryer Vent Tube, Run a Test
At this point, you can rest assured the dryer vent is clean and ready to function safely and efficiently. All that’s left is a bit of reassembly—plus one test cycle, to ensure that the dryer’s hot air is properly reaching the outdoors.
Tools and Materials Needed
- Vacuum cleaner with hose attachment
- UL-listed metal foil duct tape
- Work/safety gloves (optional)
- Screwdriver, if necessary
Step 1: Inspect All Dryer Vent Parts
How old is that dryer vent hose, and is it made from plastic/vinyl or coiled-wire foil? As a fire precaution, the U.S. Fire Administration recommends replacing dryer vent hoses made of those materials with a stiff-walled or rigid metal duct tubing. This is an ideal opportunity to make the update.
Step 2: Reattach Hose and Vent Cover
Seal sections with UL-listed metal foil duct tape or reattach brackets.
Step 3: Give Dryer a Test Run
Plug in the dryer and turn on the gas valve, if required. Run the dryer for 15 to 20 minutes on the fluff or air dry setting to make sure all of the connections are strong—there should be no air leaks inside and the exterior vent should demonstrate strong and steady airflow that blows out any residual debris. When the cycle’s up, reattach the exterior cover on the dryer vent outside and gently move the dryer back into position. Voila!
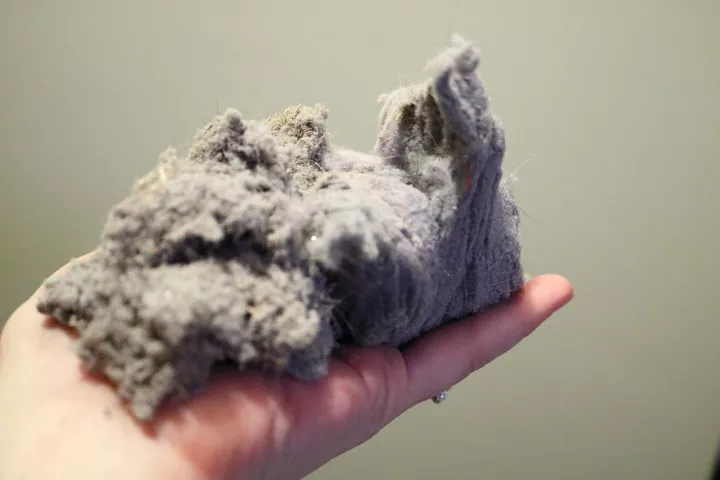
Photo via Liberty Brammer
Tips for Keeping a Dryer Vent Clean
Some of the best maintenance you can perform to keep dryer vents from getting dirty is preventative maintenance. Here are a few tips to reduce the amount of dust and lint in and around your dryer throughout the year:
- If you don’t already, get into the habit of cleaning out the lint trap filter before every cycle. It’s quick and easy and goes a long way towards keeping your dryer vents clean.
- Periodically hand-wash the dryer lint screen in soapy water and air dry to remove any residue from cleaning products.
- From time to time, use the hose attachment of the vacuum to remove any extra lint that’s visible in the lint filter.
- Regular light cleaning (like sweeping and dusting) in the laundry area reduces the number of particles drawn into the dryer vent.
Have you cleaned your dryer vent recently? Do you have any more tips to share? Comment them down below!
Comments
Join the conversation
-
We just remove the hose off the unit and top and add a new one every other year or so. Cost more but no holes made from a tear. And takes less time.


Frequently asked questions
Have a question about this project?