


How to Make a Balloon Garland to Level-Up Your Next Party

By Brooke Ressell
From baby showers and birthday parties to graduations and weddings, balloon garlands are an eye-catching way to take your decorating game to the next level. With all of the color, shape, and size possibilities, balloon garlands are an incredibly memorable, versatile, and photo-worthy decor piece.
However, hiring someone to create a balloon garland for you can add up rather quickly. And with a party budget already filled with food, drinks, games, and presents, it’s nice to save some cash where you can.
How do you make a balloon garland at home without having to hire it out? Luckily, you can make a balloon garland for literally any occasion, and it’s really not all that hard. In fact, after reading our tips and tricks for how to make a balloon garland at home, you’ll wonder why you never thought to try it sooner.
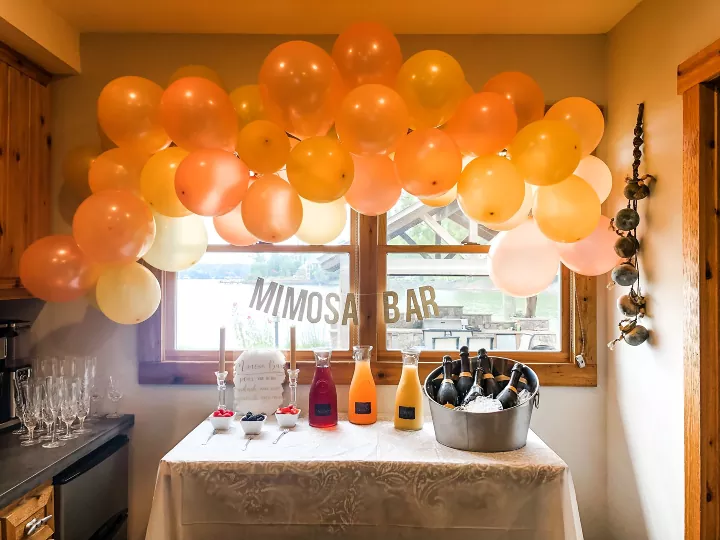
Photo via Carley | CountryPinesFarm
How to Plan Out a Balloon Garland
Coming up with a solid plan is the first step in making a balloon garland on your own. Whether want to make the garland from scratch or buy a kit with everything you need, there are a few considerations to think about first.
Determine Where to Hang Balloon Garland and How Big It Will Be
Will the garland be a feature decoration above a small dessert table? Will it span the entire length of a large archway inside? Or will you hang balloon garland outside your home?
Figuring out the role the balloon arch will play in your overall decorating scheme will help you determine how many balloons to make a garland, and whether or not you should buy a kit, which might be more cost-effective for larger garlands.
For small balloon garlands, you may need only sixty-five balloons or so. But for much larger balloon garlands, you may need more than two hundred. Also, remember that balloon garlands always look best when you include a variety of different balloon sizes in them.
Decide on a Balloon Garland Color Scheme
Next, you’ll want to determine a color scheme for your balloon garland. Do you like the look of a bold and beautiful rainbow garland? Or would you rather have pastel colors with glittery gold accents?
Either way, your options are endless, and the type of celebration you’re hosting can help you narrow down your choices even further: For example, if you’re planning a garland for a wedding or bridal shower, traditional gold and white might be the play. Or, if it’s for a birthday party, the garland’s balloons might want to coordinate with the theme of the party. Looking online for inspiration is always a good idea before you get started.
Decide How to Inflate Balloons
Then, you’ll want to decide how you’re going to inflate all of these balloons. Blowing each one up individually takes a lot of time, and it can even cause you to pass out. Yikes!
Fortunately, there are plenty of electric balloon inflators on the market—like The Balloon Buddy—that make the job of blowing up balloons much quicker and easier. Air compressors are also a great tool to inflate all of the balloons for your garland.
Determine How to Hang Balloon Garland
Lastly, you’ll want to decide how you want to support all of the balloons and keep them together. In other words, what materials will you use to make the base of the balloon garland you build?
There are many options available—such as fishing line, arch stands, and twine. In this guide, we’ll focus on using a balloon decorating strip because they’re by far the quickest and most convenient tool for making a decorative balloon display.
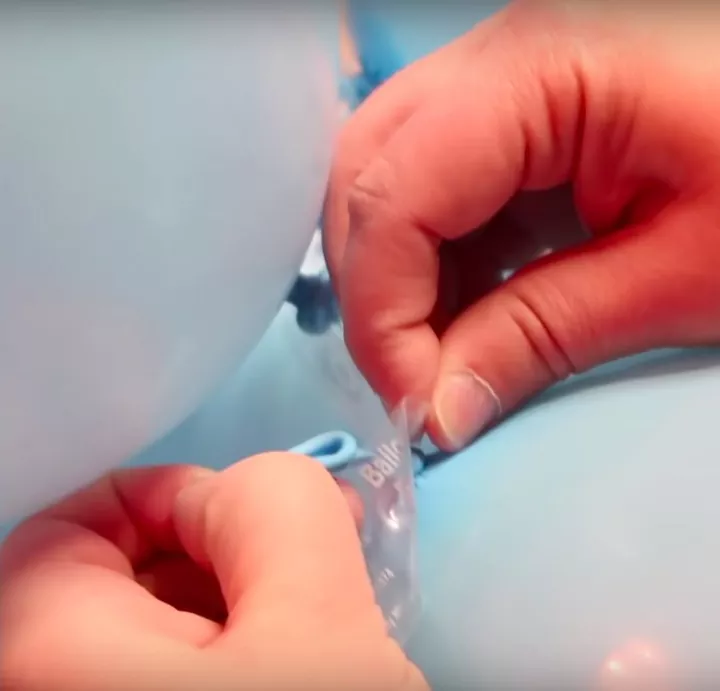
Photo via Kara S.
How to Make a Balloon Garland
Learning how to do a balloon garland with a balloon decorating strip as the base is as easy as it gets. With just a few tools and materials, you’ll have a decorative piece that will get plenty of attention from all of your guests. Here's how to make and hang balloon garland with a strip.
Tools and Materials
- Latex balloons of different sizes (anywhere from 65-200+ balloons, depending on how big yours will be)
- Balloon decorating strip
- Glue dots
- Adhesive utility hooks (like Command)
- Scissors
- Measuring tape (optional)
- Electric balloon inflator or air compressor
Step 1: Inflate Balloons
Once your plan has been made and you’ve purchased all of the necessary tools and materials, the first step toward making a balloon garland is inflating all of the latex balloons. To do this, simply attach each balloon, one at a time, to your electric balloon inflator or air compressor and fill them to your desired size. Tie the end of each balloon in a knot before moving on to the next one.
Vary Sizes
Step 2: Cut the Strip
During the planning phase, you determined the size of balloon garland that you wanted to make. Now, you need to measure the balloon decorating strip using a measuring tape or by holding the tape up where you plan to hang your balloon garland. Use your scissors to cut the balloon decorating strip to the desired length, leaving an extra inch on each end just in case (you can always snip it off later).
Step 3: Insert the First Balloon
Now that all of your balloons are inflated, the next step is to insert the end of one balloon into one hole on the balloon decorating strip. To do this, simply take the tied end of the balloon and thread it through any of the holes in the balloon decorating strip. Make sure that the balloon’s knot is fully through the hole for security.
Step 4: Insert the Remaining Balloons
Continue to insert the balloons into the balloon decorating strip one at a time until all of the balloons are fastened into place.
Alternate different sized balloons and colors throughout the length of the balloon decorating strip. We even recommend setting aside a few small balloons to fill in the garland at the end (which we’ll walk through below).
Step 5: Attach the Hooks
Next, attach utility hooks to the wall in your desired location. You will need at least one hook for each end of the balloon garland.
Step 6: Hang the Balloon Garland
Carefully hang the garland on each of the two balloon garland hooks. To do this, simply slide each hook through one of the remaining holes located at both ends of the balloon decorating strip.
Step 7: Fill In as Needed
Now that your balloon garland is hanging in place, it’s much easier to catch any bare spots that could use an extra balloon or two. Take the smaller balloons you’ve set aside and attach them to the surrounding balloons with glue dots. You can also hang more hooks along the length of the garland if you feel like it needs more shape and lift. Follow Steps 5 and 6 to hang hooks and attach the garland.
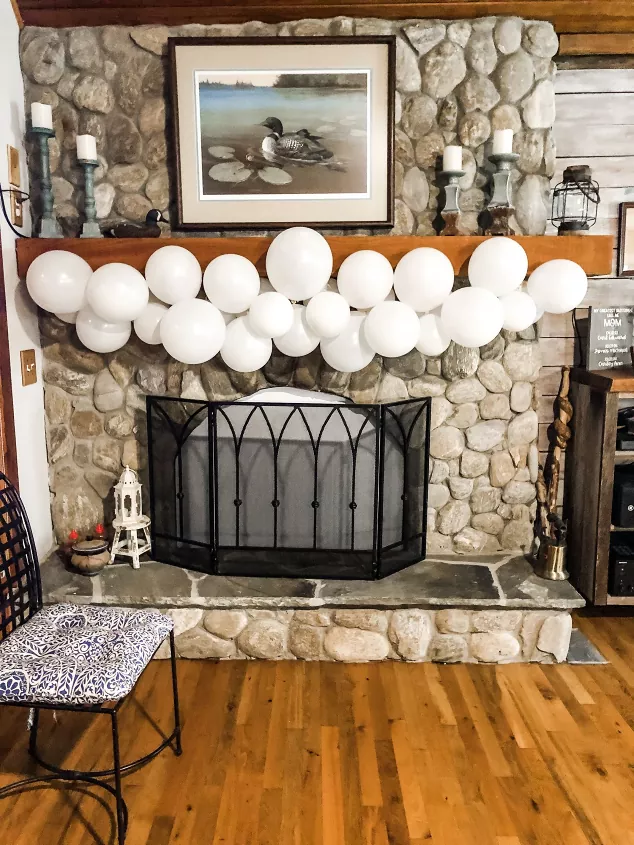
Photo via Carley | CountryPinesFarm
How to Hang a Balloon Garland
Once you learn how to build a balloon garland the first time and see how fun it is to arrange the balloons along the garland, you’re probably going to want to build many more in the future. Plus, you can display them in different locations and in many shapes, so your options are endless.
Here are a few tips we have for displaying an attractive balloon garland for any occasion:
- Get creative and brainstorm all the places that you can decorate with a balloon garland including over archways, along bulkheads, around windows and signs, as a welcome arch on porches, and hanging from open garage doors.
- If you want to hang your garland on fabric, carefully poke safety pins through the bottom end of the balloon and through the fabric, then close them to secure.
- Hanging balloon garland outside? Just be sure that it won’t rub against anything rough that might pop the balloons, like tree bark or grass.
- Make your garland and hang it the day before so you’re not rushing to complete it before a party.
Have you successfully made a balloon garland for a celebration? Tell us about it in the comments below!


Frequently asked questions
Have a question about this project?