


How to Make a Christmas Bow 3 Different Ways

By Alexa Erickson
The holiday season is filled with festive energy, and decorations take center stage. Twinkling lights adorn rooftops. Ornaments fill Christmas trees. Perfectly wrapped presents are strategically placed for all to see.
If you’re new to the decorating game or are just trying to sharpen your skills, you may be intrigued to learn how to make a Christmas bow. We have you covered with three bow-making techniques in this guide, whether you’re looking for a large bow to top your tree, or the finishing touch on a wrapped present. It's amazing what some ribbon and a few simple materials can do!
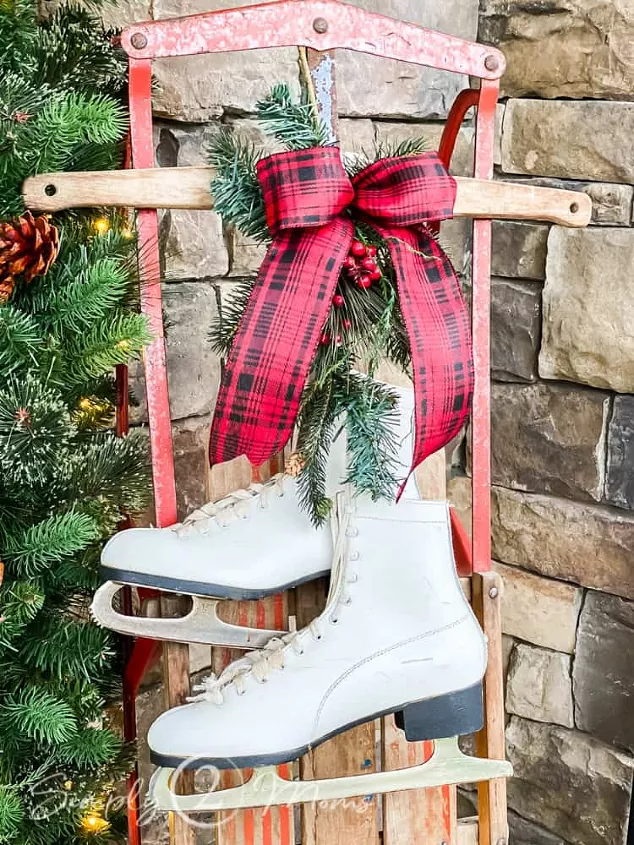
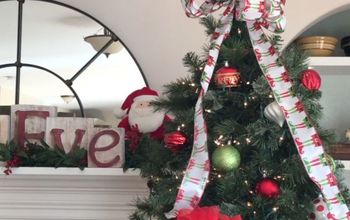
Photo via Simply2Moms
Uses for a Christmas Bow
A Christmas bow is inexpensive and relatively easy to make. Bows can embellish the home in various ways. Your best bet is to make plenty for multiple uses, and consider varying sizes to fit your needs. Here are a few uses for a Christmas bow this season:
- Add a splash of color to your front door wreath
- Embellish garland draped over the mantel or along the staircase railing
- Top a present
- Use it as a tree topper or tree filler
- Attach it to the front of a gift basket
- Hang two at the top corners of a door frame
- Place a small one in your hair for your next holiday party
Materials Needed to Make a Christmas Bow
When purchasing materials to make a Christmas bow, consider the type of ribbon you want. Double-sided ribbon is a great hack for ensuring the right side of the ribbon is always facing up. Wired ribbon is ideal for creating and maintaining shape and fullness. Having sewing pins on hand is great for creating intricate bows. Finally, sharp scissors like fabric scissors are essential! They create clean cuts for a seamless finish to your Christmas bow.
How to Make a Classic Christmas Bow
The classic Christmas bow is a great place to start for novice crafters and minimalists alike. Think of this method for creating a bow sort of like tying a shoe—two loops of ribbon wind around each other to create a bow with tails hanging down.
Tools and Materials Needed
- Wired ribbon
Step 1: Create Three Loops
Cut ribbon into your desired length. Then, create three loops with your ribbon so that the first and last loop face upwards and the middle loop faces downwards.
Step 2: Cross and Fold
Cross the right loop over the left loop. The side with the tail hanging down will face out. Then, fold the right loop down through the center loop and pull tight.
Step 3: Shape and Arrange
Arrange the bow’s loops so they are shaped and fluffed to your desire.

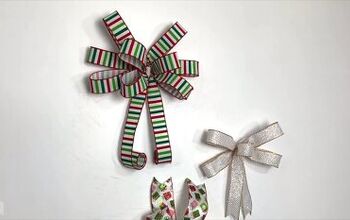
Photo via Kara S.
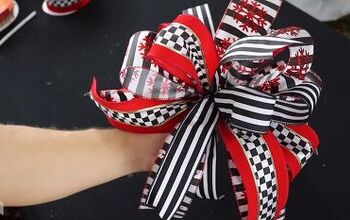
How to Make a Large Christmas Bow
Ideal for topping the tree or serving as the centerpiece of a wreath, a large Christmas bow is surprisingly easy to make yourself. What gives this bow such a full look is cutting the ribbon into multiple pieces, each piece making its own loop to feather out from the bow.
Tools and Materials Needed
- Measuring tape
- Spool of two-inch wide wired ribbon
- Scissors
- Thread and needle
- Sewing pins
- Six-inch floral wire
Step 1: Cut Three Pieces of Ribbon to 18 Inches
Roll out measuring tape and secure it at 18 inches. Then, unravel some of the ribbon from the roll until it reaches the 18-inch mark. Cut three pieces of the ribbon to this length.
Step 2: Fold and Pin Each Ribbon
Place your finger over the center of each piece of ribbon. Use your other hand to fold each end of the ribbon inward, the ends overlapping each other. Pin the ends in place at the center.
Step 3: Stack the Ribbons
Stack the ribbons on top of each other, with the folded sections fanned out. Sew the layers of the ribbons together at the center with a thread and needle. Then, position the folded sections into loops.
Step 4: Cut Two Pieces of Ribbon into 10 inches
Cut two additional pieces from the ribbon roll into 10-inch pieces. Fold, pin, and stack the ribbons as you did in the previous section. The centers should be pinned together while the folded sections are fanned out.
Step 5: Stack the 10-Inch and 18-inch Ribbons
Stack the 10-inch ribbons on top of the 18-inch ribbons. Pin them together in the center. Sew the centers together.
Step 6: Cut One Piece of Ribbon Into 6 Inches
Cut a 6-inch piece of ribbon and shape it into a loop. Pin it in the center of the joined ribbons you’ve stacked, pinned, and sewn already. The fold of the loop of the 6-inch ribbon should be against the center of the joined ribbons. Sew the loop to the underside of the bow.
Step 7: Cut Two More Pieces of Ribbon Into 18-Inch Pieces
Use scissors and the measuring tape to cut two more pieces of the wired ribbon to 18 inches each. Once cut, place one end of each ribbon against the center back of the bow and sew in place. This will create the bow’s streamers.
Step 8: Attach Floral Wire
Fold a 6-inch long floral wire in half, then sew the folded section of the wire to the back of the bow. This will allow you to attach the bow to the top of the tree, on a wreath—whatever you please!
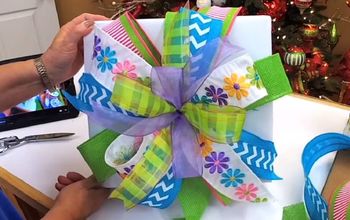
How to Make a Pom Pom Bow
Top a gift with a beautiful bow that will dazzle beneath the tree. A handmade pom pom bow is sure to show others just how much you appreciate them.
Tools and Materials Needed
- Ribbon
- Measuring tape
- Scissors
- Craft wire
Step 1: Wrap Ribbon Into Circles
Form a ribbon circle that’s about the width of the size of the bow you’d like to make. Six inches across should work. Wind the ribbon around until at least eight circles are formed. The more loops, the fuller the bow.
Step 2: Trim Corners
Once wrapped, flatten the loops of each circle and make a diagonal cut at each corner.
Step 3: Secure Center Notches
Once all four corners are cut, refold the flattened loops. The cut notches will meet at the center. Tie a small piece of craft wire around the center notches tightly in a knot to secure.
Step 4: Twist and Fluff the Loops
To create a full-looking bow, pull at the loops. Begin on one side of the bow, pulling out the innermost loops and twisting to the right. Pull out the next innermost loop, and twist to the left. Continue until all loops on one side are twisted. Repeat on the other side.
What’s your favorite way to decorate with a Christmas bow for the holidays? Comment below!
Comments
Join the conversation
-
Agree! Directions are confusing. Photos and video needed.
-
Without some sort of pictures I was totally confused, For example Pom Pom bow says to make circles, flatten, then make a diagonal cut at each corner - since when does a circle have corners? Also there as no picture of the Pom Pom bow. Pictures and or video of all he steps is definitely needed for the various bows.


Frequently asked questions
Have a question about this project?