


How to Paint a Stone Fireplace for a Breathtaking Transformation

By Brooke Ressell
A new stone fireplace can be a gorgeous feature in any room of your home. But an old, outdated one can quickly become an eyesore that you can’t wait to cover up. The biggest problem is that removing a stone fireplace surround and replacing it with another product such as drywall, tile, brick, wood, concrete, or steel can be an enormous undertaking, and it can get expensive quickly.
Fortunately, DIYers over the years have discovered just how easy—and inexpensive—it can be to completely change the look of an old, outdated stone fireplace by simply painting it. With just a few tools and materials and the perfect shade of paint, you can completely transform what was once an eyesore in your home into a feature that you just can’t stop staring at.
The best part is that learning how to paint a stone fireplace is probably much easier than you think, and we have you covered with this guide.

Photo via Lauren
Best Paint for Stone Fireplaces
The first step to painting a stone fireplace and getting the results you want is to purchase primer and paint that work well over stone. Just using leftover paint from a previous project, such as painting bedroom walls or painting a deck, is not recommended.
Primer for Stone Fireplaces
If you want the paint job to actually last, priming is the most important step in learning how to paint over a stone fireplace. There are several important things that primer does to prepare the stone before you paint:
- Primer adheres better to stone than paint alone because it acts more like a glue that sticks to the stone as opposed to just covering it up as paint does.
- Primer makes the stone less porous by filling in its natural holes, which stops paint from simply soaking into the stone—and requiring you to paint multiple coats.
- Primer covers up dark colors in the stone, which makes it easier to cover the stone with fewer coats of paint.
- Primer will seal the stone it’s painted, giving the stone a smoother finish in the end.
The best primer to use on a stone fireplace is an acrylic latex primer such as True Value EasyCare Ultra Premium Interior Primer/Sealer. Most primers come in flat white, but some paint stores can tint it to the color of your finished paint. Don’t skimp on a good primer!
Paint for Stone Fireplaces
Now that you understand the importance of using a good primer, you also want to find the best paint for stone fireplaces instead of just settling for any type of paint you happen to have lying around. Using the right type of paint—with the right finish—will make a big impact both on how the painted stone fireplace ends up looking and on how the paint job will hold up over time.
Type of Paint: The best paint for a stone fireplace is latex paint such as Sherwin-Williams Cashmere Interior Latex paint. Latex paint works great for stone surfaces because it dries quickly, adheres well to the primed stone, is durable and long-lasting, and it’s also fade resistant.
Finish: When it comes to finding the right finish, most DIYers prefer to use eggshell-finish paint on a stone fireplace because it looks nice and it’s fairly easy to clean. However, a satin or semi-gloss sheen is perfectly fine too—it really just depends on your personal preference here.
Color: As with paint finish, the color of paint you choose is based totally on personal preference. If you enjoy a monochromatic look, consider painting the stone fireplace the same color as the walls that surround it. Conversely, if you really want the fireplace to be a more noticeable feature in the room, then consider picking a bold or bright color.
Use Paint Chips or Samples
How to Prep for Painting a Stone Fireplace
When it comes to learning how to prep for painting a stone fireplace, all you really need to keep in mind is that the few steps involved are worth taking. With a little prep work, your newly painted stone fireplace will look great for years to come.
Tools and Materials Needed:
- Rubber gloves
- Safety glasses
- Mask
- Drop cloths
- Painter’s tape
- Vacuum
- Wire scrub brush
- Bucket of soapy water or an all-purpose cleaner like Savogran TSP
- Acrylic latex caulk
Step 1: Remove All Items
Before you get started, remove all items from the fireplace and the mantel, if you have one. Things like mirrors, artwork, home decor pieces, logs, fireplace grates, or fireplace screens should all be placed out of the way.
Step 2: Secure the Painter’s Tape
Next, you want to secure painter’s tape around anything that you don’t want to get painted such as the walls around the fireplace, any metal fixtures, or the mantel itself.
Step 3: Place Drop Cloths
Place drop cloths on the floor around the fireplace so that you don’t accidentally drip paint on your flooring. Secure drop cloths to the floor with some painter’s tape if needed.
Step 4: Put Protective Gear On
Before cleaning, make sure you put protective gear on including safety glasses, a mask, and rubber gloves. The stone on your fireplace may be covered in dust, dirt, grime, soot, and even moss, so wearing protective gear will keep your skin, eyes, and lungs shielded from those things in addition to any cleaning supplies you may be using.
Step 5: Vacuum
Vacuum any ashes that remain inside the firebox if you have an open fireplace.
Step 6: Begin Cleaning
Take the wire scrub brush and begin scrubbing the surface of the stone fireplace with either soapy water or an all-purpose cleaner. Be sure to scrub well on the stones themselves and in any grooves between the stones.
Step 7: Let Dry
Before moving on to the next step, let the fireplace dry completely. Depending on what cleaning products you use, this could take up to an hour or more.
Step 8: Fill Cracks
Look carefully around the entire surface of the stone fireplace. If you see any large or small cracks on the stones themselves or on the mortar, fill them in with a paintable acrylic latex caulk. See our best tips for caulking like a pro.
Step 9: Let Caulk Dry
Drying times may vary by brand, so read the label on the acrylic latex caulk you are using and follow their instructions for drying time before diving in to paint.

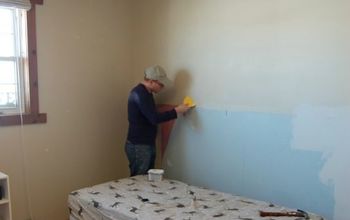
Photo via Lauren
How to Paint a Stone Fireplace
You’re now prepped and ready to start painting. So how do you paint a stone fireplace like the professionals? It’s easy! You just need the right tools, materials, primer, and paint, and your stone fireplace painting project is sure to turn out great.
Tools and Materials Needed:
- Safety glasses
- Mask
- Heavy-duty 5-wire paint roller frame
- Paint roller covers with a 1-inch nap
- Paintbrushes with wood handles and synthetic bristles
- Paint tray
- Paint tray inserts
- Acrylic latex primer
- Latex paint
Step 1: Cut In
Before starting anything, be sure to wear proper safety equipment and clothes that you don’t mind getting paint on—just in case.
Using a smaller paintbrush, start cutting in with primer on the edges of the fireplace along the walls, ceiling, floor, and around the mantle. Cutting in simply means brushing on the paint in all of those tight corners and other areas that cannot be reached easily with the roller. Learn how to build a rustic floating mantle too.
Step 2: Paint Grooves
Using a larger paintbrush, paint primer into all the grooves between the stones since the roller will not be able to coat these areas well.
Step 3: Roll Primer
Next, pour primer into the paint tray, roll the covered paint roller in primer, roll out excess primer against the paint tray, and then roll the primer over the entire stone surface, making sure that you have an even coat everywhere.
Step 4: Fill In
If there are any remaining areas that are not covered well with primer, use the smaller paintbrush or roller to fill them in.
Step 5: Clean Up
Pour and brush any remaining primer from the paint tray back into the can then close the can. Clean all of your paintbrushes off with hot, soapy water until the water runs clear, and lay them flat to dry.
Step 6: Allow the Primer to Dry
The drying time for any acrylic latex primer may vary by brand, although they typically say it will take between thirty minutes to an hour, so be sure to follow the instructions on the can and allow the primer to dry fully before painting over top of it.
Consider Weather
Step 7: Cut In the First Coat of Paint
Once the primer is completely dry, it’s time to paint using the same techniques you used before. Using the smaller paintbrush, cut in on the fireplace’s edges along the walls, ceiling, floor, and around the mantle—only this time you’ll use paint instead of primer.
Step 8: Paint Grooves
Using a large paintbrush, brush paint into the grooves in between the stones.
Step 9: Roll Paint
Next, pour paint into the paint tray, roll the covered roller in the paint, roll out excess paint against the paint tray, and then roll paint over the entire stone surface, making sure that you have an even coat everywhere.
Step 10: Fill In
If you see any small areas that are not covered in paint, simply use the smaller paintbrush or roller to fill them in.
Step 11: Clean Up
Pour and brush any remaining paint from the paint tray back into the can then close the can. Clean all of your paintbrushes off with hot, soapy water until the water runs clear, and lay them flat to dry. When you’re all done, make this paintbrush wreath out of old brushes.
Step 12: Allow the Paint to Dry
The dry time for latex paint may vary by brand so follow the directions carefully. Typically, latex paint will feel dry within an hour or so, but a second coat should not be applied until at least four hours have passed.
Step 13: Apply a Second Coat
Once the recommended time has passed, it’s time to apply a second coat of paint. Simply follow Steps 7-12 again and your stone fireplace painting project will then be complete!
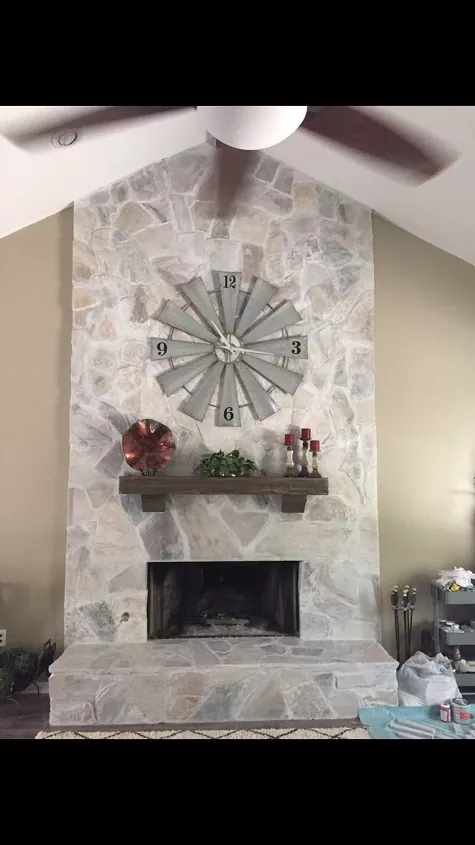
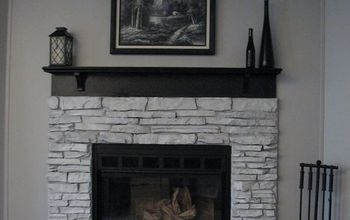
Photo via Jessica
How to Whitewash a Stone Fireplace
Did you know that you can paint a stone fireplace without completely covering up all of the original stone? If you prefer to leave some of the original stone peeking through for a rustic look, you can whitewash your stone fireplace instead of painting it.
To get started, you’ll follow all of the same steps for preparing the stone fireplace for painting. For example, you’ll want to remove all items on or around the fireplace, secure painter’s tape around the surrounding walls or mantle, lay drop cloths down on the floor, and clean the stone surface with soapy water or an all-purpose cleaner and a wire scrub brush.
Since you don’t want the original stone to be fully covered up, you’ll skip the coat of primer and move directly into whitewashing the stone fireplace instead.
To do so, mix equal parts of white or light gray chalk paint with equal parts of water in a bucket. Next, use a paintbrush to apply the paint mix directly onto the stone in a small area—such as a two-foot by two-foot square—and then wipe off any excess paint with a towel or staining pad. Whitewashing a fireplace doesn’t require as much precision as traditional painting; the goal is to create an imperfect, glossed-over look where you can still see stone peeking through.
Continue this technique until the entire stone surface of your fireplace has been whitewashed.
Have you transformed an outdated fireplace? Tell us about it in the comments below!


Frequently asked questions
Have a question about this project?