


How to Remove Popcorn Ceiling (and When You Shouldn't Try It Yourself)

By Hannah Twietmeyer
If you have an old home, chances are one or more of your ceilings are what are considered popcorn ceilings, or vermiculite, acoustic, or stucco ceilings. The vintage interior design fad—a multi-material spray layered over white paint—was often used to coat ceilings and help soundproof them, or hide uneven patches and dirty areas, according to Build. The result was a thick, textured coating, often resembling the look of cottage cheese or popcorn—hence the name.
The trend was popular from the 1930s to sometime around the 1990s before it fell out of fashion, says Insider. As a result, many houses that were built or remodeled during that time period feature popcorn ceilings. However, the style isn’t necessarily a coveted one in the 2020s, and traditional popcorn ceilings can pose some possible health risks during removal depending on the material they’re made with.
If you have a popcorn ceiling in your home that is less than appealing, just know you aren’t stuck with it and have options. Here’s everything you need to know about popcorn ceiling removal, and what to consider before the project even starts.
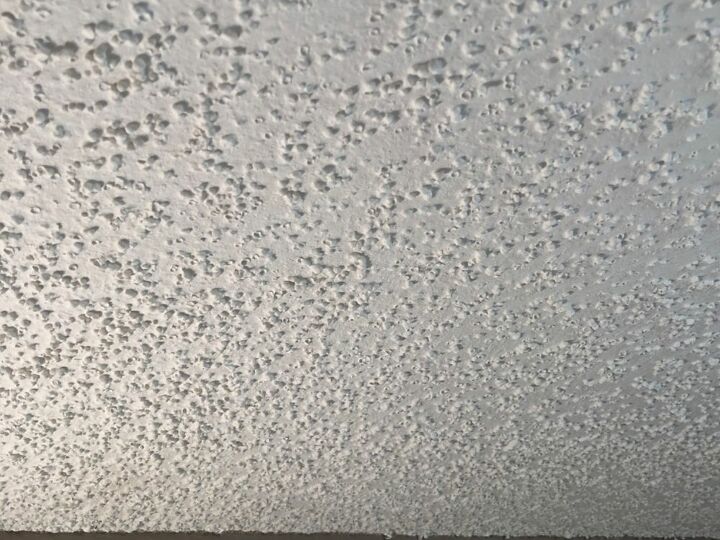
Photo via Amazing Grace !
What to Consider Before Removing a Popcorn Ceiling
Aesthetic aside, popcorn ceilings can pose health risks if they’re deteriorating. Traditionally, popcorn ceilings were made from materials such as cardboard, styrofoam, or vermiculite (a naturally occurring mineral) mixed with water and were sprayed onto a ceiling. Vermiculite, however, contains asbestos, a large factor in the popcorn ceiling’s decline in popularity.
Asbestos products were popular in the building materials market back before they were removed for health risks, as breathing in asbestos can cause lung diseases and cancer ( Mayo Clinic). Anything with the word “asbestos” is a red flag, but if you’re looking up at your stucco ceiling right now, don’t panic yet—intact popcorn ceilings, even if they contain asbestos, shouldn’t be a problem. Things get dicey if the ceiling is damaged or crumbling, at which point you should get it tested for asbestos if you haven’t already.
How to Test a Popcorn Ceiling for Asbestos
If your ceiling is an eyesore and you’re looking to replace it, then you’ll definitely need to get it tested for asbestos before it’s removed, because the process will need to be done with extreme caution. To get started:
Inspect Your Ceiling
Give your ceiling a good, hard look. Carefully scan it for any areas that may be crumbling, damaged, or need patchwork. Try not to dislodge any pieces from your ceiling—airborne asbestos fibers are what you’re trying to avoid.
Research Requirements for Testing and Removal
If you happen to find any damage to your ceiling, or if you’re unsure about any existing asbestos content, you should take action immediately. Depending on where you live, you may be able to follow a set of instructions provided by local officials. Follow the proper instructions, of course, but the process usually involves dampening a few areas of the ceiling, scraping some contents into a sealed container, and mailing it to a lab for testing.
In other areas, you might be required to hire a professional. Make sure you’re refreshed on your options and resources, which you can find on the EPA website.
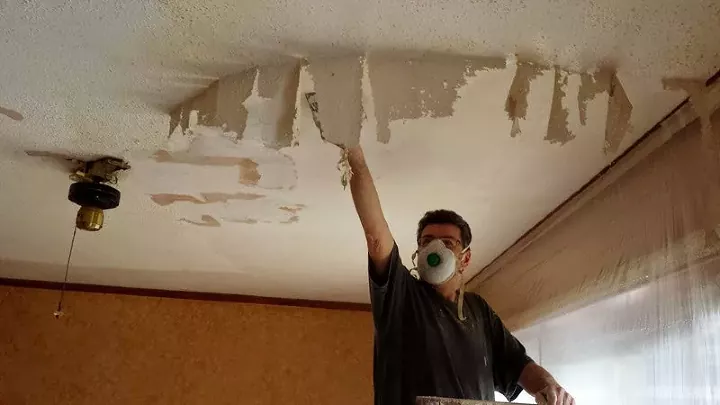
Photo via Sue @ Housekaboodle
Popcorn Ceiling Removal Options
If you choose to forge ahead with removing your ceiling, you have two options for removal—one a little more user-friendly than the other. Read on to learn more.
Professional Removal
We highly recommend that you get your popcorn ceiling removed professionally to limit any potential health risks. The team will follow strict protocol and will determine the best way to take off the popcorn ceiling in your home. According to Popcorn Ceiling Solution, you can expect about 500-square feet of ceiling to be scraped off in around 20 hours, all at about $2 per square foot (via Insider). Obviously, time and price will fluctuate based on surface area, but the process will move along much quicker (and safer) with the help of a professional team.
Keep in mind, you still will have to move furniture and seal off that area from the rest of the house for as long as the project takes. It will still be quite a task, but it’s safer and less involved for you, the homeowner.
Self-Removal
Unlike the testing process, the DIY removal of a popcorn ceiling is anything but simple. And, with a positive asbestos test, it needs to be done with extreme caution. However, if you’re ready to follow all of the safety protocols required by your state, it will save you some money when compared to the cost of hiring a professional team.
To give you an idea of what you’d be dealing with, the California Code of Regulations 1529 is a 17,000-word document detailing exactly how construction teams need to approach asbestos removal in buildings. Depending on where you live and if you’ve confirmed that you’re able to legally take on the project yourself (after contacting your state asbestos contact), be prepared to spend money on lots of plastic sheet coverings, protective clothing, high-grade respirators, approved tools for removal, and special bags or containers for disposal (via The Washington Post). Needless to say, it’s an intensive and potentially dangerous process.
If you use the traditional removal method, you’ll likely be spraying and scraping off the ceiling by hand, which could take some time. Here's how to do it.
Tools and Materials Needed
- Plastic sheeting
- Painter's tape
- Protective mask, clothing, and eyewear
- Tools needed to remove light fixtures and fans
- Ladder
- Paint scraper with an extension pole
- Putty knife
- Patching compound (if needed)
- Sanding block
- Sand paper
- Paint and painting tools
Step 1: Prepare Room and Shut Off Electricity
Be sure to remove any small pieces of furniture in the room and to cover everything else in plastic sheeting, including the floor and the walls. Use painter's tape to help hang and secure plastic.
Switch off the breaker to the room you're working in so that all electricity is cut, like HVAC systems, light fixtures, and fans. Remove all light fixtures and fans and tape plastic over vents.
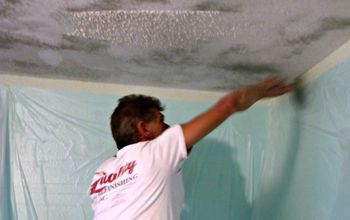
Step 2: Wet Ceiling
Use a garden sprayer to lightly dampen small areas of the ceiling at a damp. Be sure that it gets only damp and not wet—you don't want to damage the wall material underneath.
Step 3: Start Scraping
Use a paint scraper with an extension pole to start scraping the areas of the ceiling that you wet. Make your way around the room, wetting as you go, and scraping the textured ceiling. Use a putty knife in corners.
Step 4: Finish Ceiling
Once all the textured material is gone, clean up the ceiling by removing rogue nails and screws and patching up any imperfections. Then, sand the ceiling by hand for a consistent and smooth finish and paint the ceiling your color of choice.
Covering Up Popcorn Ceilings
If there isn’t any asbestos present in your popcorn ceiling, you can of course go ahead with self-removal if you choose. But if, on second thought, you’d prefer to go a cheaper, simpler, and lesser-risk route, consider these tips for renovating popcorn ceilings in your home.
Repaint
Many of the aesthetic problems in our home can be solved with a coat of paint—popcorn ceilings included. Your best bet is to go with a flat or matte paint color to reduce any light bouncing off the ceiling, and use a roller to cover more surface area and all of the scattered bumps. Although this tip won’t take away any of the ceiling’s texture, it might be just what you need to shine up the trend from the past.
Retexture
If you want to smooth things out before you paint, you can try to retexture your ceiling. This can be done with a sander, or by applying store-bought texture by hand or via spray bottle, and smoothing it out with a paint roller or drywall knife (via Dallas Paints). This process can also be used to patch up any damaged or stained areas in your popcorn ceiling. The Home Depot has a specific popcorn ceiling texture if you’re looking to mend a crumbling area without losing the stucco look.
Install Wood Planks or Ceiling Tiles
If you’d rather avoid painting or retexturing but want the look of a brand-new ceiling, consider revamping your room with wood or tile. Wood can be heavy and will likely need to be drilled directly into the ceiling, so it might be best to consult a professional for help. While ceiling tiles can also be directly screwed into or glued onto the ceiling surface, they can also be suspended from a ceiling grid (via Dallas Paints).
Have you gone through any popcorn ceiling renovations? We’d love to hear how your project went. Drop your tips below in the comments!
Comments
Join the conversation
-
My husband and I were revamping our whole interior surfaces including the popcorn ceilings. We were discouraged by task of removing and scraping, so we decided just to paint over with a Wagner sprayer using a satin gloss paint. Turned out great covered all of the surfaces of popcorn ceiling which were crumbling a n d continuously falling all over everything. It's been 12 years now and NO more falling popcorn ceiling.


Frequently asked questions
Have a question about this project?