


How to Thread a Sewing Machine and Fix Common Issues

By Judy Schumer
You’ve come to the right place if you need to learn how to thread a sewing machine. Threading your machine is where you need to start before you begin sewing and, while the steps seem complicated, the process will become easier each time you do it.
Any sewing machine will need to be threaded correctly to create the stitches required to sew fabrics together. A stitch is formed by merging the thread from the bobbin with the thread from the needle.
While most makes and models of sewing machines are threaded the same way, it’s a good idea to check your sewing machine’s instruction manual if you have it, especially if this is the first time you’re threading the machine. If you’ve acquired a second-hand machine, you can likely find the sewing machine manuals online.
If you cannot find the manual or would like a generic tutorial for how to thread your sewing machine, continue reading for our all-purpose guide to sewing machine parts, how to thread a sewing machine, and common sewing machine problems (and how to fix them!).
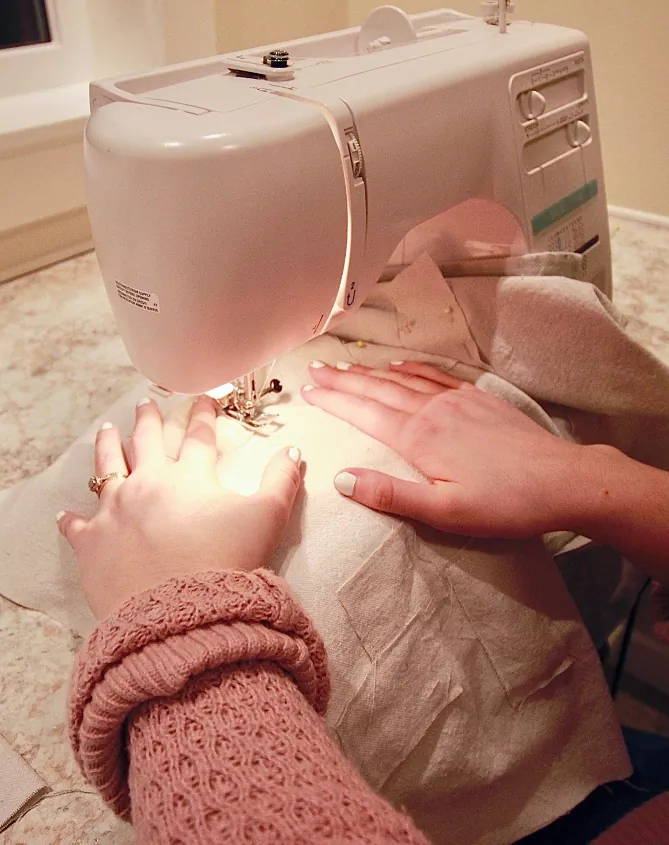
Photo via Jessica-Sara Morris
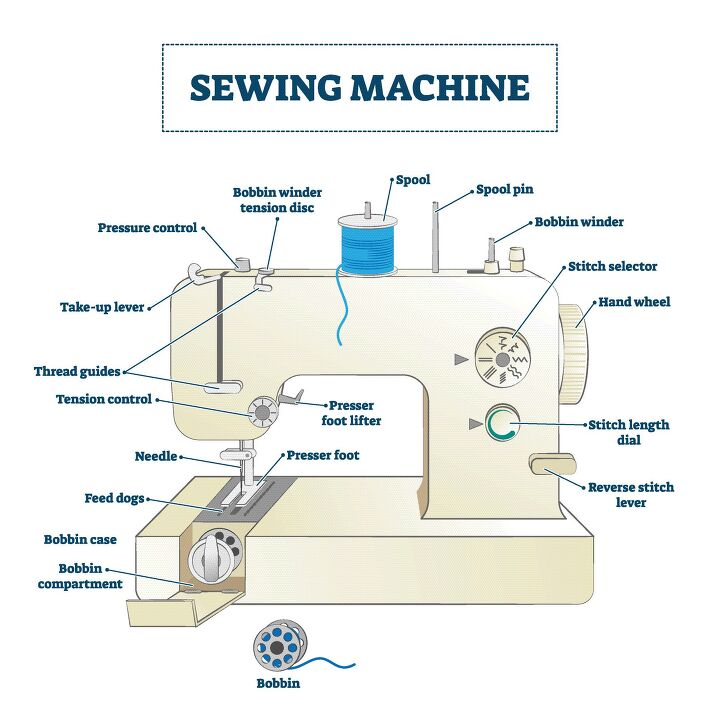
Important Parts for Threading a Sewing Machine
Sewing machines perform what looks like an easy task: creating stitches. In reality, it takes a lot of important sewing machine parts to make that process happen. Learning about the different parts will help you to efficiently operate and maintain your sewing machine for years to come. We’ve outlined the parts you’ll use to thread a sewing machine, but have more important sewing machine parts listed at the end of this guide.
The most common sewing machine parts that you’ll use when threading a sewing machine are the following:
- Bobbin – A small round spool that holds the bottom thread found either in the lower part of the sewing machine or on the front of the machine. The bobbin thread works with the spool thread to create a stitch.
- Bobbin Case – A round metal case that holds the bobbin in place while sewing.
- Bobbin Winder Tension Disc – A small metal disc that fits into the bobbin winder and applies tension to keep the thread taut when winding the bobbin.
- Bobbin Winder – Spins the bobbin as you wind thread onto it.
- Bobbin Winder Spindle or Shaft – Found at the top of your sewing machine, it holds the bobbin while you wind thread from the upper spool onto it.
- Bobbin Winder Stopper – Stops the bobbin from over-winding.
- Bobbin Cover Release Button – Releases the bobbin cover so it can be removed or closes it in place when ready to sew.
- Hand Wheel – Performs the function of stitching fabric manually. You can turn it towards you to manually move the needle up and down instead of using the foot pedal for more precision.
- Foot Pedal – The device used to control how fast your machine stitches the fabric. It is plugged into your sewing machine and works just like a car accelerator. Press down to increase the speed of the stitching and let it up to slow down.
- Needle – The sharp-pointed object that carries the thread from the spool into the fabric. The thread from the needle connects with the bobbin thread to form complete stitches.
- Spool Pin – Where you place your spool of thread. It is a spindle that fits into the hole on the thread spool.
- Thread Take-Up Lever – Usually found on the top of the needle plate but is sometimes on the side of the machine. It creates stitches by feeding the thread from the spool to the needle as it moves up and down.
- Thread Guide – A guide for where to place your thread, keeping it on the right path as you sew.
- Throat Plate – Also referred to as the needle plate, this metal plate under the needle (on the bed) covers the bobbin. It is located directly under the presser foot, which is pressed against the throat plate while sewing. The throat plate has multiple openings–one for the needle to go down to meet the bobbin and openings for the feed dogs. It also has lines on it called seam guides, which are what you use to determine how far the seam is from the edge of the fabric.
How to Wind a Bobbin
Threading your sewing machine can be broken down into three parts. First, you’ll need to thread your bobbin, then the needle, and finally, you need to connect the two. Follow the steps below to make quick work of threading your sewing machine.
Tools and Materials Needed
- Bobbin
- Spool of thread
- Sharp scissors
- Sewing machine
- Awl (optional)
Step 1: Place Thread in Spool Pin
On the top of your sewing machine is a vertical shaft that holds your spool of thread called the spool pin. Place your thread on the spool pin so that when the thread is pulled, it turns in a counter-clockwise direction.
Step 2: Pull Thread
Grasp the end of the thread and pull it out far enough so that you're able to tightly wind it around the bobbin winding tension disc, which is usually on the other side of the machine (still at the top) above the sewing machine needle.
Step 3: Wrap Thread Around Bobbin
Using the end of the thread hanging from the tension disc, insert it into one of the holes through the inside of the bobbin. Holding this piece down with your thumb, wrap more thread around the bobbin by hand to get it started.
Step 4: Place and Lock Bobbin
Place the bobbin on the bobbin winder spindle, which is usually found close to the thread spool pin. Push this pin to the right to lock the bobbin securely for winding.
Step 5: Fill Bobbin with Thread
Hold the top of the thread coming out of the bobbin. Slowly press the foot pedal to wind the bobbin. Some sewing machines have a bobbin winding button—if yours does, use that instead of the foot pedal. Stop when the bobbin is entirely filled with thread, just to the edge of the bobbin spool.
Keep an Eye On Thread Movement
Step 6: Remove Bobbin
Remove the bobbin by sliding the bobbin winder spindle back to the left. Using sharp scissors, snip the thread from the thread spool allowing a three-to-four-inch loose piece to remain hanging from the bobbin.
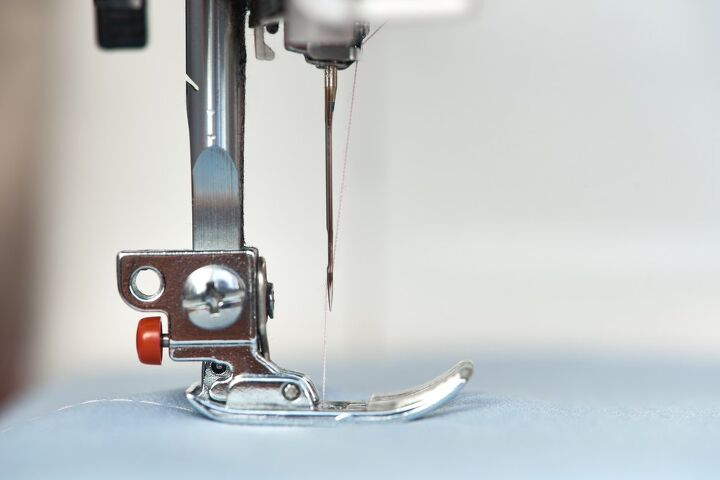
Photo via Shutterstock
How to Thread the Needle
Now it’s time to thread the needle of your sewing machine. Once you know how to do this, it’ll become second nature next time you’re ready to sew.
Step 1: Place Spool in Spool Pin
Place your spool of thread on the spool pin (the larger vertical shaft on the top of your machine) with the thread coming off so that it spins the spool counter-clockwise.
Step 2: Guide Thread
Tug the thread from the end of the spool and guide it across the top and through the thread guide. Most machines will have a guide with a diagram on top of the machine showing where to place the thread during each step of the process.
Step 3: Loop Thread Around Tension Discs
After moving the thread through the thread guide, pull it towards you. Moving downwards with the thread, loop the thread around the tension discs at the front of your machine. These are located directly above and in front of the needle assembly. You’ll be creating a “U” shape with the thread as you bring the thread upwards again.
Step 4: Wind Thread Around Take-Up Lever
After you’ve looped the thread around the tension discs, wind it through the take-up lever. This is a lever with a small hole in it that the thread will go through, in a right to left movement. If the lever isn’t up and visible, turn the handwheel toward you so the lever is in its highest position. Continue pulling the thread, going back down toward the needle.
Step 5: Push Thread Through Needle
Thread the needle the same way you would a hand sewing needle by pushing the end of the thread through the eye of the needle and pulling a few inches of it out through the other side. Continue by pulling the thread through the space in the presser foot, which is directly underneath the needle.
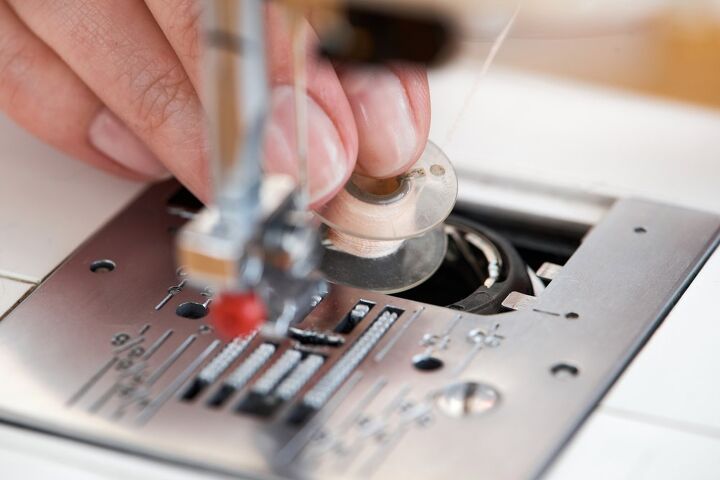
Photo via Shutterstock
How to Connect the Bobbin Thread to the Needle Thread
You’ve learned how to thread a bobbin and thread your sewing machine’s needle. It’s time to connect the two threads to get those stitches going. Here’s how.
Step 1: Find Bobbin Case
The bobbin compartment will be either on the side of your machine below the needle or horizontally below the needle (check your machine’s manual for guidance). Open the compartment to reveal the bobbin case.
Step 2: Remove Bobbin Case
Remove the bobbin case lid by lifting the little lever near the center of the bobbin case.
Step 3: Insert Filled Bobbin
Place your filled bobbin into the bobbin case with the thread coming out.
Step 4: Guide Thread
Grasp the extra loose thread hanging from the bobbin. Pull it through the small slit on the bobbin case, then guide it under and through the clasp.
Step 5: Insert Bobbin Case
The bobbin compartment should have a diagram to show you which direction the thread should go. Push the bobbin case back into the bobbin compartment, with the thread going in the direction the diagram indicates. You’ll hear a click when the bobbin case is secured. Close the compartment.
Step 6: Pull Handwheel
To bring the bobbin thread out of its compartment, turn the handwheel towards you so that the needle goes down into the machine and comes back up. The bobbin thread will “catch” and pop out.
Step 7: Pull Threads Out
Gently pull on the top thread, so the looped bottom thread pulls free. Pull the two separate threads out and behind the needle.
You’re all set! Your sewing machine is threaded and ready to sew.
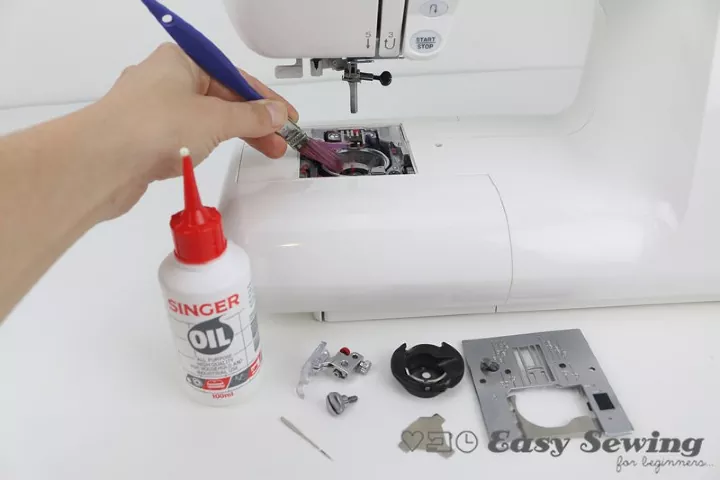
Photo via Domenica | Easy Sewing for Beginners
Common Sewing Machine Issues (and How to Fix Them)
The issues you’ll run into will be pretty common regardless of sewing machine make or model. Because of this, you can usually fix the problem quickly because there are tried-and-true methods used for repair. Thread problems like knots, tangling, and breaking along with broken needles, and machine jams are common sewing machine issues.
Luckily, fixing any of these dilemmas at home isn’t difficult. Below are the most common problems you’ll run into, along with ways to fix them—you’ll be back to sewing in no time!
Keep Your Machine Covered
Needles Break Easily
Damaged sewing machine needles will break easily; the fix for this is to use a new needle for each project. A new, sharp needle will create the best stitches. Incorrectly inserted needles will also break, so be sure to insert the needle correctly and screw it in tightly.
Another cause of needles breaking is using the wrong needle for the fabric you are sewing with. Buy the recommended needle for your material and insert it into the machine securely.
Breaking or Shredding Thread
If your thread is breaking or shredding and jamming your sewing machine, do a quick three-point check.
- Check the thread spool for any notches or nicks in the spool. Flip the thread spool over vertically and reset it on the spool pin so it feeds off the spool differently.
- Poor quality thread or thread that has been stored a while will dry out and break easily. Replace old or cheap thread with newer, better quality thread.
- Is your needle old and blunt? Has it been sewing over pins? This can cause tiny nicks in the needle. Replace the needle for clean, sharp stitches.
If you still have issues with breaking thread, it may be time to clean the area that houses the bobbin and the tension disks. Follow the thread's path (from spool to needle) by running your fingers over it, removing dust or debris in the process.
Thread Is Tangling or Knotting
When your thread gets tangled, knotted, or bunched up, the problem is almost always caused by the sewing machine being threaded improperly from either the spool or the bobbin. One of the ways this can be avoided is by making sure the presser foot is up when you are threading the machine. To solve this issue:
- Raise the presser foot and gently cut away all the knots and tangles with sharp sewing scissors.
- Remove the upper thread (the spool of thread) and re-thread it. Be sure to keep the presser foot up.
- Remove the bobbin from the case and rethread it. Make sure you are using the same thread at the top and in the bobbin. Different weight threads can tangle and knot.
- Check the tension setting. Be sure it is set correctly for the type of fabric you are using.
Fabric Feeding Issues
If the fabric is getting bunched up or jammed as you’re working the stitches in, you’re having fabric feeding issues. A few things can cause fabric feeding issues:
- There is a setting that lowers the feed dogs so you can take advantage of the free-motion sewing method. Typically you will want the feed dogs engaged to move the fabric along. If this is not happening, change the setting, so your feed dogs are raised once again.
- If this is not the case, you should clean under the throat plate. Take off the throat plate and clean it with a microfiber cloth to remove any dust or thread bits.
- Check your manual and follow the instructions for oiling your machine.
If this still does not fix the problem, you may need to take your sewing machine to a repair service.
Skipped Stitches
Skipped stitches compromise the strength of your seams. Fortunately, this is easy to fix. The wrong type of needle is the main reason for skipped stitches. Check your manual or the fabric shop for help in finding the needle you should be using and switch your needle to the correct one.
If you tend to force the fabric along, this could be another cause of skipped stitches. Let the machine do its job; allow it to move the fabric for you.
Skipped stitches are also a result of a blunt or bent needle. Replace your sewing machine needle often; it is an inexpensive fix for many issues and will give you crisp, clean stitches.
Tension Issues
If the tension settings are incorrect on your sewing machine, you can end up with stitches that are too tight, too loose, or uneven. To fix this, check your manual and follow the machine-specific instructions for setting or adjusting the tension on your sewing machine.
Jammed Machine
A jammed machine is a common problem, one that cannot always be fixed at home. Try the following suggestions before taking your machine to a repair shop.
- Carefully remove any fabric you were sewing. Do not pull on it; snip it away from the machine if needed.
- Once the fabric is removed, snip away any jammed thread. You may have to get under the throat plate to see if the jam is caused by thread around the bobbin.
- Check the needle of your sewing machine. If it is bent at all, it can cause the thread to jam. Replace the needle and rethread your machine.
If you still have problems after doing the above, it’s best to take your sewing machine to a repair shop and let a pro handle it to avoid any permanent damage.
Noisy Sewing Machine Operation
If your sewing machine becomes noisy by making grinding or banging noises while you’re sewing, you may need to clean and lubricate it. Check the needle first to make sure it’s in good condition and properly secured. Check your sewing machine manual for instructions on how to clean your particular machine’s needle clamp.
If this doesn’t help, use sewing machine oil to lubricate your sewing machine. Your manual will also come in handy here for the correct way to oil the various parts.
Foot Pedal Sticks
The foot pedal controls the sewing speed of your machine. Because it sits on the floor, it can accumulate quite a bit of dust and dirt, which causes it to stick. Unplug the foot pedal and clean around the edges to remove heavy dust, pet hair, or accumulated dirt using a microfiber cloth and/or a vacuum. Place a few drops of oil on the rivets or the pedal's spring (check your manual’s diagram for the location) to loosen it and get it moving smoothly.
Hand Wheel Issues
The hand wheel can become stuck if dust or dirt accumulates in the wheel or if the machine requires oiling. It can also become loose, interfering with the needle. Or, if there is fabric or thread stuck in the feed dogs, the hand wheel will stop working. To fix these issues:
- Clean around the handwheel, especially the inner area.
- Oil the handwheel according to the manual’s instructions to restore smooth operation.
- Tighten the screw that attaches the handwheel to your sewing machine.
- Check your machine’s needle, if it is bent or broken, replace it.
- Clear any fabric or thread from the feed dogs or the bobbin.
Graphic via Shutterstock
More Important Sewing Machine Parts
Threading aside, a sewing machine has many important parts that keep it going. Here’s a list of crucial parts of a sewing machine and what each one does to help the machine operate.
- Bed – The flat part of the machine where the fabric lays when it is being stitched. The throat plate, the slide plate or bobbin cover, and the feed dogs are located on the bed.
- Buttonhole Foot – A guide that helps make the buttonhole the correct size for the button you are using.
- Feed Dog Control – Allows you to raise or lower the feed dog as needed.
- Feed Dogs – Metal strips with teeth that pull the fabric through the machine. They work in conjunction with the needle. As the sewing machine needle goes up and down, the feed dogs go up or down with it. They also guide the fabric forward or in reverse. The speed of the feed dogs is determined by how much pressure you put onto the foot pedal.
- Guidelines – The straight lines found on the throat plate. The fabric is directed along a line to ensure the width of the seam is consistent.
- Needle Clamp Screw – A flat screw above the needle that holds the needle tightly in place. Unscrew it when you need to change needles.
- Power Switch – Turns your sewing machine on and off. It also turns on the light for the machine.
- Power Cord – Used to plug the machine into an electrical outlet, allowing you to operate your sewing machine.
- Presser Foot – Located directly below the needle, it holds the fabric in place so it moves along the feed dogs correctly.
- Presser Foot Lever/Lifter – What raises and lowers the presser foot.
- Presser Foot Screw – Secures the presser foot onto the sewing machine. You will need to remove the presser foot screw to attach accessories for more advanced sewing techniques.
- Reverse Button (or Lever) – Allows you to reverse the direction of your stitches in order to sew backward. This is a method used to start and finish your seams to make them more secure.
- Stitch Length Selector – Also known as the stitch length regulator this button or dial is used to set the length of the stitches.
- Stitch Width Selector – Also known as the stitch width regulator, this button or dial is used to set the width of decorative stitches.
- Stitch Pattern Selector – Allows you to choose the type or pattern of the stitch you want to use on a project.
- Tension Regulator Dial – Controls the tension of the upper thread and the bobbin thread as it is fed through your sewing machine to specify how tight the stitches will be.
- Thread Cutter – A small, sharp indentation that allows you to cut the end of your thread without having to use scissors.
- Upper Thread – Another name for the thread on a spool; it’s the same thread used to fill your bobbin. It creates the top part of the stitches your sewing machine makes.
How often do you sew, and what do you like to sew? Let us know in the comments, we love to hear from you!
Comments
Join the conversation
-
Gwen,
Check out this video, and other similar videos on Youtube showing how to thread various sewing machines.
https://www.youtube.com/watch?v=fgjazhZy-XQ&ab_channel=BurleySew


Frequently asked questions
Have a question about this project?
How do you thread a “White“ 4-thread serger?