Chair Makeover DIY: Garbage to Gorgeous Episode #9

Furniture makeovers are a fun way to express your style and decorate on a budget. I especially enjoy a good chair makeover because everyone usually has a place begging for an accent chair.
Even if the style and form of the chair don’t match your room decor, once you paint it and pretty it up, it will be a valued addition!
If you are doing a home office, you can use a chair with more style than an average office chair. If you are working on a home office, I have a post that might help you out: Home Office Decor
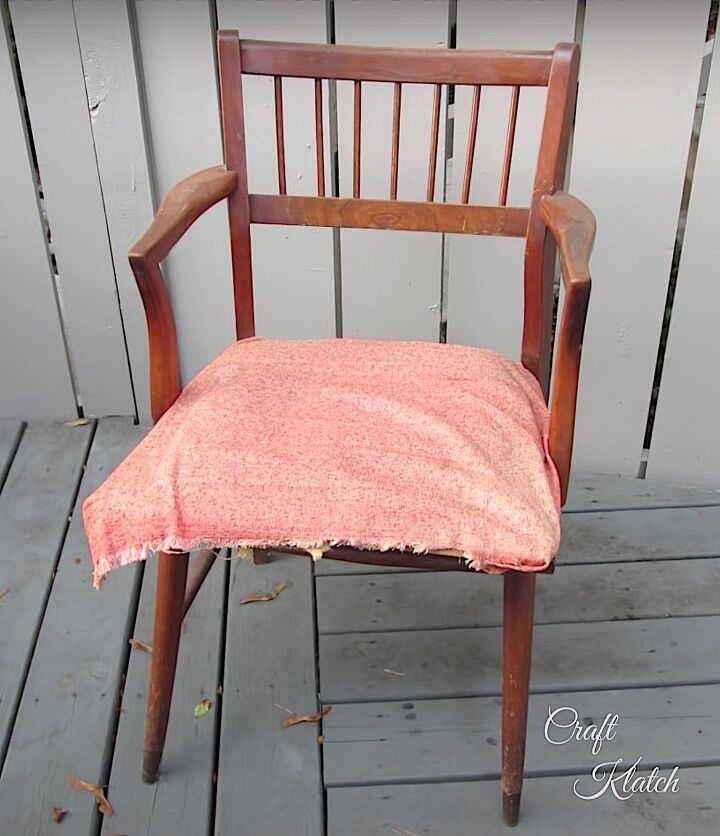
I found this disgusting beauty on the curb a couple of years ago. Since then, it has been taking up residence in my garage. I liked the shape and the promise it held, but its time had come. Bloom or face your doom!
It was a 10+ on the gross meter. It was filthy and the cushion was literally crumbling and disintegrating before my eyes. I didn’t really want to touch it, but I still had the faith!
Here is the video tutorial where I show you exactly how I did it! It’s quick:
Directions For the Chair Makeover
Step 1: Take the chair apart and get the makeover started.
To start the chair makeover, I removed the musty, grungy, nasty cushion, and got rid of it!! In cases like this, don’t try to salvage any of it! You want to give a chair new life, so let it be fresh. Who knows what has been on the foam and fabric, when a chair gets that bad.
Step 2: Clean the chair.
I first brushed it off. Then I used some elbow grease, soap, and water and left it to dry.
Step 3: Paint the chair.Now it’s starting to look like a makeover.
It wouldn’t be much of a makeover if I left the chair the same color. So, I used spray paint that has a primer built-in and would adhere to all surfaces. It took about a can and a half for good coverage. I let it dry.
Step 4: Start working on the cushion.
While the paint was drying, I worked on the chair cushion. I used duck cloth, which is a canvas type of fabric, which is pretty durable. I cut out the foam for the cushion and I also cut quilt batting. Putting a layer of quilt batting over the foam helps smooth the edges.
Step 5: Put down the layers of the cushion.
Facedown, on a clean surface, I placed my fabric, my quilt batting, my foam piece, and the seat base. I trimmed around, but not too close. You can always cut off the excess fabric later, but you can’t add more fabric once you cut it off.
Step 6: Start to staple.
I started at the corners, going opposite to opposite and then the middle to the middle. Then I followed along all the edges.
Step 7: Cut away the excess.
I cut away the excess because I didn’t want to have lumps of extra fabric that would look messy and/or prevent me from reattaching the seat.
Step 8: Reattach seat to the chair.
Now, this chair makeover is starting to come together. I saved the screws from the chair and simply reattached the cushion from under.
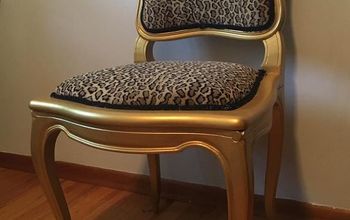
That’s it! It doesn’t stink. It isn’t nasty and I think it makes a beautiful accent chair! I didn’t end up using this chair at home. I ended up using it in an office waiting room and it was a perfect addition.
What a difference!!!
For more info, go to my blog post - link below.
I have a whole Garbage to Gorgeous® series. It should give you some inspiration!
Be sure to let me know what you think in the comments below. Let me know what you are working on! Don’t forget to subscribe, so you don’t miss a thing!
Thanks for stopping by! Remember: Life’s too short not to shimmer, so grab your glue gun and your glitter!™ Stay safe!
Mona
Enjoyed the project?
Suggested materials:
- Chair (Found at the curb)
- Black spray paint
- Fabric
- Quilt batting
- Foam
- Staple gun & staples










Frequently asked questions
Have a question about this project?
I also grabbed a chair from my neighbors garbage, but it’s not wood, metal, but the cushion was bad, I bought Vynel, not material to make new , anyway, my question is , to start stapling , where do I start stapling, corners first or sides? I appreciate your help. Thank you
Your chair looks lovely!