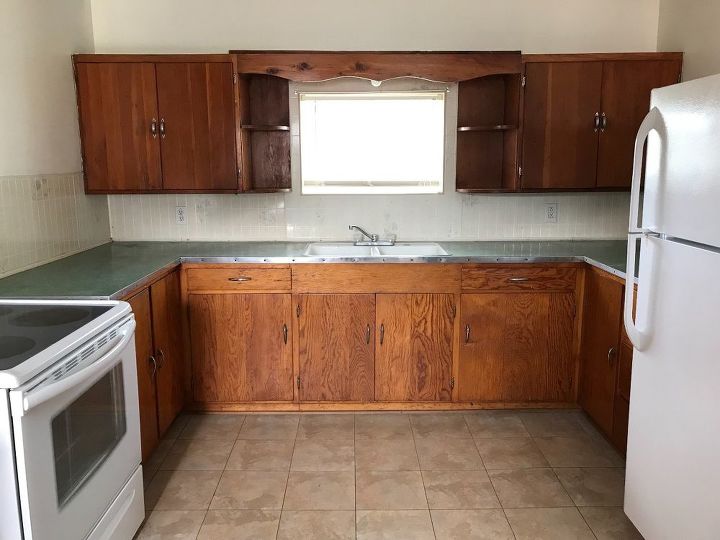
If this was my kitchen, I would sand and paint the cabinets and put all new hardware on them, removing the cornice over the sink (it really dates the kitchen). Cover the tile with a stick-on sheets of tin or copper (depending on your chosen color scheme). New countertop (most expensive piece here) with whatever you can afford - laminate, butcher block, quartz with an under-mount sink and new faucet. Either keep the flooring - it looks in good condition - or do a paper bag floor over it for a cool look. On the open shelves, I would drill holes around the edge (not the bottom one), drop in dowels and use to store plates on their sides.
My sister had a situation like this with ugly orange counters.
I carefully took all the metal trim off, cleaned it with white vinegar and set it aside in a safe place, so I could use it again it afterwards. Mine wasn't glued, just nailed, so I started at one end and worked my way around. It came off pretty easily.
Then I cleaned the counter and back splash with TSP and scrubbed it down thoroughly with white vinegar and an abrasive cleaner to cut all the shine, so the paint would adhere better.
I then filled the corners where the wall meet each other and the counter with a paint-able caulking and let dry for the recommended time. *I used a wet finger tip to smooth to a nice curved joint, but I know they have plastic tools for that purpose as well.
Next I painted the whole area with white Kilz paint and let dry.
*While I waited I made a couple of tester boards to get my design the way I wanted. I'm kind of a fly by the seat of my pants girl, but this was my sister's kitchen, so I thought this might be the best course of action. ;)
I decided on a white marble design with black streaks and grey accent tones and a few golden sparkles. * There lots of instruction on how to paint faux stone online. I had some loose eye shadow from the 80s in my makeup drawer that I'm too old to wear, so I used that for my sparkle, putting a bit on a soft brush and then tapping the brush shaft against the edge of a ruler, so some of the dust would fall off randomly over the wet paint.
I had to paint over areas and do the a couple of times, but finally got a look I liked and let it dry completely.
Then I coated the whole area with a water based clear sealer. *The non-water based ones seem to yellow. *At this time in the process I got a wild hair and put a very thinly painted design over some parts of the original painting on top of the clear coat. This is totally unnecessary, but seemed to get the "Stone" more depth.
Anyway, when you decide your design is completely done. Seal it with 2 to five more coats of the water based clear coat to protect it.
Then put your trim back on. *I have to admit, the edges of my project counter were solid, so I gave the treatment as the counter top. I figured if they came out bad, the trim would cover them.
Be sure to wait a few days for everything to be really dry before you put anything on top of your new counter, making sure the clear coat is really dry, or you run the risk of something sticking to it.
I didn't have a picture still of my sister's kitchen, but this is the same treatment on my bathroom sink in a green marble effect. (This is how I know the non-water based clear coat yellowed, but since it was mainly green didn't look bad.)
I agree that the cornice piece is what dates this the most. Maybe remove it or take down and cut off the curvy pieces to make it a straight across board. Also the curved shelving dates it as well. Could it possible be cut diagonally to make the shelves triangles. Then a total sand and paint job would make the biggest difference and not be very expensive. If you are going to keep the white appliances, I'd color match them and paint the cabinets white and perhaps use clear handles, drawers pulls/knobs to not call attention and break up the cabinet area too much. There are counter top applications that look very nice. I'd suggest the Rustoleum kit that has a lot of black in it to contrast with the white cabinets. The floor looks nice as is and will work well with the white and black, then you can accessorize with any colors you want in the future. Hardest part is to get started! Please consider posting the after of whatever you decide to do.
Check out the Unicorn Spit video's on YouTube. Unicorn Spit can be used on any surface, including counter tops. It looks like great stuff and easy to use too.
I agree with all of above comments, and I would add one more idea..... I would remove those upper cabinets and get some tall ones to replace them. You could probably pick up a couple cheap at a Habitat for Humanity Restore. And take out that valance board over the window.
Get a counter guy to redo your counters with new laminate, and one with a bullnose edge trim.
Edit:””” 3 years later😂 I decided to paint them white and I am so very pleased with the results!We bought a new house with these ugly cabinets. I really cann...
See more
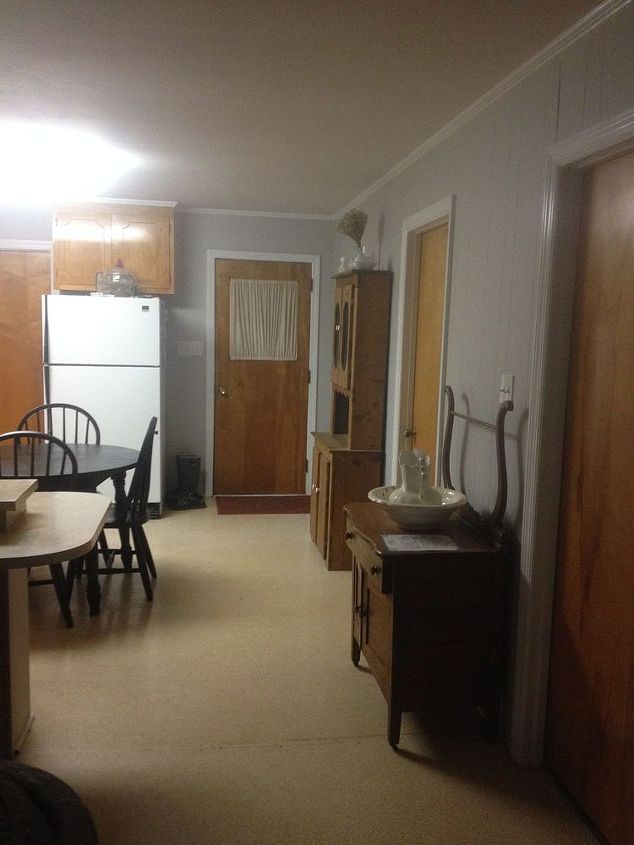
I am looking for BUDGET options for my kitchen. It is very strangely laid out. I have 3 doors (laundry, bedroom and outside) that do not help the layout. I am planing...
See more


Do you want to paint the cabinets?
If this was my kitchen, I would sand and paint the cabinets and put all new hardware on them, removing the cornice over the sink (it really dates the kitchen). Cover the tile with a stick-on sheets of tin or copper (depending on your chosen color scheme). New countertop (most expensive piece here) with whatever you can afford - laminate, butcher block, quartz with an under-mount sink and new faucet. Either keep the flooring - it looks in good condition - or do a paper bag floor over it for a cool look. On the open shelves, I would drill holes around the edge (not the bottom one), drop in dowels and use to store plates on their sides.
My sister had a situation like this with ugly orange counters.
I carefully took all the metal trim off, cleaned it with white vinegar and set it aside in a safe place, so I could use it again it afterwards. Mine wasn't glued, just nailed, so I started at one end and worked my way around. It came off pretty easily.
Then I cleaned the counter and back splash with TSP and scrubbed it down thoroughly with white vinegar and an abrasive cleaner to cut all the shine, so the paint would adhere better.
I then filled the corners where the wall meet each other and the counter with a paint-able caulking and let dry for the recommended time. *I used a wet finger tip to smooth to a nice curved joint, but I know they have plastic tools for that purpose as well.
Next I painted the whole area with white Kilz paint and let dry.
*While I waited I made a couple of tester boards to get my design the way I wanted. I'm kind of a fly by the seat of my pants girl, but this was my sister's kitchen, so I thought this might be the best course of action. ;)
I decided on a white marble design with black streaks and grey accent tones and a few golden sparkles. * There lots of instruction on how to paint faux stone online. I had some loose eye shadow from the 80s in my makeup drawer that I'm too old to wear, so I used that for my sparkle, putting a bit on a soft brush and then tapping the brush shaft against the edge of a ruler, so some of the dust would fall off randomly over the wet paint.
I had to paint over areas and do the a couple of times, but finally got a look I liked and let it dry completely.
Then I coated the whole area with a water based clear sealer. *The non-water based ones seem to yellow. *At this time in the process I got a wild hair and put a very thinly painted design over some parts of the original painting on top of the clear coat. This is totally unnecessary, but seemed to get the "Stone" more depth.
Anyway, when you decide your design is completely done. Seal it with 2 to five more coats of the water based clear coat to protect it.
Then put your trim back on. *I have to admit, the edges of my project counter were solid, so I gave the treatment as the counter top. I figured if they came out bad, the trim would cover them.
Be sure to wait a few days for everything to be really dry before you put anything on top of your new counter, making sure the clear coat is really dry, or you run the risk of something sticking to it.
I didn't have a picture still of my sister's kitchen, but this is the same treatment on my bathroom sink in a green marble effect. (This is how I know the non-water based clear coat yellowed, but since it was mainly green didn't look bad.)
Hope this helps. Happy Creating!
Any pictures to share
I agree that the cornice piece is what dates this the most. Maybe remove it or take down and cut off the curvy pieces to make it a straight across board. Also the curved shelving dates it as well. Could it possible be cut diagonally to make the shelves triangles. Then a total sand and paint job would make the biggest difference and not be very expensive. If you are going to keep the white appliances, I'd color match them and paint the cabinets white and perhaps use clear handles, drawers pulls/knobs to not call attention and break up the cabinet area too much. There are counter top applications that look very nice. I'd suggest the Rustoleum kit that has a lot of black in it to contrast with the white cabinets. The floor looks nice as is and will work well with the white and black, then you can accessorize with any colors you want in the future. Hardest part is to get started! Please consider posting the after of whatever you decide to do.
Check out the Unicorn Spit video's on YouTube. Unicorn Spit can be used on any surface, including counter tops. It looks like great stuff and easy to use too.
I agree with all of above comments, and I would add one more idea..... I would remove those upper cabinets and get some tall ones to replace them. You could probably pick up a couple cheap at a Habitat for Humanity Restore. And take out that valance board over the window.
Get a counter guy to redo your counters with new laminate, and one with a bullnose edge trim.
I would add a new floor.