This is what they look like now
How can I darken my wooden kitchen worktops?

by
LA Haggarty
+21
i usually sand and oil my work tops every year but I would like to change the look of them from the pine look they now have to a more waxed darker rustic look- any idea how to do this?
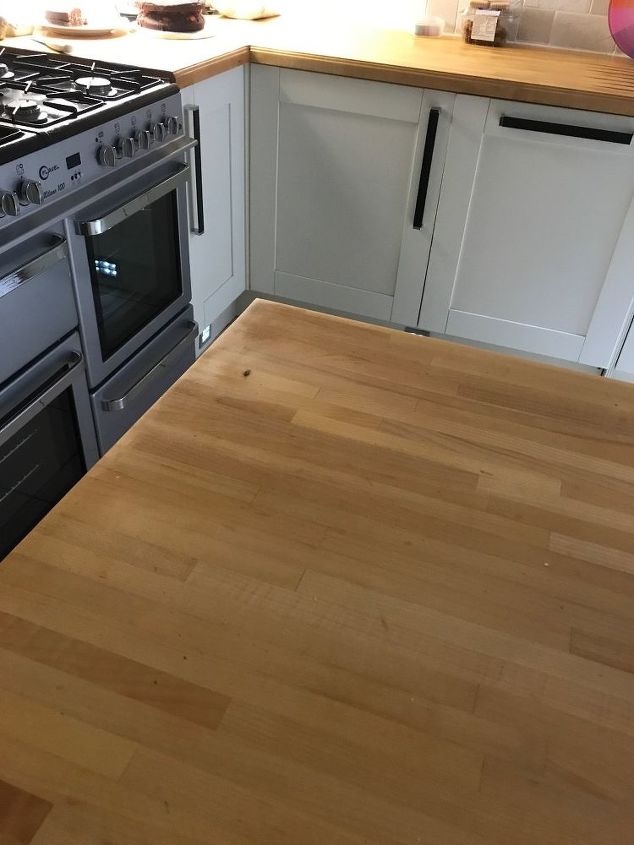
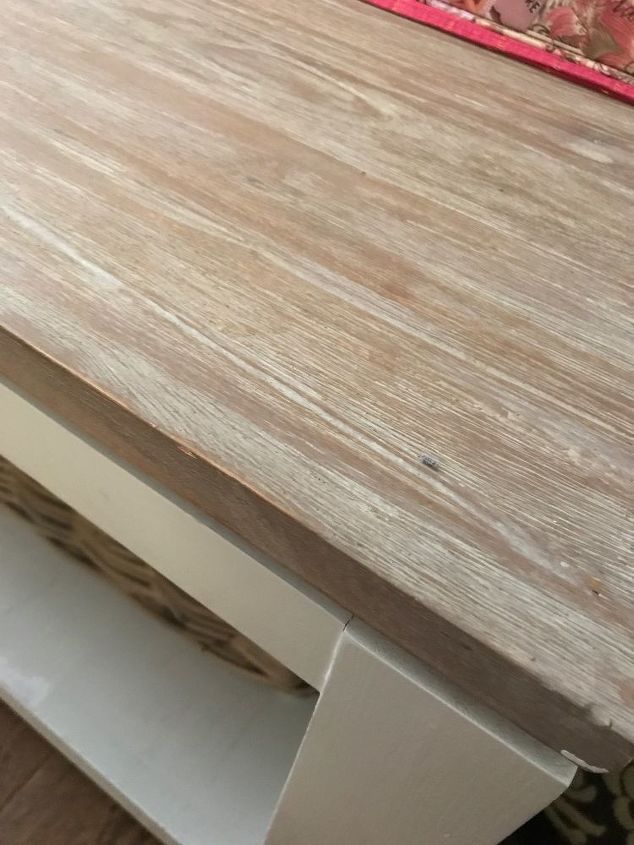
I'd like to achieve this?? Or simila. Thanks

If you want it to prepare food one its best to continue what you are doing. If you stain it a darker color you are going to have to seal it with a food grade poly, or food can be tainted.
Maybe these would work. You could ask the posters directly.
http://www.hometalk.com/diy/paint/natural-wood-stain-tutorial-1383307
http://www.hometalk.com/diy/paint/homemade-natural-effective-diy-wood-stains-9654179
Natural Wood Stain Tutorial
Homemade Natural & Effective Wood Stains
I agree with Diana. Sand it lightly, stain it and seal with a food grade top coat. Post a photo when you're done. :!)
That finish is actually a whitewash finish, not a darker finish since it would require you to add white paint in a dry-brush method. I don't think would look good on your butcher block. I have butcher block counters and stained them darker this year (after having them for 3 years), then had to use a food grade poly for the finish. I still do a beeswax finish every six months too. Perhaps if you just add a darker stain to your counters you will be happy, but I would not do the whitewash on butcher block.
you won't be able to set a hot pan on a poly finish
If you want dark on with no seal, you could use Breewax in dark finish. Never never use it as a cutting board after doing this. Also, putting something very hot on it could smell as the wax is a petroleum based product.
Add some food coloring to your olive oil the next time you oil it; oil it every 4 to 6 months for more depth.
I guess I would consider natural food stains. Haven't tried but what about coffee grounds, wine, dark berries that way it's food safe with a minor waxing.
turn off the lights!
You might try sanding the Butcher Block, then brew some Really Strong Tea, (little water, many tea bags). With soft towel rub as you would with stain, with the grain, and let dry. With this method you can layer the color, until you get to the color you want (a little darker is fine, as it will fade a little with use, and cleaning). When you have achieved the color you want, wax with Natural Bee's Wax as usual. This works, and is completely safe.
Could use Vinegar if you want it to go darker.......
I'm only givin' my opinon........I would probably strip off the top and start fresh. Stain and add the essentials for the top layer........I may have to work on my Island myself.
oh my god NEVER USE VEGETABLE OIL ON BUTCHER BLOCK!!! Olive oil will turn rancid any vegetable oil will turn rancid and ruin the surface. I belong to a group on FaceBook that makes and sells cutting boards and you should use mineral oil and bees wax or a 4:1 mixture of mineral oil and bees wax.
That said shellac (food grade) is a good sealer but I'm not familiar with any food grade stains. Google search for them.
I found this for you:
http://www.thechroniclesofhome.com/
This is the article that is not showing in the link from above:
HOW TO STAIN AND SEAL BUTCHER BLOCK COUNTERS
February 7, 2014 by Jennifer 61 Comments
While the actual title of this post is “How to Stain and Seal Butcher Block Counters,” an alternate title could be “How NOT To Stain and Seal Butcher Block Counters.” Because I definitely, definitely did both. So for those of you with butcher block counters of your own, or considering butcher block counters for your kitchen, or who just like to hear about the reality of DIY going bad before it goes good, I invite you to come on in, pull up a chair, and learn from my mistakes.
We bought this house with a butcher block counter already installed on the island, however it was rather stained and had probably been sealed with just some wax or oil so had its natural pale color. The butcher block counters that make me swoon have a richer, darker, shinier finish. I knew I could achieve this same look with good quality products and some elbow grease. I also knew that to make butcher block counters as highly-functioning as possible you need to seal them up so they don’t soak up every water, oil, and food stain that touches their surface.
Here’s a list of products I highly recommend for staining and sealing butcher block. If you are starting with fresh butcher block, not a slab that is being refinished, you won’t need the coarse grit sandpaper listed here.
Pad sanderCoarse and fine grit sandpaperDust extractor (an investment but HIGHLY recommended for any home improvement project that requires sanding – it basically eliminates all dust in the air so there is almost no cleanup!)Wood conditionerFine grit sanding spongesMicrofiber cleaning clothsWood stainFoam brushesRag (I usually use an old t-shirt)Waterlox Original Sealer
The very first thing I did was sand the butcher block down to bare wood using a pad sander, coarse grit sandpaper, and a dust extractor. I didn’t even realize how darkened and stained the wood was until I started getting down to the bare wood and saw the difference.
Isn’t that crazy??
After I finished sanding with coarse grit sandpaper I went over everything with fine grit to get it nice and smooth.
Here’s where we talk about what NOT to do when staining butcher block counters.
Do NOT skip wood conditioner. I didn’t think I needed it because the wood wasn’t soft but the stain soaked in so unevenly and looked pretty awful. So I applied another coat of stain on top, thinking it would even things out.
Do NOT do this either. It just accentuated the blotchy spots and left me with that much more to remove later.
At this point I knew I was going to have to sand the counters back down to bare wood again, which had me feeling slightly devastated. But using a dust extractor has been an absolute game changer for me because there is no mess after sanding, so I accepted my defeat and went back to square one.
So here I was, back down to bare wood, ready to have a go at round two. Here is what TO do when you are staining and sealing butcher block counters.
STEP ONE – apply a wood conditioner appropriate to the stain you’re using. If you’re using an oil-based stain, use a wood conditioner meant for oil-based stains. If you’re using a water-based stain, use a wood conditioner meant for water-based stains. I was using a water-based stain so used this wood conditioner. The counters won’t look much different at this point, just perhaps a little more intensely grained.
STEP TWO – give the entire surface a good sanding with fine grit sandpaper. That’s right – sand again after the wood conditioner has dried. The wood conditioner will cause the grain to raise in spots and sanding makes it nice and smooth and ready for stain. You should do this by hand, and not with a power sander. Wipe the surface down with a microfiber cloth to remove any dust.
STEP THREE – apply your stain. I used Daly’s water-based stain in walnut. I applied the stain using a foam brush, and moved quickly to cover two side-by-side boards the entire length of the counter. Then I wiped the excess stain away with an old t-shirt.
When the entire counter is finished, it might look a little dull and streaky – don’t despair! Once you add the sealer coats, the shine softens everything.
STEP FOUR – after letting your stain dry overnight, apply a coat of Waterlox Original Sealer. I found it best to apply this with another old t-shirt remnant. If you have a kitchen vent or hood, turn it on before you start – this stuff is STINKY. If you live in a warm enough climate, open the windows! Let it dry for 24 hours.
STEP FIVE – sand the entire surface by hand with fine grit sandpaper to remove any little bubbles.Wipe with a microfiber cloth. Repeat the Waterlox application. Let it dry 24 hours.
STEP SIX – repeat the sanding, wiping, and Waterlox process one more time.
The process is a bit drawn out but the results are so worth it. The counters are sealed thoroughly now and look just beautiful.
Unless you put food directly on the wood countertop, you could try applying one of the Old English scratch remover darker shades around the outside edges to see if that creates the effect you want and, if so, use that.
Hint: a glass turntable from a microwave -- often available cheap at Habitat for Humanity Restore Stores and Good Will and even many church sponsored thrift stores -- makes an excellent cutting board and food prep tray -- saving your countertop from cut marks -- and enabling you to stain the butcher block the shade you prefer.
My counters aren't butcher block, but I used a minwax stain that has some acrylic in it and then topped it with 3 coats of OSMO Top Oil (5 around the sink). It's a hard oil that doesn't need to be redone every six months. (Mine is going on 3 years and still looks and works just like it did at first.) OSMO is so so easy to work with, doesn't smell chemical at all (it actually has a rather nice odor... kind of nutty), is natural plant based (not petroleum based), and doesn't leave any oily residue. It really does dry hard, down in the wood... not on the surface.
I don't place food directly on my counters (to protect the counters... not the food) and never use them as a cutting board. OSMO is not 'fda food grade approved', only because it's so stinkin' expensive to go through the process. It is food grade approved in Germany, where it is made.
If the counter gets a scratch or stain, you just sand that spot down a bit and reapply the oil. With a poly finish like waterlox, you have to redo the entire counter if there's a problem spot.
Just so you know, I don't have anything to do with OSMO. I just used it and love it and am beyond thrilled that I went with it. I got the little 1/2 liter can and after 3 coats, still had 1/2 a can left. A little goes a long way! I hope to strip my pine floor of the finish someday and use OSMO on it, too.
Seriously... go research it. :)
I'm including a photo so you can see the soft sheen it has in front of the window. (I prefer that and having the counters actually feel like wood... not wax and not plastic.) They're so pretty.
If you would like this look you must understand that a little more attention must take place, especially if cutting on the surface(to which i would suggest notto do anyway & have your selection of kitchen boards).. •Now i couldn't work out whether you wanted it lighter or darker, in any instance this method should do except with darker...but after real good HAND sanding of various sand papers bringing them down to the softest to complete the first part, after a general clean with bi-carb & let dry properly (overnight) then for a darker look use a non toxic crafts stain: must have mixed sponges: then using a bees wax candle then patch draw areas always going across ways, then with sponges use the stain of your choice & from side to side apply, when dry seal with a good graded coconut oil, using the same tecnique with clean sponges(of no colour)Tip; the coconut oil will have to be made into a routine once a month to give a light quick clean,& to keep bench tops as safe & clean as possible..
No colour, easy, follow the same steps missing the non toxic stain.
This whole procedure is only the best for remaining well in health treatment, yet giving good results for the eye.. kindest regards:)))