How to Paint a Brick Fireplace and Never Look Back

By Judy Schumer
A fireplace often serves as the centerpiece of the home: It’s what families gather around during holidays, and where memorable photos sit above on the mantle. But sometimes, it may be more of an eyesore than anything else. Let’s say it’s outdated, or the color of the brick has faded or doesn’t match the rest of your decor. Luckily, it’s easy to transform a brick fireplace by painting it.
Compared to removing or refacing the fireplace, painting is a minimal-mess project that’ll only take a few hours. You’ll avoid toxic brick dust and chunks of mortar everywhere, all while beautifying your space. Painting your fireplace is also much less expensive than calling a professional to tear out your fireplace. For the cost of a few tools and paint, along with a bit of DIY know-how, you can have a completely revived focal point in your room. And if you aren’t fully committed to a complete painting, consider whitewashing your fireplace for a farmhouse look that allows the natural brick to peek through.
Use our guide to find out how to prep the brick for painting, what paint you should use, and how to paint or whitewash your fireplace for a stunning update to your home.
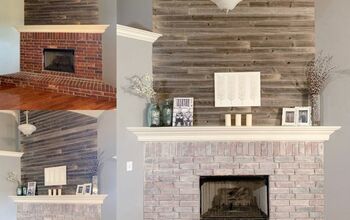
Photo via Carley | CountryPinesFarm
Best Paints for a Brick Fireplace
Now that you’ve decided to paint your brick fireplace, you’ll need to find the correct paint to get the job done quickly while making sure your efforts will last for many years to come.
Primer for Brick Fireplaces
When buying supplies to paint your brick fireplace, don’t skip the primer! While some projects are more forgiving than others and won’t suffer from not having a primer coat, painting your brick fireplace is not one of those projects.
Using an oil-based masonry primer ensures that the porous surface of your brick is sealed, blocking out stains and allowing only the beauty of your paint to show through. A primer will also help hide any repairs made to your fireplace brick before painting it.
The proper primer helps with adhesion, guaranteeing that your new paint doesn’t slide off as you’re painting, and also protects against moisture. Kilz makes a primer that works well on brick and is readily available at hardware and home improvement stores.
An oil-based primer is especially helpful at covering up stubborn soot marks or dark spots on the brick. Taking the time to do this step as part of your fireplace painting project will pay off by providing a solid foundation for your paint, ensuring beauty and durability for years to come.
Get Primer Tinted
Paint for Brick Fireplaces
Now that we've covered the best primer for brick fireplaces, onto paint! There are three factors to think about here: paint type, paint finish, and the color.
Paint Type: Because you’ll be using a primer formulated to grab onto both the brick and the paint you use, you can use a brick or masonry paint or a high-quality latex paint that’s heat-resistant (up to about 200 degrees, or the temperatures the average fireplace can reach). Look for a temperature rating on the label to be safe.
Finish: Choose a matte or eggshell finish to hide flaws in the surface of the brick. A gloss paint produces a sheen that will make the paint and any imperfections the center of attention on the fireplace, instead of the fire itself, your mantle, or the decor surrounding it. And you might want to splurge a bit here: High-quality paint withstands scrubbing, so you can wipe away soot before it permanently defaces the paint.
Color: The color you choose is entirely dependent on the prominence you want your fireplace to have in the room. Choose a color the same as your walls if you’d like the fireplace to blend in. Choose a neutral or white if your mantle is the star of the show or a rustic brick color to preserve a brick fireplace look.
How to Prep for Painting a Brick Fireplace
Cleaning is a crucial step you need to take before you paint your fireplace because it gets the bricks ready for primer, and therefore ready for paint. We'll also guide you through taping off your fireplace before painting.
Safety Warning
Whenever you’re working with harsh cleaners or paint, you risk getting some onto your skin. Protect yourself by wearing long pants, long sleeves, and safety goggles. Wear a painter’s mask to avoid breathing in any brick dust or soot, and wear rubber gloves to protect your hands from cleaning chemicals.
Tools and Materials Needed:
- Safety goggles
- Painters mask
- Rubber gloves
- Broom and dustpan
- Vacuum
- Bucket
- Painter's tape
- Disposable drop cloths
- TSP (Trisodium phosphate) cleaner
- Wire brush
- Paintable acrylic caulk
Step 1: Clear the Area
Remove any decor items and furniture away from the fireplace to allow yourself ample room to paint while protecting things you don’t want paint splattered on.
Step 2: Put on Safety Gear
Protect yourself by wearing long pants, long sleeves, safety goggles, a painter’s mask, and wear rubber gloves.
Step 3: Vacuum and Sweep the Fireplace
Use the broom and dustpan to remove any ashes from the fireplace. Discard ashes in a metal, fireproof container outside. Using your vacuum's brush tool, lightly vacuum the mantle and bricks to remove dust and loose dirt.
Step 4: Place Drop Cloths and Tape
Use painter’s tape to cover all edges around the fireplace to avoid getting paint onto the walls. Place drop cloths on the floor and the hearth to protect them from paint splatter. Tape the mantle's edges with painter's tape if you aren’t painting it.
Step 5: Clean the Brick
Pour 1/2 cup of TSP into a bucket with a gallon of warm water. Dip the wire brush into the solution and gently scrub the bricks and mortar lines. You want to clean the bricks thoroughly, but you don’t want to damage them by applying too much pressure.
Step 6: Rinse the Brick
Discard the solution (pour it down the toilet) and rinse both the bucket and brush. Fill the bucket halfway with warm water and use the brush to rinse the brick, removing any cleaning solution residue. Let the brick dry for 24 hours to allow water that entered its pores to dry out thoroughly.
Step 7: Inspect and Fill Cracks
Check the bricks and the mortar for any cracks. Fill in all cracks or chips with the acrylic caulk. Let the caulk dry according to the manufacturer’s instructions before priming.
Step 8: Replace Painter’s Tape as Needed
If any of your painter's tape has come loose during the cleaning process, replace it with new tape to protect the areas you do not want to paint.
Photo via Bobbie
How to Paint a Brick Fireplace
Once you’ve completed your prep work, you’re ready for the fun part—painting your brick fireplace! You’ll need a few more supplies to finish the job, including primer.
Tools and Materials Needed:
- Safety goggles
- Painter’s mask
- Oil-based brick and masonry primer, tinted if using colored paint
- Paint tray
- Disposable paint tray inserts
- 1-inch paintbrush
- Roller frame
- Two paint roller covers with a 3/4” nap
- Brick/masonry paint or acrylic latex paint
Step 1: Prep Priming Supplies
Prepare all your supplies for priming the brick. Wear protective gear such as goggles and a face mask, place a disposable insert into the paint tray, then pour your primer into the paint tray.
Step 2: Prime the Mortar
Use the 1-inch paintbrush to apply primer to all mortar lines and edges between bricks. Be sure to coat all the nooks and crannies between the bricks.
Step 3: Prime the Bricks
Use the roller to apply primer to the surface of the bricks. Take your time as you roll to allow the primer to adhere to the porous brick. Touch up any missed spots with the 1-inch paintbrush.
Step 4: Allow the Primer to Dry
Let the primer dry according to the manufacturer’s instructions. Depending on humidity, you may need to let the primer dry overnight. Clean your brushes and paint tray if you are letting the primer dry overnight. If drying time is only a few hours, cover the brushes and paint tray with plastic wrap to keep the primer from drying.
Step 5: Apply a Second Coat
Repeat Steps 2 and 3 to apply a second coat of primer. The second coat will entirely hide any imperfections or stains peeking through the first coat of primer.
Step 6: Allow the Primer to Dry
Allow the second coat of primer to dry, using the manufacturer’s recommended drying time as a guide. Thoroughly clean all your brushes. Discard the disposable tray and roller cover you used with the primer.
Step 7: Prep Painting Supplies
Prepare all your supplies for painting. Wear protective gear such as goggles and a face mask, place a new disposable insert into the paint tray, then pour your paint into the paint tray.
Step 8: Paint the Mortar
Use the clean and dry 1-inch paintbrush to apply paint to all mortar lines and edges. Go over all areas to be sure you’ve covered the primer.
Step 9: Paint the Bricks
Use a new roller cover on the roller frame to apply the latex paint to the bricks. Touch up any missed spots with the 1-inch paintbrush.
Step 10: Allow the Paint to Dry
Let the paint dry according to the manufacturer’s instructions. Cover all tools and materials with plastic wrap to keep the paint from drying on them.
Step 11: Apply a Second Coat
Repeat Steps 8 and 9 to apply a second coat of paint. The second coat will completely cover the primer, giving your fireplace a finished look.
Step 12: Allow the Paint to Dry
Allow the second coat of paint to dry, using the manufacturer’s recommended drying time as a guide. Thoroughly clean all your brushes. Discard the disposable tray and roller cover you used with the paint. Remove and discard the painter's tape and drop cloths.
Your fireplace is now painted and ready to be decorated with a wreath, your favorite painting, or a grouping of your favorite family photos displayed on the mantle.
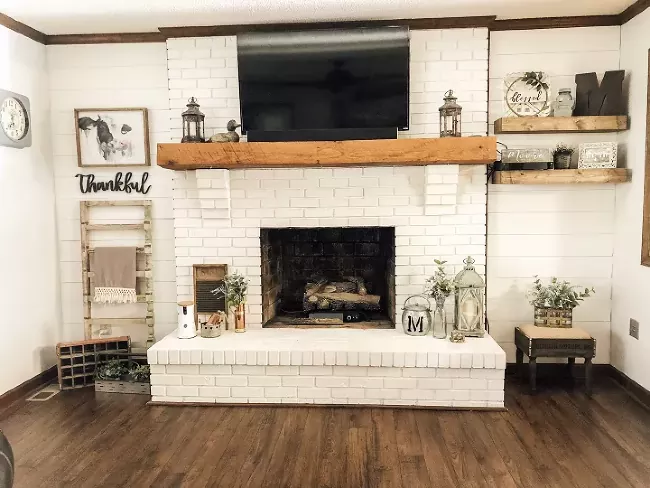
Photo via Amanda | the flourishingfarmhouse
How to Whitewash a Brick Fireplace
Whitewashing your brick fireplace is a great alternative to painting: It gives a traditional brick fireplace a new look, but is reminiscent of an old farmhouse. While painting your fireplace completely covers the brick, whitewashing allows some of the color and much more of the texture of the brick to show through. The best part about whitewashing your brick fireplace is that it’s incredibly easy! Whitewash is essentially watered-down paint, and the technique entirely skips priming to preserve the farmhouse look and feel.
To whitewash your brick fireplace, use the instructions above for How to Prep for Painting a Brick Fireplace, using drop cloths and painter's tape to keep the whitewash from splattering onto your mantle, walls, flooring, and furniture. Clean the brick so the whitewash will adhere properly, let it dry, then whitewash as follows:
Tools and Materials Needed:
- Mixing bucket
- Interior all-in-one latex paint with primer (flat or eggshell finish)
- Paint stirrer
- Paintbrush (1 ½ to 2 inches wide)
- Spray bottle filled with water
- Clean, dry rags
Step 1: Prepare the Whitewash
Mix the whitewash solution in the mixing bucket using a 2:1 ratio of water to paint (16 ounces of paint to 32 ounces of water, for example). Stir with a paint stirrer until the mixture is well blended.
Step 2: Test the Whitewash
Use the paintbrush to apply the whitewash to an inconspicuous area of your fireplace. Dab it with a rag to soften the whitewash. If you like the coverage, continue to the next step.
If you want heavier coverage, add paint, a little at a time, to the whitewash mixture until you get the coverage and opacity you like. Keep the paint to water ratio at no more than 50/50 (32 ounces of paint to 32 ounces of water, for example).
Step 3: Whitewash the Fireplace
Working in an area with a few bricks at a time, lightly spray the area with water. Apply the whitewash solution using the paintbrush. Dab the area with a rag to soften the look. Your whitewash will lighten as it dries and is absorbed into the brick. Continue until all the bricks have been whitewashed to your desired look.
Step 4: Let Dry
Allow the whitewash to dry for 24 hours before removing the painter's tape and drop cloths.
Have you painted your brick fireplace? Tell us about your project in the comments!








Frequently asked questions
Have a question about this project?