Handmade Woven Cord Basket DIY

I love making woven crafts! I've made all sorts using different types of ribbon, like here, here and here, newspaper - here, here, here and here, macrame cord - here, here, and here - mostly on upcycle items like tin cans, yogurt jars, books, and picture frames. It's so easy to have whatever you're using to go 'over and under' to create a cool look!
So naturally I was excited to see a diy woven basket on Pinterest that I was interested in! Clicking on the link took me to marthastewart.com where I saw the tutorial for making one. The cool thing about making this basket is that it uses a cornstarch container as the mold. And of course I had an empty cornstarch container in my stash just like the one used.
We all love baskets and making a woven one is sure to please just about everyone!
Supplies
- Cornstarch Container (3.5"x3.5")
- Macrame Cord (3mm - 109yds)
- Yard stick
- Masking tape, scissors
- Bobby pin/hairpin
Instructions
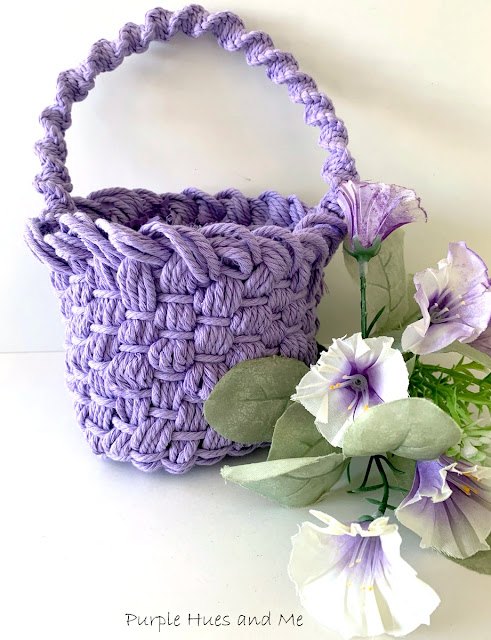
I'm sharing my version of creating the Martha Stewart basket. Since I already had lots of different color macrame cords on hand - I picked out a lavender shade to use.
The original instructions said to cut nine groups of four cords, 25" long, taping five groups down vertically, placing each group about 1/2" apart.
Then measure one group of four cords, 30" long for the handle and place in the middle of the remaining four cord group, horizontally and tape down.
I somehow misread (my fault - senior moment) the directions and made 10 - 25" long four cords groups, plus the 30" long group (handle) which I placed horizontally in between two groups on one side and three on the other side. I didn't realize my mistake and left them there in place to weave each group in a over and under pattern mid-way across the vertical group. I must say this extra group of cords didn't crowd the basket shape or weaving. In fact, it helped to fill up space between the groups.
Next, move the woven cord groups close together in the center to tighten the weave. Then take the cord from the original 109 yd roll and lay across the bottom of the horizontal cords at the left side end. Then begin weaving that cord (working cord) over and under the cord groups around the woven cords.
Continue to weave the working cord around the woven group base. After several times, place the woven cords on top of the mold which is the bottom of the cornstarch container.
Continue weaving around the mold - over and under - as before, forming the shape of the woven basket.
As you move around the mold with the working cord, be sure to tighten the cord and pull and straighten the cord groups.
Once you reach the end (top of the mold) leave enough working cord to weave another group (four) over and under into the weaving pattern along the entire height of the woven basket.
To do this, I started out using a darning needle, but it was difficult to pull the cord through the eye of the needle without separating some of the strands of the cord.
To finish the top of the woven basket - first take the longer group of cords and drape across the top of the mold. Then take the group of cords to the right and take it behind the handle cords, draping down in an arc. Be sure to keep the cords together and in line. Then take the group to the right, curving behind and around, down into the first arc.
Continue creating cord arcs as you move around the top. I used a hairpin to group the cords together to insert behind the previous arc. It was easier for me to pull them through that way.
When reaching where you began, tuck the last group of cords through the arc created by the first group. Then begin tucking the ends of the group cords under or behind several of the weaving cords.
I used a bobby pin to insert the group cords behind the weaving cords which were quite tight in places. And I had to tuck each cord under, one at a time. It took me what seemed like forever to do this. I wanted it to be over and done.
And be sure to leave the longer cords out to make the handle.
Since mentioning the handle, the original tutorial called for twisting the handle cords together in two groups. I tried that but the handle seemed too flimsy so -
since I had four cords, I decided to make a four strand spiral knot handle - with the two middle cords as anchors and the two side ones as tying cords. But to do this, I had to lengthen the tying cords. So I cut off most of the left - right cords leaving a couple of inches and replace them with longer (108") cords (tying them in knots to the leftover portion of the previous cords) inside the basket. These would have been the tying cords and the lengths would get shorter and shorter while the anchor cords remained basically the same length. That wouldn't be enough using the 30" length for making a spiral knot handle.
To begin making the spiral knot, take the left tying cord and pass it over the anchor cords and above the right tying cord.
Pass the left tying cord above the anchor cords and through the loop formed by the right tying cord.
Pull on both tying cords to tighten the knot and you've completed a right half square knot. A spiral knot is basically two right half square knots . . .
tying them over and over making sure you are always tying the half knot in the same direction to create the spiral design.
While making the spiral knots, if you twist the spiral knots closer together, a somewhat new look will emerge for a chunky more sturdy design. Perfect to use as a handle!
Measure the finished spiral knot handle to the basket securing the cords inside by inserting them under a couple of working cords and tying in knots, cutting off excess cords. Then trim the ends of the tucked in cords. And then, straighten and flatten the arcs before removing the mold from the woven basket.
I love the look of the basket, but in retrospect, I would use a much sturdier, stiffer cord to maintain the adorable shape of the woven basket. Mine doesn't look like the one pictured on Pinterest or in the tutorial. A stiffer cord would make the weave look much neater, too.
There are so many ways to use this adorable woven basket!
Enjoyed the project?
Suggested materials:
- Container (empty cornstarch box) (Stash)
- Macrame Cord - 3mm 109yds (Amazon)
- Masking tape
- Yard stick
- Bobby pin/hairpin

Comments
Join the conversation
-
 17335038
on May 14, 2022
Thank you for the bright and in-focus close-up pictures clearly showing the steps of the very pretty! finished project.
-








Frequently asked questions
Have a question about this project?