


How to Create Beautiful Refurbished Country Style End Tables

Refurbishing old furniture, or upcycling, is definitely more than just a trend. The idea is to take something old or worn that you might otherwise get rid of and turn it into something new and chic. In this case, I’ve taken some old end tables that didn’t really fit with the décor in my home and turned them into completely new items. An end table with storage is incredibly useful, and giving it a country-style makeover meant that it fit in with my interior design.
This project is incredibly simple and can be adapted for almost any style of table or any piece of furniture that you want to give a new look to. I chose an old small end table. The materials used can be easily sourced and it doesn’t require too much in the way of carpentry or any specialized skills. Country style is an easy trend to achieve and one that immediately changes the look and feel of a room. So, it was an obvious go-to when deciding what to do with the small end table that needed a makeover. I’m very pleased with the results and want to share them so that you can have a go at turning your old furniture from drab to fab, too!
Tools & Materials
For this project, I used:
- Paint and varnish remover
- A wallpaper scraper
- A sander
- Dust sheets
- Wood finish
- Polyurethane gloss
- Sponges/cloths/brushes
- Chalk paint
- A vintage-style handle
Step 1: Gather Your Materials
The first step to completely changing the look of the small end table was to gather the materials needed. There’s nothing worse than having a project ready to go but finding a key component of one of the middle stages is missing just when you need it. For this project, I already had my old end table – you can use any kind of table you want for this and most will be different, which gives a unique look to anything you create.
It was also important for this project that I had the tools needed to achieve the desired effect. Firstly, I needed some paint and varnish remover in order to take off the coats of varnish that had been applied to the table when I bought it. I used both a scraper and a sander for this, though you can use whatever you have that would help you remove the varnish. I also used dust sheets below the project to collect any mess, but this isn’t imperative. I also used wood finish to stain the table how I wanted it and I needed chalk paint for the legs and body of the table. I also sourced a handle for the drawer on the table from Hobby Lobby. It fit perfectly with the country-style aesthetic I was creating.
Step 2: Strip and Sand
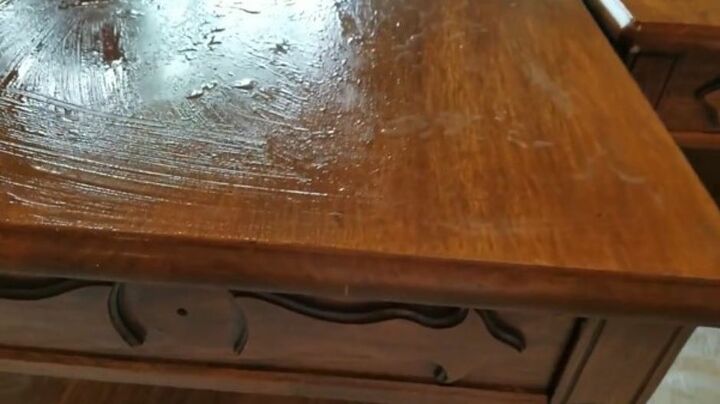
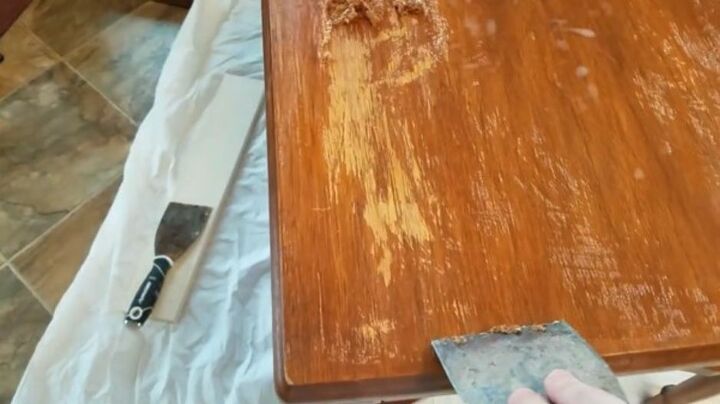
Once the materials and tools have been collected, it’s time to prepare the table by removing any paint or varnish that may already be on it. Some tables might already have had this stage completed and be unvarnished - if that's the case, you can skip straight ahead to step 3. But for already-varnished tables, it’s important to take the varnish off so that the new varnish fits with the style of the end result. Or, if you're planning to paint it, it can often be hard to paint over varnish, so it needs to go.
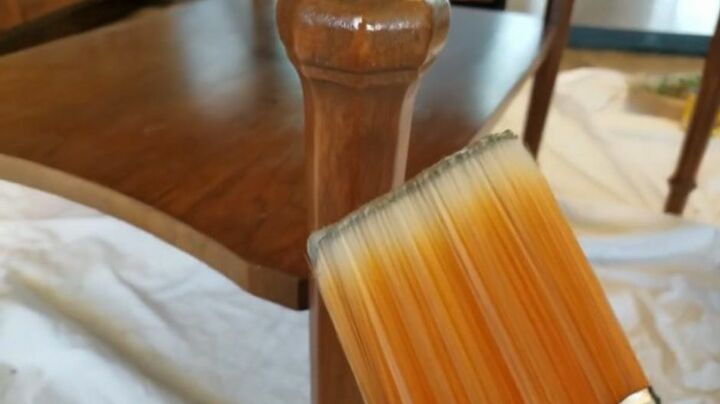
I began by coating the tabletop with paint and varnish remover. I then began scraping at it with a wallpaper scraper. In order to speed up the process and make it look neater, I used a sander to scrape off the old varnish. If you don’t have access to a sander, the wallpaper scraper does work. You could even use sandpaper to remove the extra stain and to make the tabletop look neater. Once I had successfully removed the varnish, I wiped the surface down a few times. This enabled me to begin the actual staining and painting project with a completely fresh blank canvas.
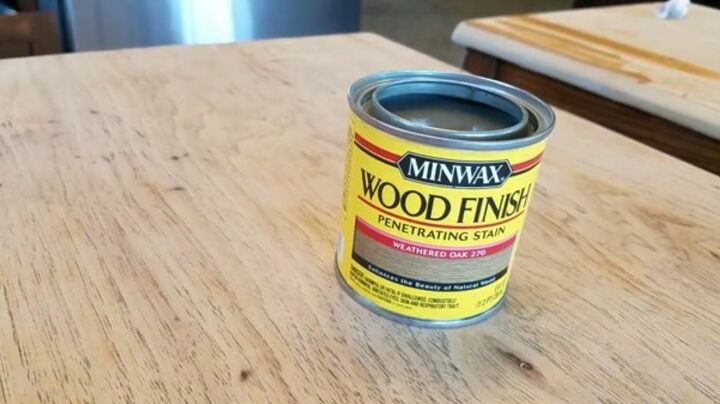
Step 3: Stain
The next step was to stain the tabletop, working on the aesthetic that I wanted for the country style end table. For the staining part of the project, I used Minwax Wood Finish. I used Weathered Oak 270, which would give me the farmhouse, country style effect that I was going for. You could choose any kind of staining you like if you wanted a different style or wanted to match an existing room or set of furniture.
I dipped one coat of the stain on a sponge brush and ran it over the tabletop. Once it had dried, I used some Minwax Polyurethane Clear Gloss in order to fully create the smooth, shiny tabletop effect and to protect the staining I had just done. This step is necessary in order to create a hard-wearing, functional tabletop. If you are placing food and drinks on the table, it is good to reinforce the staining so that you don’t have to keep varnishing the tabletop. I only needed one coat, but you can use your own judgment. If the varnish doesn’t seem to be sticking, give it another coat or two.
Step 4: Paint
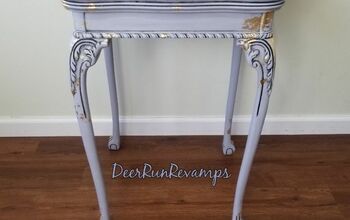
The next step was to apply the paint to the rest of the table. I like to use Rust-oleum’s chalk paint because the matte effect worked perfectly for the country style farmhouse look I was going for. This is the stage that I really needed the dust sheets for, so that the paint didn’t drip down the legs onto the floor. The chalk paint isn’t the easiest paint to use, but the look at the end is worth it.
I slathered it onto the legs and the drawer of the small end table. Don’t panic if it takes multiple coats of paint in order to completely cover the patches of wood – it took me three coats of paint to achieve full coverage across the table, as I chose a fairly light gray color, but the darker the paint you choose, the fewer coats you will need. Once these have dried, check for any patches that have been missed, so that there is equal coverage across the end tables.
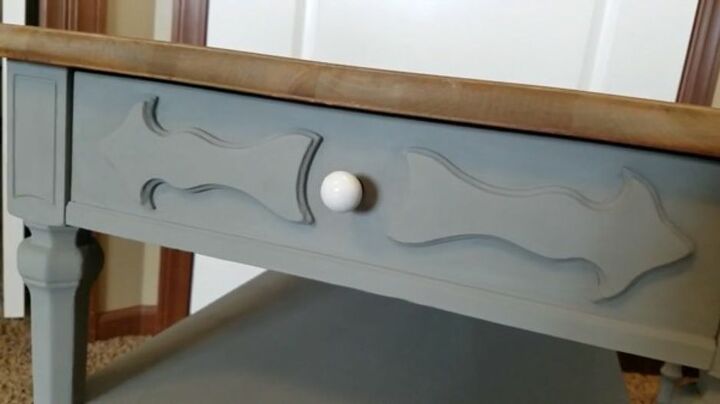
Step 5: Replace Knobs
The final stage might not work with everyone’s end tables, but it will for an end table with storage. Usually, the country-style farmhouse look can be completed by choosing a knob for the drawer that suits the style. You could find one that matched the décor of the room you are placing the table in, or that matched other furniture.
I chose this knob from Hobby Lobby as I felt it complemented the aesthetic of the country style perfectly. It’s fairly easy to replace a knob with just a basic screwdriver. The most important thing at this stage is to choose a knob that is not just sufficient for the aesthetics, but one that also works on a functional level to ensure that the drawer can be opened and closed properly.
Once the knobs of the end tables have been replaced, you should have your very own beautiful refurbished country style end table.

The project is simple and easy, and you can customize almost any stage of it for whatever furniture you might end up needing to refurbish. Not only does this mean that you don’t throw things away or have to purchase something new, but it also means that you’ll add a touch of your own creativity to your home.
I chose the end table with storage so that I could keep the useful functional nature of the small end table while not having to keep the aesthetic it gave off. You don’t even have to use the country style either – you can paint and varnish the table in any style you want to suit your home. This project could be just what you need to spruce up your home - it's perfect for any time of the year and can really make a room in a house feel completely different.
Let us know how you got on with making this project and how you transformed your end tables into something completely new and beautiful. Share this project with friends and fellow Hometalkers you think would love to upcycle some old furniture.


Frequently asked questions
Have a question about this project?