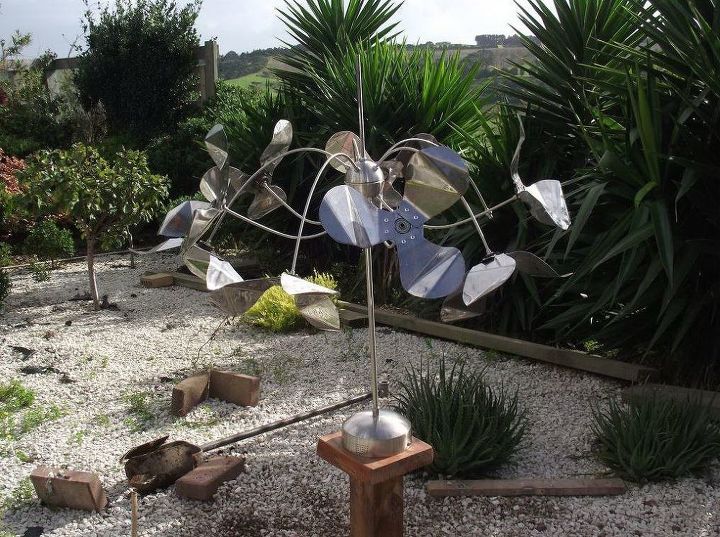
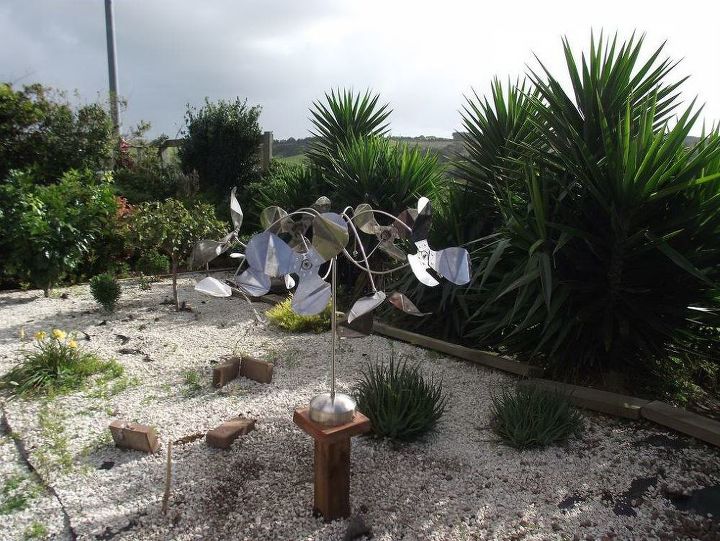
Spinny Winny Recycley Thingy Scrap Metal Art

Stephen Taylor
by Stephen Taylor
5 Materials
$26
3 Days
Medium
I absolutely hate people chucking perfectly good stuff away, I am a junk magnet (much to my wifes chagrin) but what must be done, must be done.
I am going to try to do this using tools most people will have, so no welding, lathes etc ( I have access to most of these things but not everyone does)
Step 1: Recycle That !!
I was on the way in to work one morning and I saw this poor, forlorn, abandoned light fitting at the side of the road, I ignored it and carried on to my dentist appointment but an hour later it was still there!
It was fate, the stars coming into alignment or someother such rubbish -- so into the back of the car it went!!
It is made of stainless steel so I should be able to use it for something.
Step 2: So What Was I Going to Do With It?
Good Question!
Initially I had no idea, I was thinking a water feature or something, but really was open to ideas and I would sleep on it (looks uncomfortable!)
I got it home and took all the unnecessary bits off of it.
This was all the glass shades, light bulbs and wiring.
So I have ended up with a bunch of 12v bulbs and a 240/12v transformer which I am sure that I will use at some point in the future.
I tightened up all the internal bolts and nuts etc and am ready to transform it.
Step 3: Scrap Stainless
I had a root around in the scrap bin at my wifes work and found a bunch of stainless steel sheet offcuts so I cut out some equilateral triangles from it.
I nipped the sharp points off as I am clumsy and would probably stab myself.
Now I could have cut these out with a hacksaw or jigsaw, but as I had use of a guillotine I used that.
I also bought some bearings, these would have been about $5 each in NZ but I found a chinese seller on ebay and bought the via the UK at 57 pence each.
Each one of these was centered in one of the truncated triangles


Step 4: Attaching the Bearing Without Welding It
The first picture shows the process of attaching the bearings to the triangles
1. Centre bearing on triangle
2.Drill a hole and cut 6 slots
3.Bend slots out a bit
4.Locate piece of cut off gas pipe at rear
5. Press in bearing
6. Rear view of pressed in bearing
Step 5: Those Steps in a Little More Detail
I used a jigsaw to cut the 6 slots, originally I used a hacksaw but this was a bit time consuming as you had to dismount the blade for each one.
I used a small adjustable spanner to start bending the tabs out in order to accurately locate the back "gaspipe" section
I then used the vice to press in the bearing into the hole and locate the tabs and bearing inside the pipe
Step 6: Spinners Complete
All ready for the next stage
Step 7: Making the Propellors
Back to the stainless steel sheets, I am going to make propellors (and hopefully the will spin as opposed to clatter off each other!)
First I made a template out of plywood, a little smaller than the finished size I want, this is so I get consistency(ish) of size
Once made I clamped the template to a piece of stainless
Step 8: Cutting Out
Now these could be cut out using a handsaw, jigsaw or even a bandsaw, but because
a) I am lazy
b) it makes a lot of noise and my neighbour is peeing me off with his drumkit
and c) because I have one
I used my nibbler
one done 29 to go!
Step 9: Bend Me, Shake Me, Anyway You Want Me!!
Using the vice I put a couple of bends in the blades so that when all assembled they will (hopefully) catch the wind and rotate
Step 10: Assembly
I drilled and bolted each spinner to 3 blades (once I know if it works I will probably change the bolts for pop rivets) and put the first one onto the light fitting base
9 more to make (or 27 blades if you prefer)
Step 11: Suddenly -- Lots More Propellors!!
I made a whole bunch more (same as above, I actually used my Jigsaw with a metal cutting blade as I broke the nibbler!!)
They were then assembled on each arm, I still have 2 to make but ran out of stainless steel so back in the skip I go)
We also had a 4 day power cut due to a Cat 2 Hurricane passing through, so as I had no access to electricity I decided to make the mounting stand as I could do that with hand and battery tools.
Step 12: The Stand
I cut out a circular base to fit inside the Stainless steel base and a square table for it to mount on, I also used an old fence post as the upright, these were all planed and sanded an give a coat of preservative (decking oil)
Step 13: Bolting It All Together and Putting It in the Ground
Unfortunately one of the internal fittings broke while I was bolting it all together, but "panic ye not", I removed all of the internals and bought a piece of threaded bar that would fit down the centre and using several nuts bolted everything together.
I then dug a hole with my post hole borer and mounted it in the ground.
Once it was all tamped down I cut off the excess threaded bar.
And so there it is.
Total cost was Five pounds 70 pence for the 10 bearings (about NZ$10) and NZ$16 for the stainless threaded bar,
It spins, it whirrs and it will probably mince a chicken if one decides to fly through, and as a bonus it also acts as a bird scarer near my vegetable beds.


Resources for this project:
See all materials
Any price and availability information displayed on [relevant Amazon Site(s), as applicable] at the time of purchase will apply to the purchase of this product.
Hometalk may collect a small share of sales from the links on this page.More info
Frequently asked questions
Have a question about this project?
Comments
Join the conversation
4 of 55 comments
  • Carolyn Prenot Carolyn Prenot on May 29, 2018

    You could use it for different planet and since you have electricity,. Or different balance thing a mjig., number of animals / robots I do not know anything about electrify or how about solor power with plants and some lights inside , look at maginzines or online for metal objects in art . Not to copy but a start for idea

  • Well my grandma taught when throwing something out( or in your case found something usable) to look at it twice before throwing it in the bin. I have made so many soup can pencil holders , tuna fish can pin cushions, jar for water plant growers and or vases. And forget what I have made out of just cardboard boxes and contact paper and a hot/cool glue gun, or once in a while gorilla duct tape, ex: drawer dividers, book shelves and my favorite a multiple shoe holder as one never has enough shoes or places to put them. So thank you Grandma and thank you too.

Next