Installing a Loft Ladder and Hatch

$150
6 Hours
Medium
Here's how my Dad and I finished installing a loft ladder with hatch for easy access to the attic, creating more storage space. This loft ladder installation features a Youngman Timberline Loft kit with review, which is unsponsored and unaffiliated. Includes video as a guide.
Disclaimer: I am not a professional and am sharing this DIY loft hatch from a novice's perspective and what I've learnt from my carpenter Dad. Always seek a professional, or loft ladder fitters if you don't know or are unsure of what you are doing.


It might surprise you that I've NEVER walked around an attic before, unless they're fixed loft hatch stairs and floorboarded. That is, until I learnt how to fit a loft ladder and hatch with my Dad a few months ago.


That scene in National Lampoon's Christmas Vacation when Chevy Chase's legs go through the ceiling really put me off. For life.


Also, loft hatches and ladders can be a minefield. Particularly if you've never created your own loft access before, unlike my Dad. So, here, I'm going to show you what I learned while fitting loft hatch ladders.
Tools and Equipment We Used


Please note that while this fitting a Youngman timber loft ladder project is unsponsored, as an Amazon Associate, I do earn from qualifying purchases made through links.


  • Wooden loft ladder without hatch *(requires making a custom loft hatch)
  • 2 x plywood gussets (scrap wood, cut into triangular pieces
  • Jigsaw
  • Hand saw
  • Mitre saw *is preferable to make the made to measure loft hatch as it needs to be square
  • Tape measure
  • Combi drill
  • Impact driver
  • Reciprocating saw
  • Sawhorses
  • Clamps or timber to prop up the hatch
  • Packers
  • Extra structural timber to ensure the hatch is more secure
  • Marker pen and pencil
  • Architrave trim or UPVC to finish
What Types of Loft Hatch Conversion Kits Can You Buy?


Here in the UK, there a few different types of loft ladders are on the market, similar to ours, which is a wooden folding loft ladder. More space saving stair options are:


  • Sliding loft ladder, available in wood or an aluminum loft ladder
  • Concertina loft ladder as opposed to a 2 section
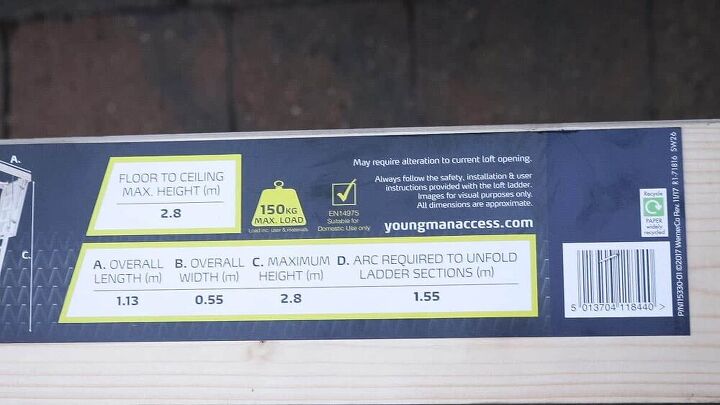
  • Timber folding loft ladders with handrail, typically allowing a maximum weight of 150kg
  • Insulated loft hatch with ladder (which this Youngman has 26mm of insulation


Small Hatch Loft Ladder


If, for example, you want to create access to your attic in a confined area, then I recommend these WolfWise telescopic loft ladders for small spaces.


We own these retractable ladders to climb up, just outside our bathroom, which can also be used for a variety of projects. What do you think the best loft ladder is? Let me know in the comments!
Youngman Loft Ladder Installation


Firstly, before I get started with fitting a loft ladder and hatch, please note Wickes are not the only place that sell them. You can pick them up on Amazon, Screwfix, B&Q, Toolstation and even Costco.


Other loft hatches with ladders can be purchased from the following manufacturers:


  • Mac Allister
  • Keylite
  • TB Davies
  • Telesteps
  • Dolle
  • Zarges Loftmaster
  • Ramsay loft ladder
  • And more


Do You Need Planning Permission for Loft Stairs?


Man websites state that here, in the UK, you do not require planning permission to install loft hatches and ladders or loft stairs. However, I suggest that you always ask your local council as rules can vary depending on where you live.


Also, this may be different if you live in a listed building. But, one thing is certain, you must comply with building regulations. And, where you do cut access for your ceiling hatch, support replacements must be put in place.
How to Build a Loft Hatch


To get started, my Dad and I decided on the loft hatch position, which was in the new DIY UPVC porch we installed.


Important Tips


Before cutting, it's vital that you know whether there are cables or pipes above. Also, whether you are about to cut into a structural timber. If in doubt, seek a professional.


We knew what was above this area, as it was originally a flat roof with felt, simply joining the house to the garage. By 2019, my Dad built a pitched roof on top.


Also, we used the packaging that came with our Youngman loft ladder kit and temporarily taped it to the ceiling, evenly. To get the right width, we also added a straight edge to draw along it.


Note, if you do cut through timber, you'll need to fix in replacement supports with strong enough fittings, such as bolts, etc.
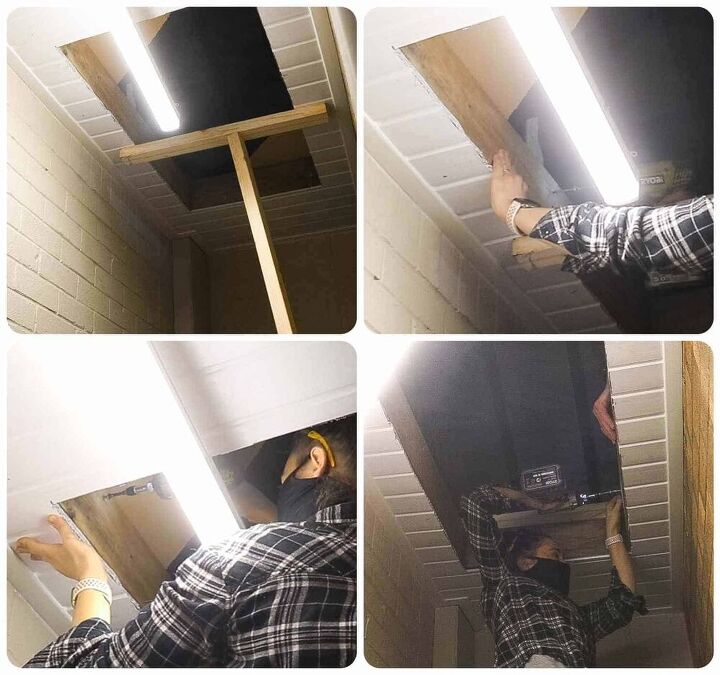
Cutting the Ceiling For a Loft Hatch


After drawing around our loft hatch template, I drilled a hole to slot my jigsaw in. Then cut along my pen lines.


Above, you can see me cutting through UPVC fascia. I also took extra caution when hitting wood, to which my Dad used a hand saw as he could get a feel better.
Cutting Through Wooden Beams


Note, I can't stress this enough, if you don't know what you're cutting, then get advice.


Above, I took instructions from my Dad to cut as much as I could with my 2 in 1 reciprocating saw, inline with the opening we created.
Drilling Through the Old Flat Roof


Next, my Dad asked me to drill a hole in all 4 corners, inline with the loft hatch opening.


Then, poke through some scrap plastic in each one, so they're visible from above, where all 4 points in the attic can be lined up, to cut safely from above.


Note: we have access to above from another loft opening, so we can go up there.
Cutting From Above


As we're installing a 2nd timber loft hatch, but to another section of the attic, my Dad was able to go up their and cut through the remaining wood.


Above, he's using the same reciprocating saw, which also turns into a jigsaw, and cut.


Note: you'll need someone to support it somehow from underneath.
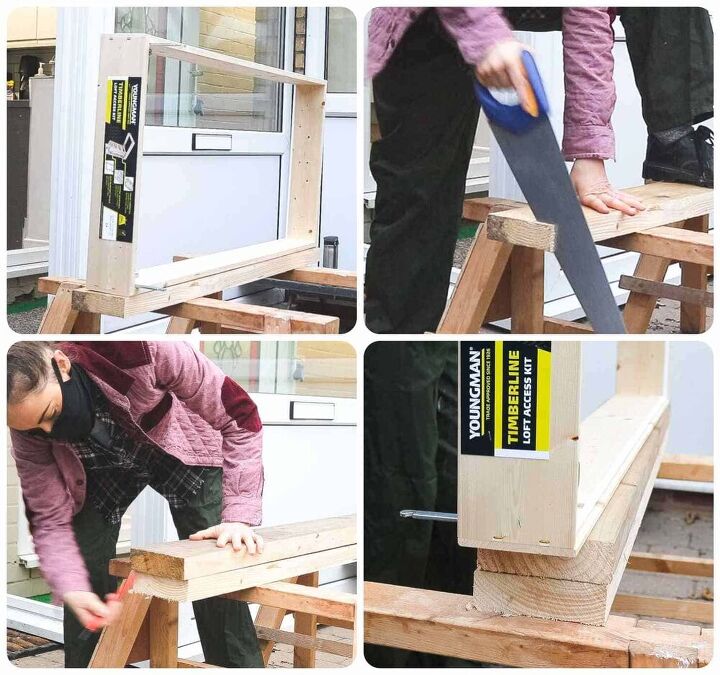
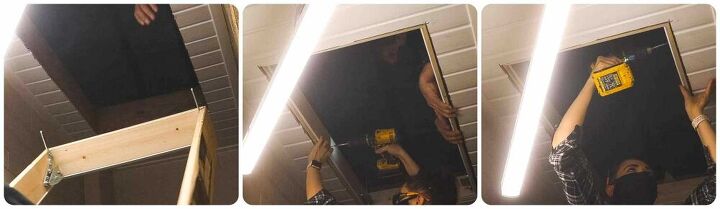
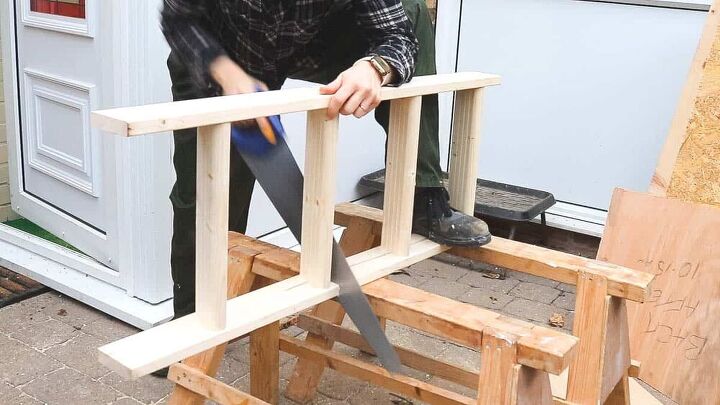
Building a Loft Hatch


Loft hatch sizes vary from brand to brand. This is also useful for a loft hatch replacement, which may require some adjustments in the roof.


Above, I held the longest side of the loft hatch kit's opening against some structural timber to copy the length and cut with a hand saw*. I made two of these cuts.


Then stacked the two cuts on top of each other, including the kit's opening. And finally, held another piece of structural timber against it and marked the height of my stacked piled to make two more cuts.


*Read important hand saw tips below
Tips for Cutting Your Loft Hatch Support


Remember, we're all learning on each DIY job? Well, I like to use a hand saw where possible. It doesn't require a plug, ear defenders or goggles. Albeit, it's slower, but I also like the safer leisurely pace, which I find a therapeutic exercise.


BUT, sometimes, I lead to the side while cutting without knowing. So, when I came to place my wooden loft hatch supports around Youngman frame, when I got to the last screw, I noticed it was buckled.


When making a loft hatch, it needs to be square, so if doing this again, I would absolutely use a mitre saw.


Fixing a Twisted Loft Hatch


Before adding in the last screw, unscrew one of the opposite corner's screw, positioned on a diagonal until the twisted bit lays flat on the floor.


Then get someone to step on it, or apply pressure while nipping in the screws.


It was quite embarrassing in front of my Dad as I've used a hand saw for years, but we all learn from our DIY mistakes!
Ensuring You Have a Perfectly Square Loft Hatch


You'll need to ensure you have a square loft hatch to prevent any issues opening and closing the hatch door. Tips for this are:


  • Measure from each diagonal, corner to corner with a tape measure, to check they are the same measurements. If not, tap the larger corner until they match
  • Once square, cut some plywood gussets and temporarily screw to two diagonally opposing corners, so it stays like that. You'll need to remove these later once screwed in situ.
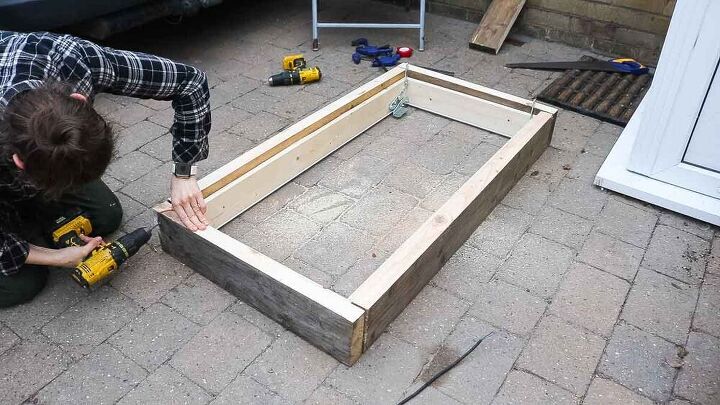
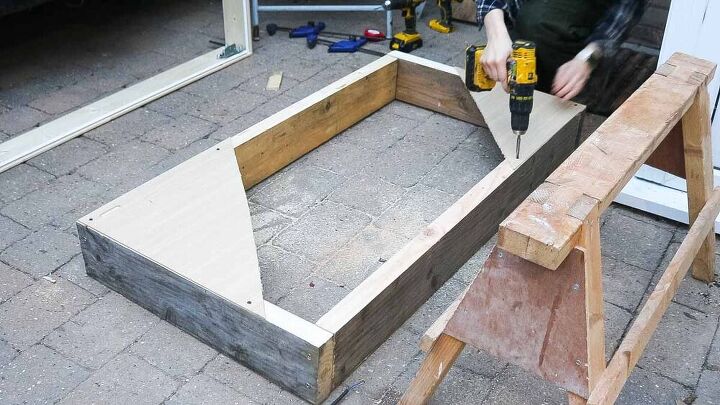
Screwing in the Loft Hatch Support


After taking the loft hatch support to the hole we created, we first needed to prop it with timber as it was hanging from the UPVC fascia.


Meanwhile, we eyeballed what was even as possible, ensuring nothing hung over the fascia's cut opening.


My Dad then added packers between the hatch suport and existing timber and directed where to add 4 inch screws using an impact driver all the way around.


It's important to add enough screws to remove any wobble. And also add any more supporting timbers where you may have created a weakness.


For example, I drilled and bolted beams together years ago before adding replacement floorboards after a washing machine leak. These are much stronger than screws.


Remove The Plywood Gussets


Once we had a few screws in, holding the loft hatch in place, I passed the combi drill to my Dad so he could unscrew the plywood gussets.
Installing The Youngman Loft Ladder Hatch


Once our hatch support frame was screwed in place, it was time to take up the Youngman loft hatch it. Note the hinged loft hatch prongs are at the back, facing upwards.


I then ensured it was flush with the bottom of the UPVC fascia cladding and screwed in the middle. Tip: By adding a screw in the middle, it allowed me to get level from either side easier.


Then add more screws around. Another screwing tip: avoid an impact driver here, or go easier, as the Youngman loft frame is much slimmer.
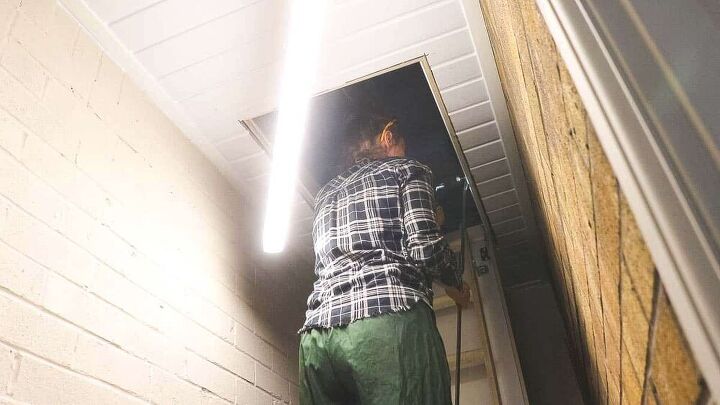
Attaching the Hatch Door


To continue fitting the loft hatch and ladder, it was then a matter of following the instructions, starting with attaching the loft access door.


Hanging the Wooden Loft Ladders to the Hatch


Next, we fixed the ladder to the door, then I had to screw a hanging support strip from the top, either side to the hatch opening. Note, it has a washer to allow the hatch to open, freely.
These two hanging strips, attached to the hatch's wall then need to be screwed to the bottom of the folding ladder. *But before the fold starts.


Do this either side.
Adding The Youngman Loft Ladder Catch


Once the ladders are screwed on, it was time to screw on the catch. Or latch, if you will.


At the back of the catch, there's some prongs that slot into manufactured holes, so don't worry about the placement.


Also, where it meets, there's a matching part. I'm not sure if it was already in place, or you need to screw in yourself, but don't remember any difficulties.
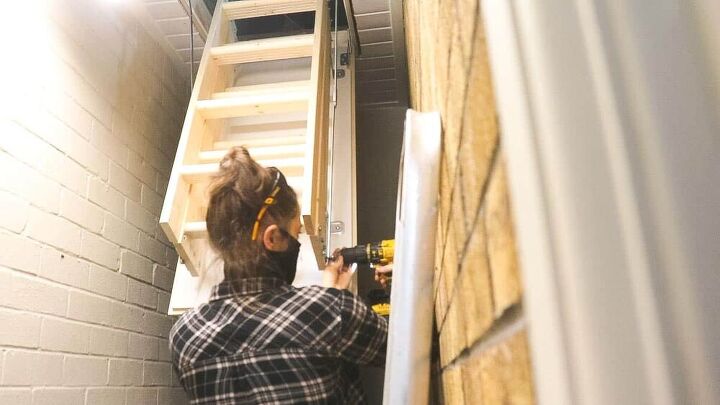
Cutting the Loft Ladders


Now, don't get too cosy as we haven't quite finished. You'll probably find that the wooden loft ladders aren't quite the right length. Ours were too long.


So, we had to open out, but have the excess folding behind the opening to allow us to open them fully.


Then measure the distance from the floor to the bottom of the upper ladders. I recommend taking a vertical measurement and not on a slope to prevent cutting off too much. (Then you can always take off a little bit more later for fine-tuning).


*We found this gap to be 21", which yours is probably different.
Cutting the Bottom Folding Loft Ladders


Before unscrewing the bottom of the ladders, I transferred the pencil lines to the ladders.


Then took to my sawhorses to cut off my hand and screw them back to the loft ladders and check.


Ours was fine, resting on the floor, so we popped their plastic feet back on.


Can You Buy Youngman Loft Ladder Spares?


With a quick google search, I've found a handful of suppliers that sell spares for the Youngman loft ladder ranges, including a ladder extension kit. Although, you will need to check whether the Youngman Eco S line matches the timberline model we fitted.
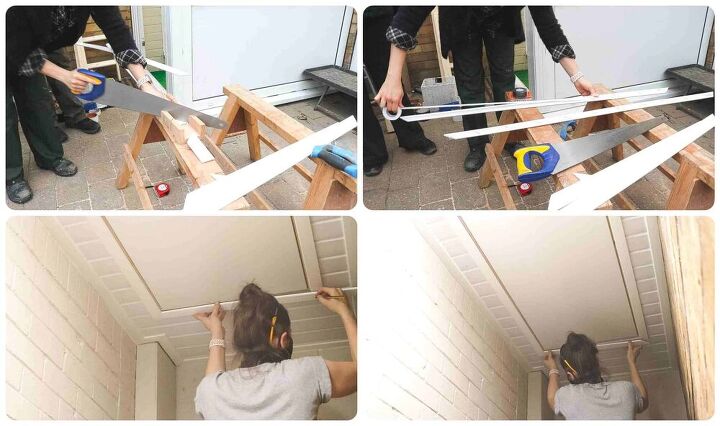
Adding a Hatch Trim to Your Loft Ladders


Now we have a new loft hatch in place, we needed to trim the hatch to cover up raw edges in the UPVC cladding.


To match, I mitred 45mm plastic trim using a mitre box and added double-sided sticky foam to stick it up. Then blended it in (and help it stay up), with white silicone along the sides.


If plastic wouldn't match, you can mitre wooden architrave, then stick, nail, punch and fill the heads before painting or varnishing.
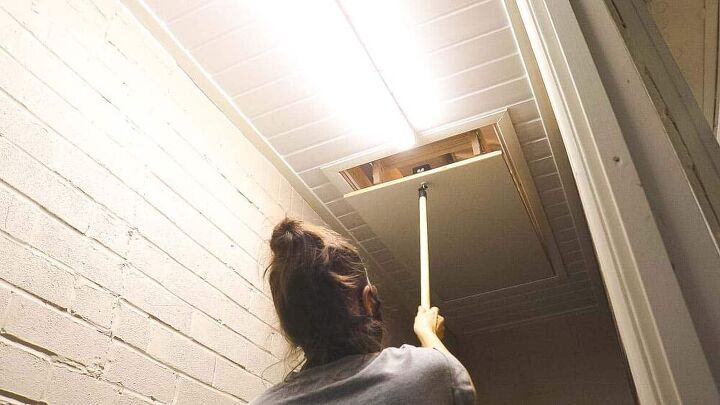
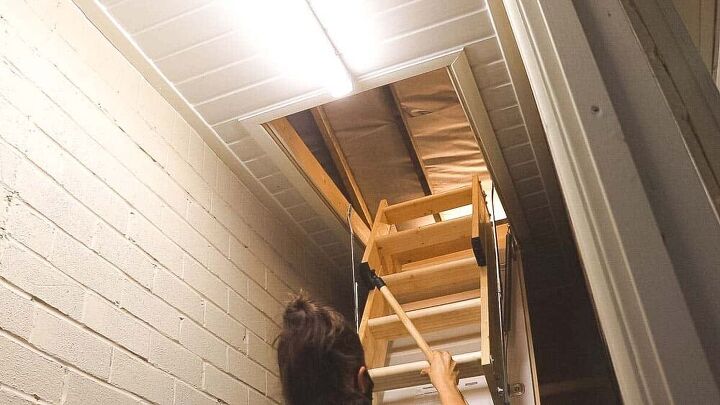
Using the Youngman Loft Ladder Operating Pole


These loft ladders also come with a loft hatch pole to pull down to open. Now, I'm always nervous when doing this, purely because I've seen too many films where the ladders shoot out and hit the actor in the face.


Fortunately, these ladders don't do that anyway, as they're the folding type.


But, storing the pole isn't pretty, unless you have a cupboard. With this being in a porch, we store it near our shoes. At least, for now.


Youngman Timberline Loft Ladder Kit Review


We've had this loft hatch and ladder fitted for a few months now. And although I'm sure the metal ones might be stronger, they've given me the confidence to finally go into the attic for storage.


For the price (around £110 at the time of buying), they're decent for a large loft hatch compared to our small one. My husband is of average build and also uses them with no issues.


If you want to feel more secure going up the lift, then you may want to choose a model with a handrail. But, as ours is next to two walls, I feel safer.


I would definitely fit this again, but, if we have any issues, you can be sure that I will update this post.


Prep Time


3 minutes


Active Time


2 minutes


Total Time


5 minutes


Difficulty


Some skill required


Instructions


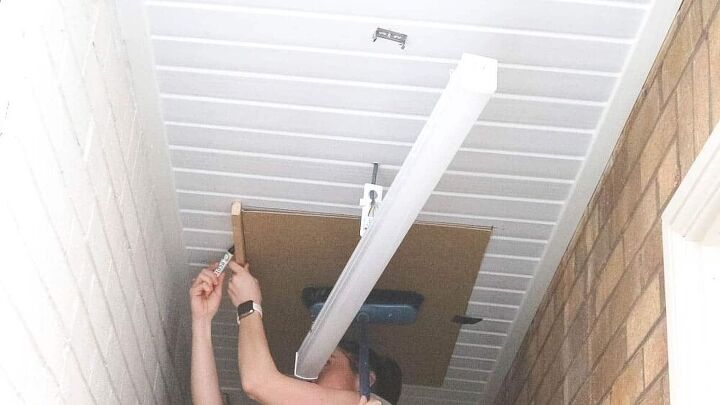
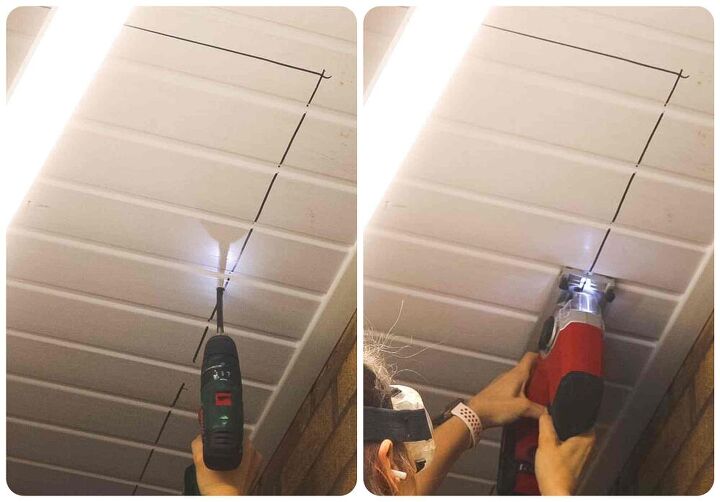
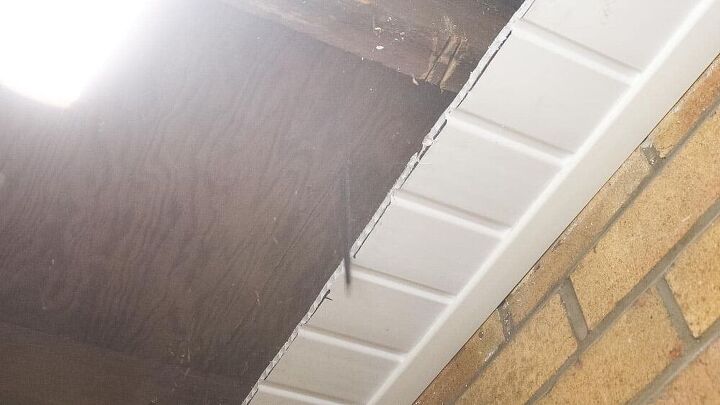
  1. We determined and marked where we wanted the loft ladder with hatch to be using a template. *We also made sure we weren't cutting through pipes and cables and replaced any structural timber supports.
  2. After drawing around the template, I drilled a hole to slot the jigsaw through and cut the UPVC cladding.
  3. When hitting wood, we used a handsaw to cut through timber.
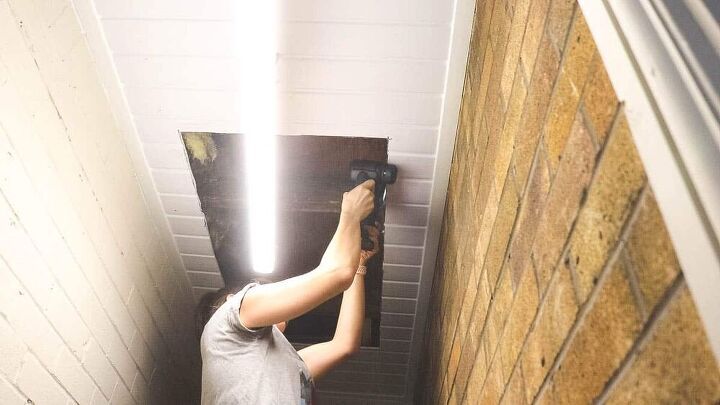
  4. Once the fascia was removed, I we then used a reciprocating saw to cut the majority of the timber.
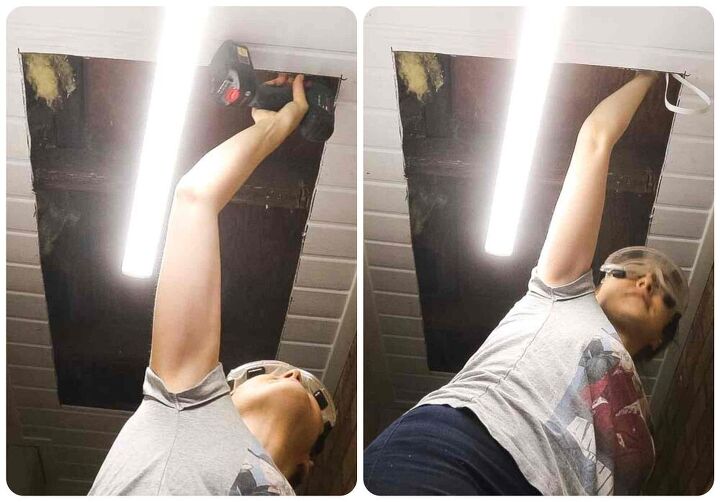
  5. I then drilled a hole in each corner and poked scrap plastic in each as a reference for where to cut from above.
  6. Then cut with the reciprocating saw again, but this time, from above and removed that section of roof.
  7. Next, I cut and screwed a structural frame around the loft kit insert, then removed the insert.
  8. We then took the loft hatch frame to where we'd cut and trimmed any protrusions before making even, resting above the fascia.
  9. Using packers, we screwed the frame to the roof beams with several 4 inch screws.
  10. Next, we took the loft insertm with the protruding hinges at the back, facing upwards and made flush with the fabric, then screwed to the frame.
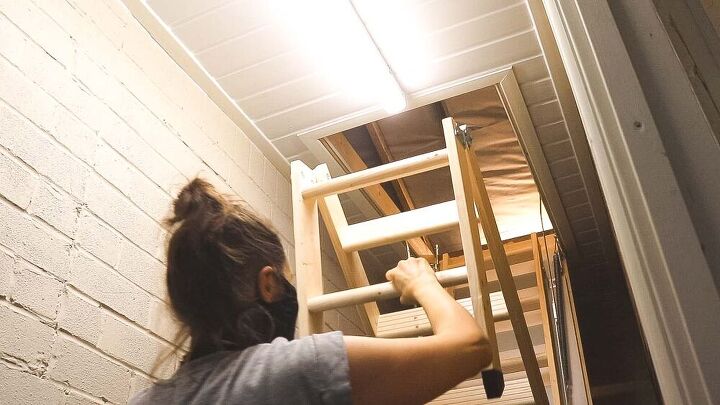
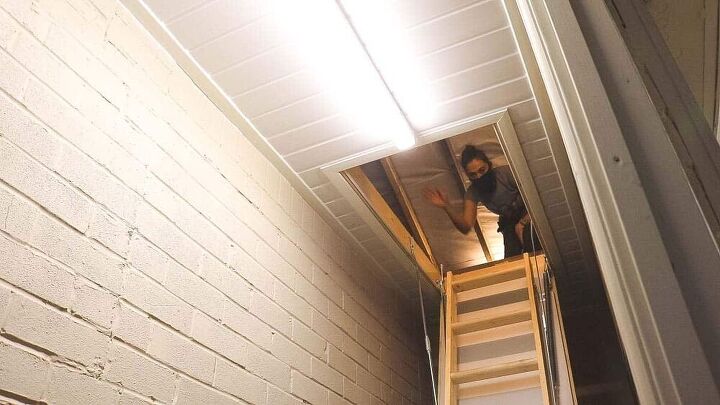
  11. Then hung the hatch door and fitted the ladders to the them as per the manufacturer's instructions.
  12. As the ladders were too long, we opened them out, while the folded area was aiming backwards and measured the distance from the floor to the fold and cut the bottom piece to the same length and screwed back.
  13. Finally, I cut some UPVC beading for trim with a mitre box and stuck them around the cut edges of the opening and rang along the outsides with silicone.
The Carpenter's Daughter
Want more details about this and other DIY projects? Check out my blog post!
Go
Frequently asked questions
Have a question about this project?
Comments
Join the conversation
 1 comment
Next