


How to Remove Popcorn Ceilings Without Breaking the Bank or Your Back


See post: Sarah’s Big Idea|How to Remove Popcorn Ceiling (and Then Fix the Damage You Caused)
How to Remove Popcorn Ceilings
“Popcorn ceiling” refers to a texture that is sprayed on drywall and plaster ceilings. This was a very popular ceiling finish that started in the 1960s and is still common in many homes. Look up and you are likely to see some kind of texture in the drywall of your ceiling.
Back in the day, a popcorn ceiling was considered a great way to add visual and textural interest to the overhead space in a home. Popcorn ceilings don’t require any additional painting after they are applied, making it an easy choice for contractors. It is most commonly found in bedrooms and hallways of residential homes.
Over time, popcorn ceilings were found to be incredibly difficult to keep clean and dust free. Since the mid- 2000’s, popularity for textured popcorn ceilings has diminished significantly across North America.
A trend towards modern, clean-lined design features has influenced many homeowners to seek alternatives to popcorn ceilings and look for ways to remove this outdated ceiling finish.
A smooth finish on ceilings is more favorable these days for its benefits over a textured finish because it won’t harbor dust or allergens. A smooth ceiling will reflect the light better, brightening the home, and help give the space a lighter and more open ambiance.
DIY Popcorn Ceiling Removal
Ceilings are just as important as walls and floors, and are often an overlooked design feature. Ceilings should invite the eye up and give the perception of more height. High, well-maintained ceilings allow a space to feel bigger and brighter- two elements that can increase overall home value.
Repairing and patching drywall on a smooth ceiling is also much easier than on a textured one. There are many companies that offer popcorn ceiling removal but the cost can be quite pricey.
Costs to remove popcorn ceilings in a home can be thousands of dollars and will take weeks for a professional to do. Depending on the condition of the ceiling there may be additional costs for repairs, priming, and painting. Despite the cost, removing popcorn ceilings can increase the value of your home.
It is possible to learn how to remove popcorn ceilings in your home yourself, saving you a ton of money over hiring a professional.
Two questions must be answered before you begin removing popcorn ceilings:
- Is there asbestos in your ceiling?
- Are your popcorn ceilings painted?
Do all popcorn ceilings have asbestos in them?
Houses built after 1980 most likely do not have asbestos in them. Inhaled in large quantities, asbestos fibers can cause lung disease, scarring of the lungs, and lung cancer. However, not all popcorn ceilings contain asbestos. According to the EPA, the use of asbestos in textured ceiling paint was banned in 1977. After the ban, popcorn ceiling materials were created using a paper-based or Styrofoam product to create the texture, rather than asbestos.
Is it legal to remove popcorn ceilings yourself?
It is not illegal to remove a popcorn ceiling yourself as long as there is no asbestos in it, there are possible health risks in doing so, and it is a dirty and difficult job. It is illegal to paint over a ceiling containing asbestos because the act of spraying or rolling paint can disturb the asbestos and contaminate the entire room.
How do you know if there is asbestos in the popcorn ceiling?
To test ceiling texture applied before 1980 for asbestos, use a putty knife to scrape a small amount into a sealable plastic bag. If you’re concerned about the possible health risks involved in taking the sample, a testing service can be hired to come out and take it for you.
Send the sample to an approved testing service to see if it contains asbestos. To find a testing service in your area, contact the state environmental or health office. A directory of state offices can be found on the EPA website.
If the material is found to contain over 1% asbestos then by law you can not remove it yourself and will need to contact a professional asbestos removal company or leave the ceiling as is. Even if it doesn’t contain asbestos, it’s important to wear an appropriate dust mask or respirator when removing the popcorn ceiling.
What should you do if the popcorn ceilings are painted?
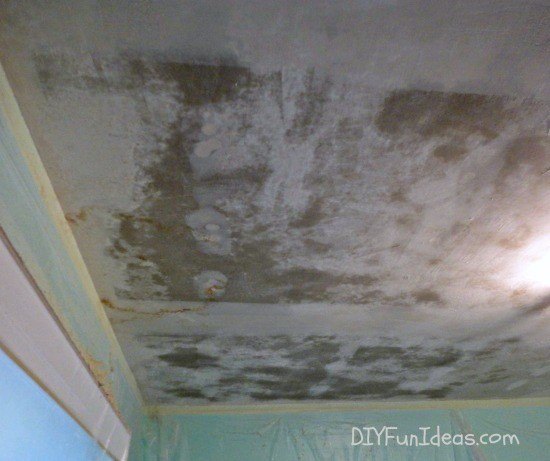
Another potential problem that can make removing a popcorn ceiling much more difficult is if the paint has been applied over the texture. This prevents the texture from absorbing water, which is necessary to loosen the material. While a painted textured ceiling can be removed, it usually requires the application of a chemical stripper to breakdown the paint barrier.
If it is unclear if your popcorn ceilings are painted, combine a few drops of liquid dishwashing soap with warm water in a hand sprayer. Lightly spray a small spot in an inconspicuous location and wait a few minutes for it to absorb the water. If the water will not soak in, the ceiling has been painted. Otherwise, the texture should come off easily.
Supplies Needed to Remove Popcorn Ceilings:
- Plastic sheeting
- Painter's tape
- Rags
- Putty knife
- Pump up sprayer
- Liquid dishwashing soap
- 6" or wider floor scraper
- Drywall joint compound
- Dust mask or respirator
- Eye protection
Prep the Room for Popcorn Ceiling Removal
Prepping the room before you remove popcorn ceilings is a crucial step that you don’t want to skip. By removing furniture from the room and putting up plastic sheeting around the walls and floors you will save yourself from having to clean up a huge mess later.
Steps for Room Preparation Before Removing Popcorn Ceilings:
- Remove all furniture from the room.
- Turn off the heating or cooling system and close any vents. Ceiling vents should be removed and covered with plastic.
- Turn off the power to the room an remove any ceiling lights or paddle fans.
- Cover wall outlets and switches with plastic, sealing them with painter's tape.
- Cover the floor with plastic, extending it a foot up the wall and attaching it with painters tape.
Prep Yourself for Popcorn Ceiling Removal
Make sure that you are wearing a mask and safety glasses to protect yourself from dust and flaking popcorn. You will also need a ladder and work shoes or boots that provide you with plenty of support. Remember to wear old clothing that you don’t mind getting dirty or dusty.
How to Remove a Popcorn Ceiling
See post: Amber Foster|How to Remove Popcorn Ceilings
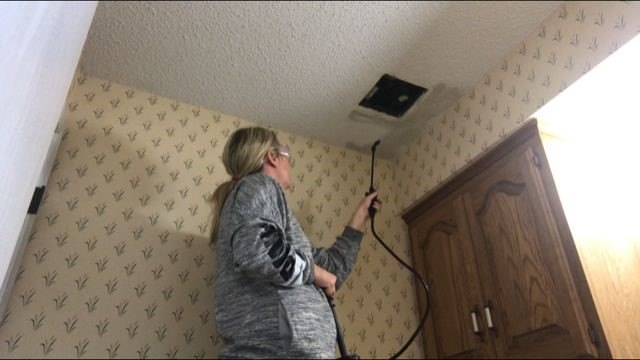
Wet the ceiling with a pump sprayer. For easier scraping and practically no dust during popcorn ceiling removal, use a garden pump sprayer to mist the ceiling and let it soak in for about 15 minutes before scraping. Only give it a light misting—too much water could damage the drywall or loosen the joint taping.
Scrape the Popcorn Off
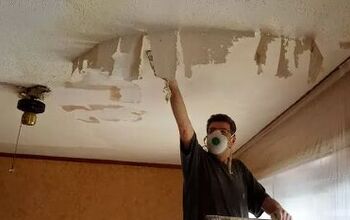
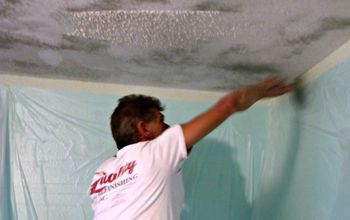
Wait 10 to 15 minutes for the water to soak in and then start scraping off the popcorn using a ceiling texture scraper. Use a smaller putty knife to scrape the corners and crown molding.
You can also use a floor scraper, or another wide bladed tool, to gently scrape away the popcorn texture. Be careful not to gouge the drywall or tear the drywall joint tape. If the texture proves difficult to remove, spray it again, wait a few minutes, and try again. Work in small sections so that the ceiling areas that you sprayed down don’t dry before you get to them.
Prime and Paint the Ceiling
After the popcorn is gone, it’s time to finish your ceiling with primer and paint. But before you can paint, you may need to do a little prep.
After removing the popcorn, the ceiling should be sanded and bad seams and the dings need to be "topped off" After topping off and sanding, it is wise to prime the ceiling before painting.
See post: DIY Fun Ideas|How to Remove Popcorn Ceilings in 30 Minutes
Follow These Steps to Prep the Smooth Ceiling Before Painting
- Hammer any visible nails or screws below the surface and cover them with joint compound.
- Replace any damaged drywall tape and smooth out the joints with joint compound.
- Once the repair work has dried, sand the ceiling with a long-handled mesh sanding pad. Sand only to remove the high spots, as too much sanding will damage the ceiling.
- Prime and paint the ceiling.
With the right tools, a little prep work, and the correct method, you can remove popcorn ceilings yourself. There is no need to spend thousands of dollars hiring a professional to do the job. By removing the popcorn ceilings in your house yourself you can increase the value of your home and enjoy a fresh, modern look.
Have you removed popcorn ceilings before? Let us know your best tips and tricks in the comments!
Written for the Hometalk community by: Adrienne Carrie Hubbard | Crafty Little Gnome
Comments
Join the conversation
-
I will have to hire this work to be done, but your information gave me lots of insight into the project. Thank you.
-
A drywall pro saved me a lot of money by simply plastering over my popcorn ceiling. It gave it a smooth finish without the mess of removal.


Frequently asked questions
Have a question about this project?