


Changing a Mixer Tap (Narrowboat or House)
This changing a mixer tap is a guide to help you, whether you're in a narrowboat bathroom or kitchen in the house. It's useful if you have a leaking tap and can't, (or don't want) to fix it. If you're fixing a mixer tap from scratch, then you might prefer reading my pull out mono mixer tap guide here.
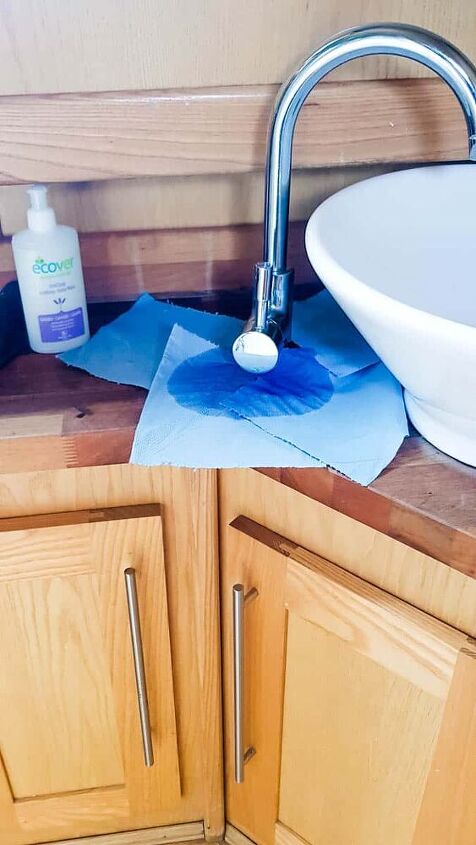
While buying a 57ft narrowboat last month, one of the issues on the boat survey that came up, was this leaky tap.
So, I'm going to show you how to replace it last weekend and the issues I faced. But, I'll also talk about why I didn't just fix it.
You also might be wondering about the tap itself. Yes, this is definitely in the bathroom, (AKA, "The Head"). However, technically, it's a kitchen tap, due to the large vessel sink.
Should I Try to Fix a Dripping Tap?
I've been informed that, the most common place for a tap to leak, is the handle itself. And because I've only ever fitted a brand new tap to fresh Speedfit plumbing, that's what I was going to for ease.
However, I was curious how to fix a leaking tap, so turned to YouTube. Then I soon discovered many taps like these have a little allen key slot to unscrew the handle.
And you might need to replace the cartridge or o ring seal inside. I've even seen people soak the cartridge in limescale remover to fix. But, with mine, I found ours in the handle it had seized up.
Plumber Tips Passed On
Note that one of our narrowboat neighbours on the marina said, don't bother trying to fix if:
- You don't know the brand of the tap
- The model
- Size cartridge or seal you need
- You night fix it for a few days and it's not worth the hassle
- And don't buy a cheap replacement tap, in case it's not British standard*
*I didn't stick to this rule, hence why I faced complications on this job.
Turning Off the Water
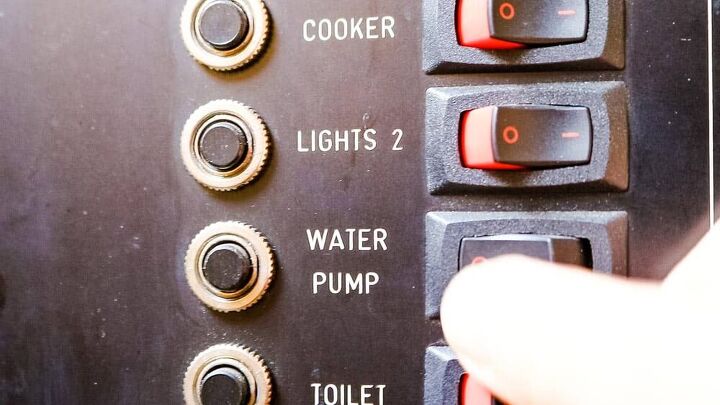
Before I even started getting stuck in in the cupboard, I turned the water off.
Now, normally, you'd turn it off at an isolation tap nearby. However, our narrowboat didn't have any, meaning I had to switch it off at the boat's water pump.
This wasn't ideal, because this stops the water flowing ANYWHERE, such as the kitchen, toilet or shower. So, during the job, I thought I may as well add some while I'm here. Although, other peoples' train of thought is it's not that important.
Getting Prepared to Disconnect the Tap
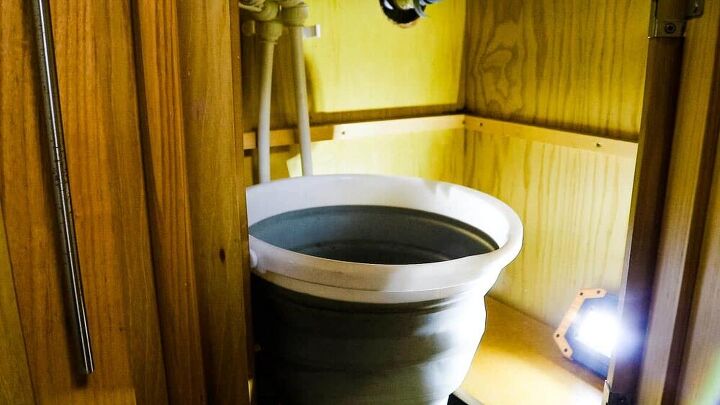
Before you even start dismantling the plumbing, you'll need to empty the cupboard underneath and remove any obstacles or precious items.
Also have a bucket ready, along with plenty of rags and/or towels as it's not dry work. Other times, I've used food trays for shallow spaces, or simply a washing up bowl.
And, get yourself a torch! Especially if you're working in a narrowboat. I use a USB charging one, which I love.
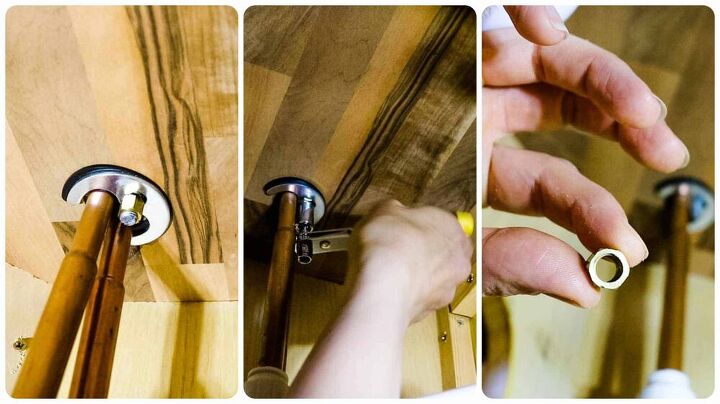
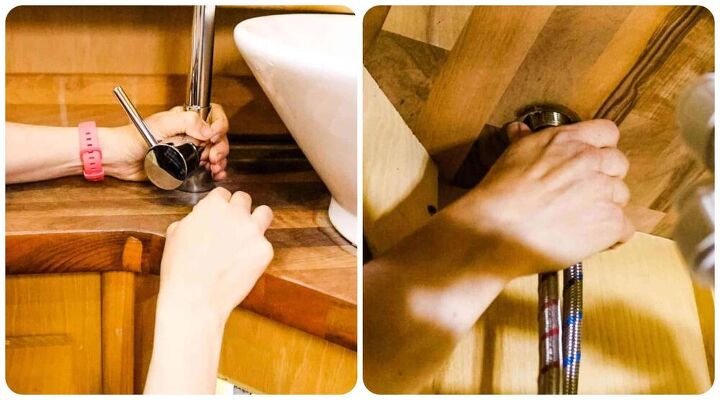
Unscrewing the Tap's Mount
Taps can vary regarding how they're clamped to your counter top.
Above, the old one had a bolt fixed to the tap, which I needed to unscrew the nut, threaded through a rubber and metal washer. Apparently, this is British standard.
However, yours might be like our new one, which has a large screw barrel, screwed to the tap, and clamped with a large hex shaped nut. To unscrew, I recommend some water pliers.

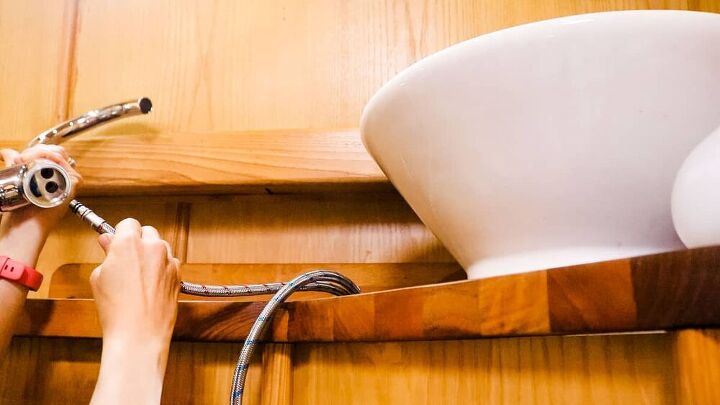
Disconnecting Copper Hose Tails From Speedfit
Something I'd never seen before, were these copper hose tails. If you don't have these, you may need to unscrew flexi hose tails from some isolation valves, or even disconnect Speedfit hose tails.
But, for reference, here's how to disconnect pipes from Speedfit in general:
- Unscrew the compression screw-bit of an elbow, T or coupler join
- Pull the collar bit in
- While pulling the join away from the pipe
Note, sometimes they can be a bit tight if there's pressure in the pipes. If so, try unscrewing more before pulling apart, or perhaps a squirt of silicone spray might help.
Tip
If you preferred, you could instead buy flexi tails already with isolation valves integrated.
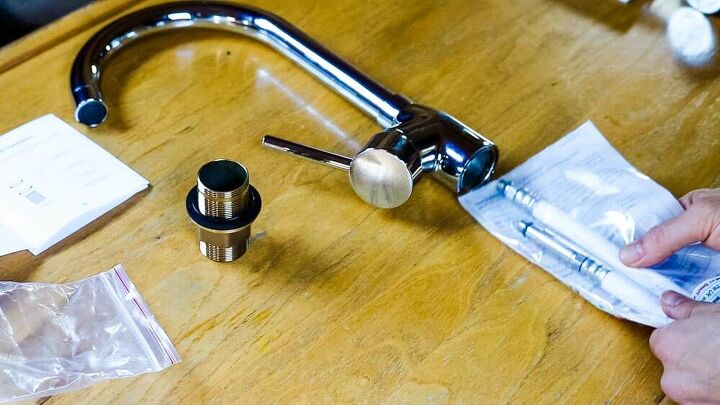
Familiarise Yourself With Your Tap
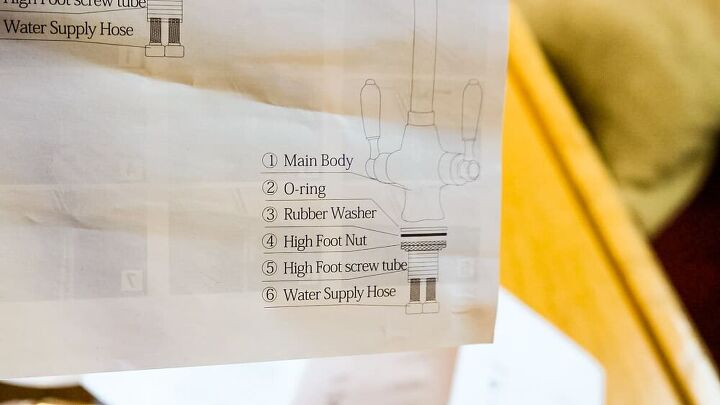
Firstly, I like to get all the parts out and read the instructions and diagram, because all taps vary. Especially, when it comes to the washers and fittings.
BUT, a word of warning I'm passing on, is:
If you buy a cheap tap online, the Speedfit hose tails might screw in, but, in my case, the tap's base wasn't wide enough to them screw the fitting barrel on. AKA, high foot screw tube.
Whenever I need to buy a tap in the future, I'll be going into a store instead, to check as I had to bypass Speedfit entirely and use the existing tap tails.
The Order of the Tap Tails
I'm going to skip past my trial and errors, because it had been 2 years since I'd done any plumbing!
The method to fit you tap is:
- Slot the barrel screw with nut over the top of the tails,
- While it dangles, they won't fall off
- Slot the tails through the worktop from underneath, so you can work from above in the next paragraph.
- Make sure you have your washers on too, according to your instructions
Screw in the Tap Tails
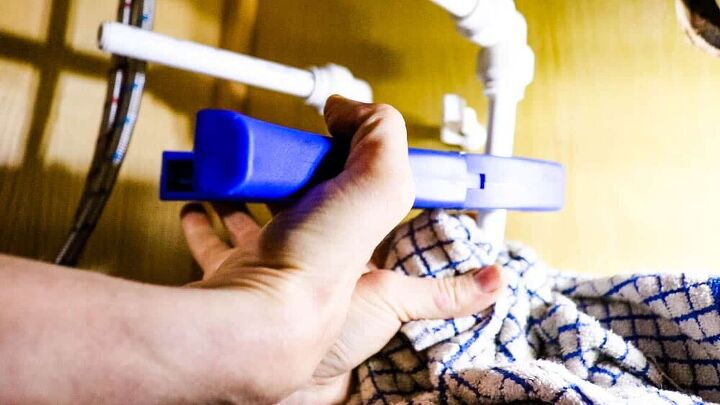
Whether you have Speedfit, normal, or copper tap tails, they'll need to be screwed into the base of the tap.
Mine, below, had red lines for the hot one, and blue for the cold, so it was very easy working out which side was which. That is, providing your plumbing is in a logical order.
Note, some instructions just state to hand tighten, some say use water pliers. However, I'd be cautious about tightening too much and doing any damage.
Positioning The Tap
I then ensured my o-ring washer was between the tap and worktop.
Then, as I'm fitting a new mixer tap, I positioned the handle where I wanted it, while only hand tightening the nut from underneath.
There's no point in doing your final tight nipping up in case you need to disconnect everything again.
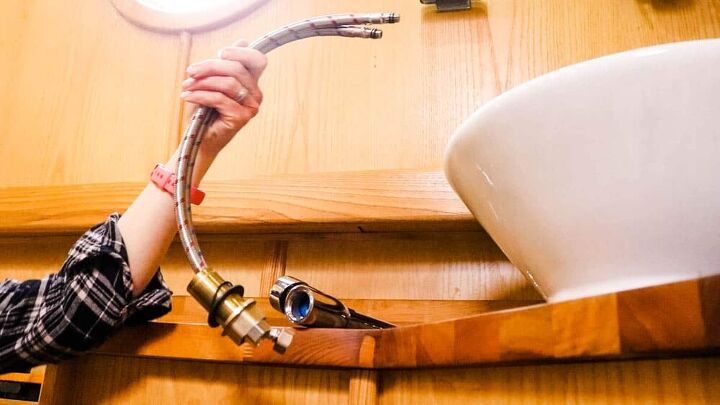
Attaching Flexible Tap Connector With Isolating Valve
If you're like me, and you're forced to only use the existing flexi tap tails and connect to brass isolation valves, then the next few steps are for you.
But, if Speedfit is your bag, then I urge you to send the tap back and buy one from a physical shop where you know plastic plumbing hose tails fit.
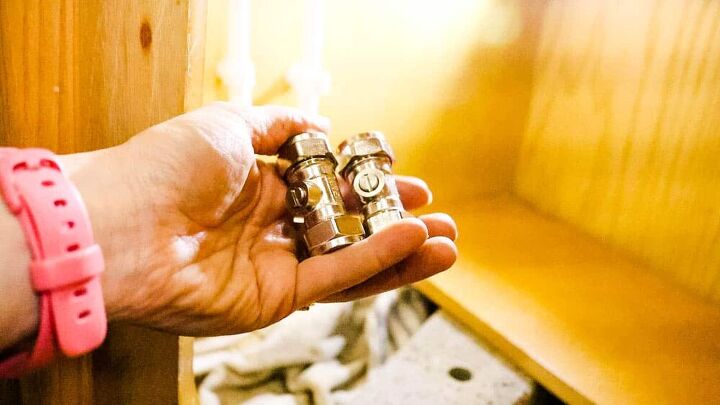
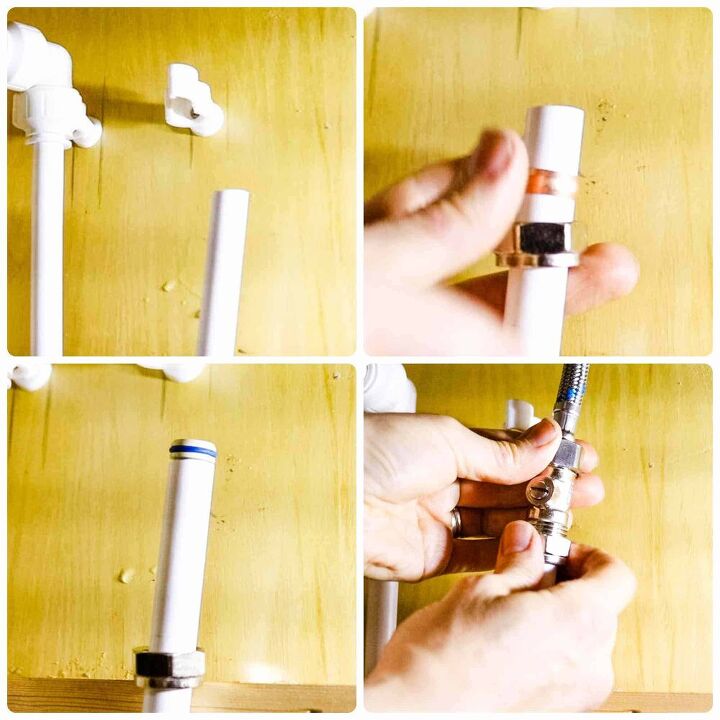
Note, as I was dealing with 15mm pipes, I bought a 2 pack of 15mm compression isolation valves. Let me talk you through them!
Speedfit Isolation Taps
If you find Speedfit hose tails work a treat in your tap while still able to mount to the worktop, then you can follow me fitting Speedfit isolation taps here instead.
Things To Know With Brass Isolating Valves
As I've only ever slotted some copper pipe into existing isolating taps, I learnt something new. And that was:
- There's an arrow on the side, which states which way the water should flow through (so, I'll be pointing the arrow towards the tap)
- You'll find a slot at the side, to turn the water off and on
- If you see straight through it, it clearly means the tap is open and water will flow through
- I turn mine off with a flat heasd screwdriver or knife into a closed position, to which you'll see a ball valve appear - I left it like this to continue working with
- Also, both compression screw ends come with an olive inside, which we'll need one for the Speedfit side, but NOT one for the hose tail end
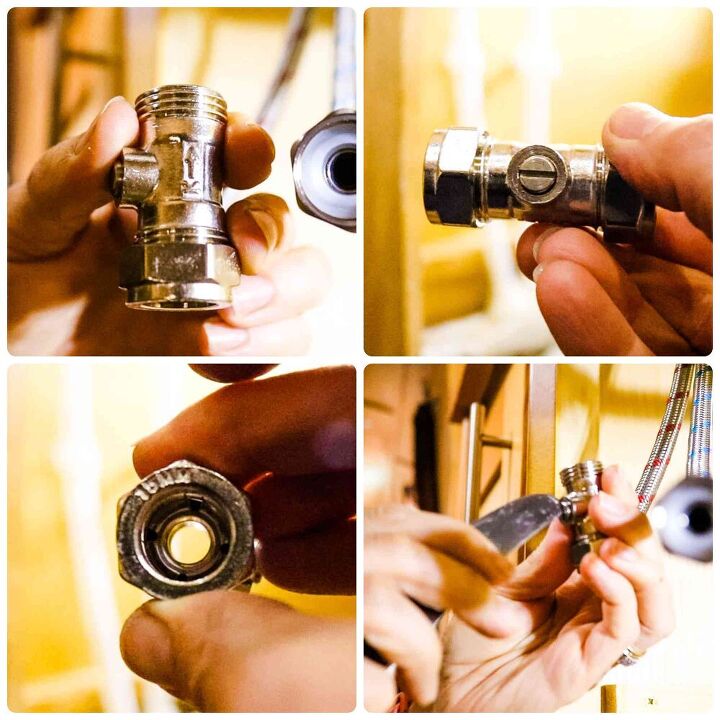
Hand Screw An Isolation Tap To Each Flexi Tail
Now you're familiar with isolation taps, it's time to screw one on each of the bottom of the tap tails.
Remember to:
- Ditch the olive
- Position the arrow in the direction of which way the water will flow
- Hand screw for now, in case you get your hot and cold water mixed up
Decide Where To Cut Your Speedfit
Next, I positioned one of the flexi tails along side the Speedfit pipe, but raised it above by about 3 inches, to allow room for slotting together. Also, there was a bit of studding in the way.
Then make a clean cut with some plastic plumbing pipe cutters.
Can You Cut Plastic Pipe With a Hacksaw?
Yes, if you must. But, you'll need to sand it smooth to remove any burrs, which may damage the rubber seals on the Speedfit inserts.
Also, don't be tempted to mix and match with other plastic plumbing brands in case they fail. I personally don't think having a plumbing leak on a narrowboat or house, is ever worse the stress!
Fitting Brass Isolation Valves to Speedfit
After making a clean cut with plastic pipe cutters, there's no need to sand it.
Simply:
- Slot over the compression screw end
- Then the olive
- Push in a Speedfit insert (do not skip this, unless you're connecting Speedfit fittings to copper pipe)
- Hand screw together
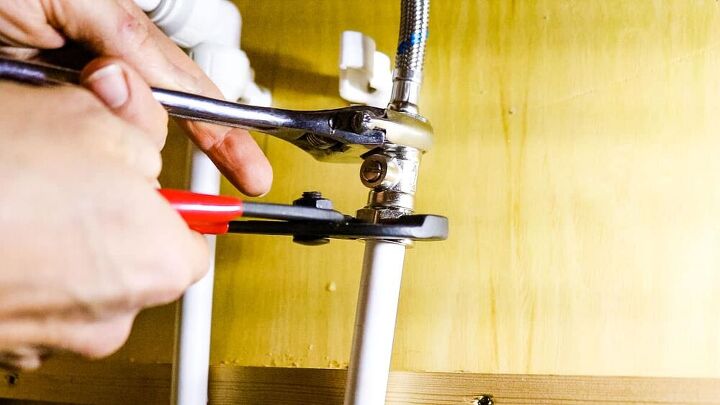
Screwing Tight With Water Pliers
After hand tightening the isolation between a flexi hose tail and Speedfit pipe, I then used a spanner and water pliers to tighten properly. I tightening until I got resistance, then one final turn.
With there being an olive inside, it can do damage to copper, or Speedfit, so I didn't over tighten just incase.
Instead, I dried everything, then left until over night and check to see if it was wet. If so, just nip it up again and monitor later.
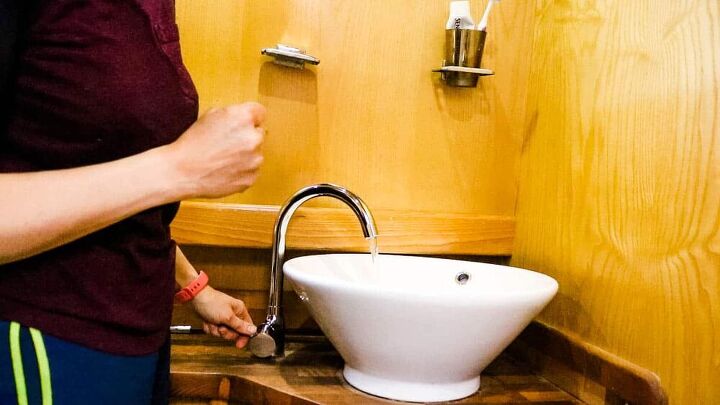
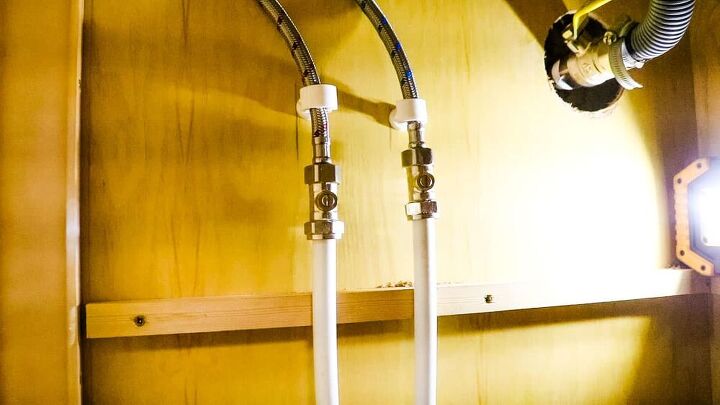
Turn the Water Back On
Finally, it was time to turn the water back on.
So, with this being on a narrowboat, I had to switch it on by the water pump on the switch board. But now, I also have my isolation taps to turn on with a knife.
Now, check to see if the hot and cold water is plumbed up correctly. Note, hot water should be on the left, cold on the right!
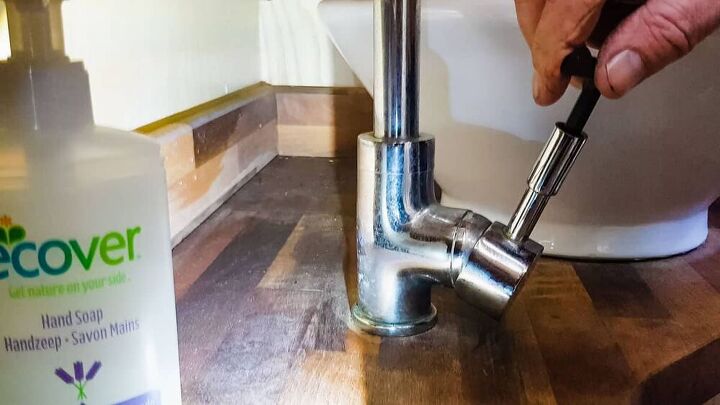
Tighten the Final Nut
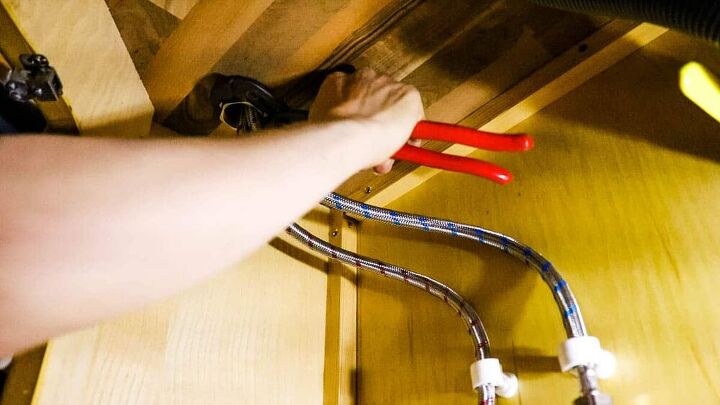
Once everything was in good order, I kept the tap still from above with one hand, while tightening the large hex nut with pliers underneath.
I also trapped the hose tails in the clips to keep them from ever getting knocked.
And here's how it looked in the end and on to next plumbing job!
Changing a Mixer Tap Tutorial
Prep Time
20 minutes
Active Time
30 minutes
Total Time
50 minutes
Materials
- Mixer tap
- Plastic pipe cutters
- Speedfit pipe inserts
Tools
- Water pliers
- Spanner
Instructions
- Turn the water off
- Unscrew the tap mount screw
- Place a bucket under the plumbing and rags/towels
- Disconnect the plumbing (see notes above for tips)
- Thread the new hose tails through the tap's large mount washer and nut
- Poke it through the worktop
- Hand screw the hose tails into the new tap
- Hand tighten.
- Screw on an isolation valve to the bottom of the flexi tails by hand, with the arrow facing the same direction of which way the water will flow
- Line up the flexi tail next to the speedfit, to see where you need to cut the plastic pipe with pipe cutters
- Slot over an isolation valve compression end over the pipe, followed by an olive
- Push in a Speedfit insert into the plastic pipe
- Push everything together and hand screw tight
- Use water pliers and a spanner to screw until you get resistance, then screw one final turn
- Repeat for the 2nd tap, making sure you line up the hot and cold pipes to the right one
- Wipe everything dry,
- Turn the isolation tap on, then the narrowboat's water pump back on if needed, and test the tap
- If you find leaks the next day, tighten a little bit more and check again.
You Might Also Like


Frequently asked questions
Have a question about this project?