


How to Fix a Cracked or Chipped Windshield

By Stacey Kelleher
While vehicle windshields are incredibly durable and designed to withstand significant wear and tear, they are not entirely impenetrable. Airborne objects, extreme temperatures, and even poor installation can cause windshields to crack and split.
And the sooner you repair minor windshield damage, the better. Windshield damage is more than just a nuisance. Tiny cracks can quickly become big cracks, affecting your visibility while driving and compromising the windshield’s structural integrity—especially in an accident.
In this guide, we’ll cover different types of windshield damage, how to repair cracks and chips, and the signs you may need to call a professional to replace your windshield entirely.
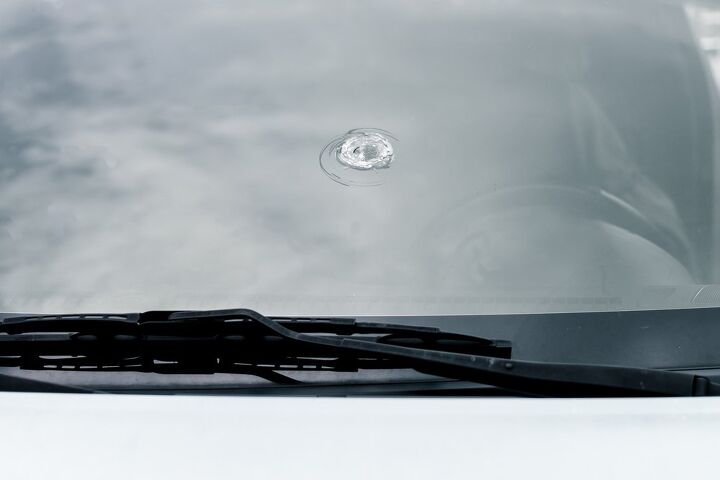
Photo via Shutterstock
How Windshields Crack
Windshield damage has a few different causes. Flying objects are probably the most common culprit for windshield cracks. Tiny pebbles, loose gravel from the road, and debris falling off other vehicles can all damage glass. That’s no surprise to any driver who has even been startled by the sound of something hitting their windshield as they're cruising down the highway.
Environmental conditions can also impact the integrity of your windshield. Significant changes in temperature and heat created by direct sunlight can cause cracking. Although rare in many parts of the country, hail storms can do a lot of damage to property—including your vehicle.
Why It’s Important To Fix Windshield Cracks Quickly
If your cracked windshield doesn’t interfere with your ability to see while driving, it’s tempting to push repairs to the end of your to-do list. But you should fix windshield damage quickly for a few reasons:
Small Chips Can Turn Into Large Cracks
If left untreated, minor chips can expand into larger, more noticeable cracks over time. That means more time, effort, and money to repair. And if they become too big, you are more likely to need an entire windshield replacement.
Weather Can Make Windshield Damage Worse
Modern auto windshields contain two outer layers of glass that sandwich an inner layer of protective vinyl. That vinyl helps stabilize the glass and prevents debris from entering the interior of the car. This triage of materials makes up what is called laminated glass.
Once that outer layer is pierced by an object, moisture can get in, which creates a fog that makes it hard to see through. And if the weather is cold enough, the moisture can freeze and cause further cracking.
Accident Danger
All auto glass contributes to the overall structural integrity of the vehicle. The windshield, in particular, serves so many important safety functions.
A windshield helps the equilibrium of a car during a crash. Modern windshields are designed to transfer the force of a front-end collision down through the framework of the vehicle, lessening the force of impact on passengers. Windshields also support the roof and help prevent it from caving in if the car happens to roll over.
In a frontal crash, a damaged windshield is more likely to shatter and can even interfere with the airbags, increasing the risk of harm to front-seat passengers.
You Can Get a Ticket
As if the above reasons weren’t enough to fix the crack in your windshield, many states have laws that require drivers to repair or replace cracked windshields. If you get pulled over for any reason, you can be cited for cracks or chips, especially if the officer feels that the damage obstructs your view of the road. Taking the time to make repairs now can save you a costly traffic ticket in the future.
Types of Windshield Damage
Not all windshield cracks are alike. Here are the different types of damage you may notice on your windshield:
Pits and Gouges
Pits and gouges develop when debris makes contact with the glass, creating minor divots in the surface. While they are usually not very noticeable and don’t generally obstruct the driver’s view, they can worsen over time.
Cracks
Cracks in your windshield are more concerning. Cracks form a distinct line and generally run horizontally across the glass. They may all look similar, but there are actually a few different types of windshield cracks:
- Edge cracks form along the outer edges of the windshield and expand inward toward the center of the glass.
- Floater cracks generally form a few inches from the edge of the windshield and are more likely to worsen in extreme heat and cold.
- Stress cracks are not usually caused by a single impact to the glass. They usually develop over time as a result of repeated exposure to extreme temperatures or multiple impacts.
Chips from Debris
Most windshield damage is caused by a single event—a rock, stone, bolt, screw, or virtually any hard airborne object hitting the glass. These cracks can resemble spider webs with a single, central impact point and smaller cracks extending out from the center like a spider web.
Some impact points are surrounded by concentric rings referred to as bullseye chips. Star cracks are also common, which have a single impact point with cracks extending out in the shape of a star. These chips all tend to be the easiest to repair.
How Do You Fix a Cracked Windshield?
Yes, a windshield crack is a frustrating inconvenience. But the good news is that repairs can be quick and easy.
While some household products including super glue and clear nail polish are often touted as good DIY options to repair cracked windshields, they are not the best way to fix a cracked windshield. You want the best solutions that won’t compromise the safety and value of your windshield.
Instead, we recommend using a commercial glue or resin filler specifically designed to minimize the appearance of chips and cracks and stop them from spreading. You can find a variety of products online for as little as $10 and tackle your windshield repair in under a 30 minutes!
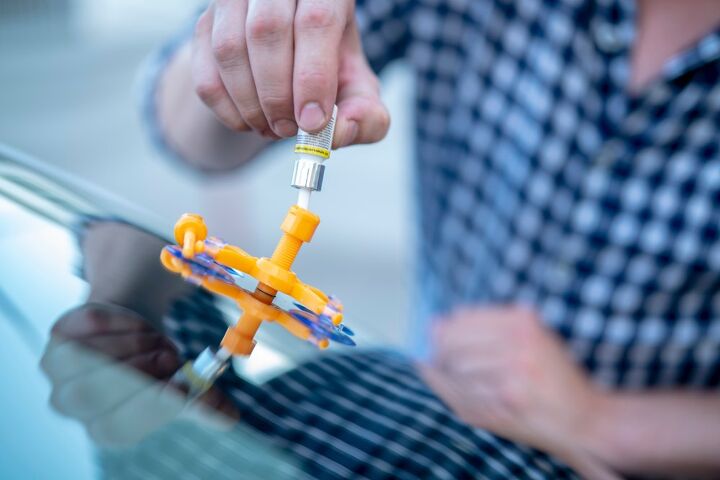
Photo via Shutterstock
How to Fix Windshield Chips With Filler
Follow these steps to repair minor cracks and chips and have your windshield looking as good as new. For best results, work in a shaded area out of direct sunlight until your repairs are complete.
Keep in mind, we’ve provided the following directions based on the windshield repair kit that we’ve chosen for the tools and materials list. Specific instructions may vary slightly with other repair kits. Always follow the instructions for the product at hand.
Tools and Materials Needed:
- Clean, dry microfiber cloth
- Glass cleaner spray
- Pin or thumbtack
- Windshield repair kit
Step 1: Clean the Glass
Spray glass cleaner onto a clean microfiber cleaning cloth and clean the windshield. Do not spray the chip or crack directly. Allow the area to dry before moving to the next step.
Step 2: Dislodge Loose Glass and Debris
Sometimes, small pebbles or pieces of gravel can become embedded in the windshield. Use a pin to carefully pick out any debris or loose glass.
Step 3: Scape Off Remaining Glass Fragments With a Razor
Most kits include a razor for this step. Use it to scrape away any remaining loose fragments of glass on the windshield’s surface.
Step 4: Attach the Applicator to the Windshield
Commercial windshield repair kits usually come with an applicator that has suction cups to stick to the windshield. In the center of the applicator is a center ring where you will insert the resin. Place that center ring directly over the chip you’re fixing.
The suction cups should not cover any cracks extending out from the center impact point. Luckily, the suction cup legs are usually extendable so you can adjust them accordingly.
Step 5: Tighten the Resin Chamber
Some resin repair kits have a resin chamber that must be screwed down until the bottom makes full but gentle contact with the glass. Just be sure it’s not putting excessive pressure on the windshield or it could affect the resin flow and, ultimately, your results.
Step 6: Squeeze Resin Into the Resin Chamber
Depending on the extent of the damage, squeeze three to six drops of resin into the resin chamber (see what your kit’s instructions say to be safe). If you notice any leaking at the bottom of the chamber, screw it down slightly to create a tighter seal.
Step 7: Screw Pressure Driver Into the Resin Chamber
Next, take the pressure chamber provided in the kit and screw it into the resin chamber to force the resin into the chip. Keep tightening until the pressure driver is entirely screwed in.
Step 8: Allow Resin to Flow Into All Areas of the Chip
Give the resin four to six minutes to fully flood into all areas of the break.
Step 9: Unscrew Pressure Chamber to Release Air Bubbles
Unscrew and remove the pressure chamber from the resin chamber. This allows any air bubbles to escape.
Step 10: Repeat Steps if Necessary
Check to see if all of the damaged areas have been filled. You’ll be able to tell by looking at the glass from a 45-degree angle. Repeat Steps 7-9 as needed until all areas of the chip are filled with resin.
Step 11: Remove Applicator
Once the desired results have been achieved, remove the apparatus by lifting up the suction cups.
Step 12: Make Touch-Ups If Needed
Fill any remaining areas of damage with resin using the tip applicator of the resin fluid and cover gently with a curing strip that comes in the kit.
Step 13: Move Vehicle Into Direct Sunlight to Cure
If you can, move your vehicle into an area that gets direct sun to cure the resin completely (it’ll take up to ten minutes).
Step 14: Remove Curing Strips
Once the resin is fully dry, remove the curing strips.
Step 15: Scrape Off Excess Resin
Holding the razor blade at a 90-degree angle to the glass, scrape off any excess resin. It should come off in small white flakes.
How to Fix Windshield Cracks With Filler
If you have cracks instead of chips, the process is just slightly different. For cracks, you won’t need to use the pressurized applicator and instead, you can apply resin directly to the damaged area.
From inside the vehicle, apply a bit of pressure to the center and both sides of the crack to push air out of the crack. Then, make your way back out of the car, reapply resin to the damaged areas, and cover with curing strips. Follow Steps 13-15 in the previous section—that’s it!

Photo via Shutterstock
When to Call a Professional
Knowing what type of damage you have will help you determine if you can repair your windshield, or have to replace the entire piece of glass. You must also factor in the damage’s location, size, and depth.
The National Windshield Repair Association (NWRA) offers very specific guidelines for repairable windshield damage based on the size and shape of the chip or crack. But as a simple rule of thumb, the NWRA considers stone breaks up to two inches in diameter and single-line cracks up to 14 inches repairable damage.
Here’s when to see an auto glass repair technician for help:
- If your windshield damage is larger than the above measurements
- Damage has penetrated into the middle layer of the windshield
- Cracks extend to the outer edges of the glass
- If any other windows outside of the windshield become chipped or cracked. Other vehicle windows are made with tempered glass, which is more vulnerable to breaks and shatters than laminated glass.
Many vehicle owners put off windshield repairs because they assume chips and cracks mean a brand new windshield. But that is not always the case! Budget-friendly repair kits may do the trick if the damage is minimal. Prompt repairs are important to keep the damage from getting worse and to keep you and your passengers safe.
Have you repaired a cracked windshield? Share your tips and tricks below!


Frequently asked questions
Have a question about this project?