13 Fall Crafts to Do Before You Pull Out Your Warm, Fuzzy Boots
Get ready to embrace the autumn season with these fun and creative fall crafts! From adorable candy scarecrows to stunning egg carton wreaths, leaf-stamped napkins to all-natural orange peel candles, these tutorials offer a wide range of fall-inspired decorations to add warmth and charm to your home.
Whether you're a crafting pro or just starting out, these step-by-step guides make it easy to create festive and budget-friendly DIY fall decor that will surely bring smiles to your family and guests. Let's get crafting and celebrate the beauty of fall with these DIY projects!
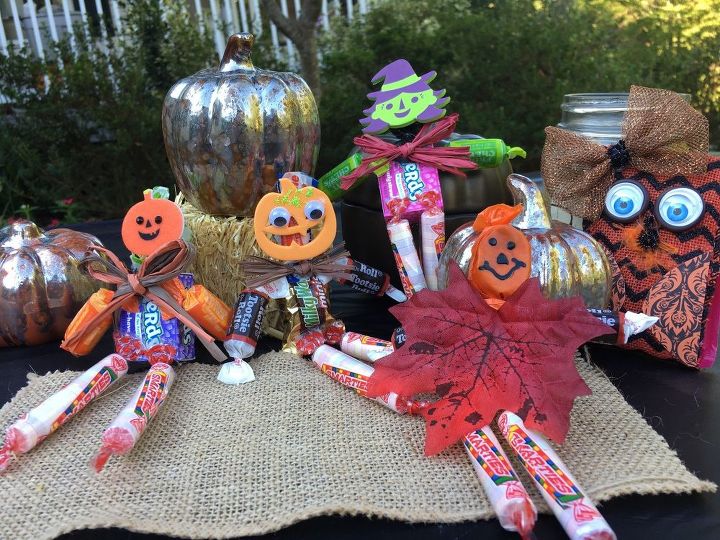
1. Harvest candy scarecrows
This project by Stacy involves making scarecrows using candies and other items from the Dollar Store. The idea originated from a magazine and became a yearly tradition for Stacy to create scarecrows for her kids' classes.
The Halloween scarecrows are made by assembling candy and raffia, and the maker recommends using a low-temp glue gun for easy assembly. Faces are added using Puffy paint and foam stickers, making these harvest candy scarecrows a fun and inexpensive fall treat to share. Get tutorial here
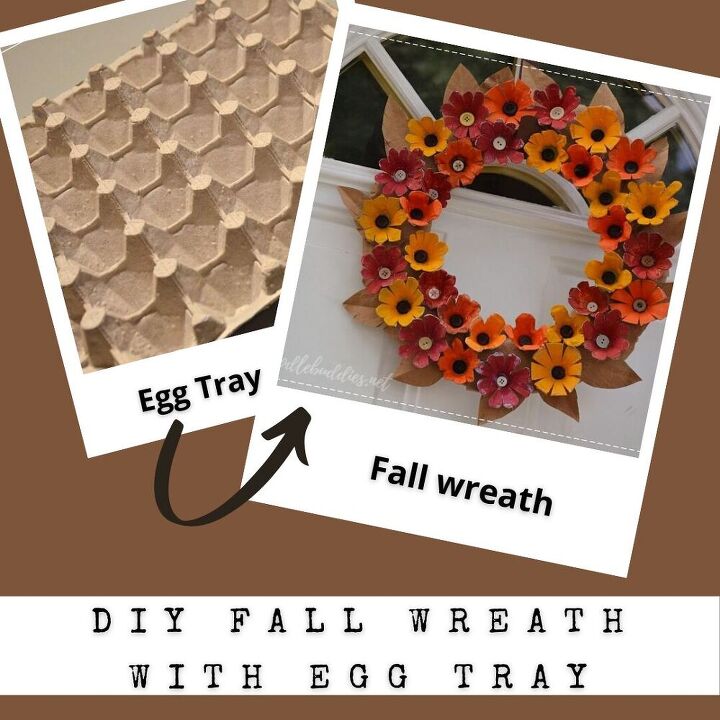
2. DIY egg carton wreath
Next, Naush shows us how to make a stunning fall wreath using mostly household materials. The base is prepared using double corrugated cardboard with brown paper bag strips and brown wrapping paper leaves.
Flower shapes are cut from an egg carton and painted with fall acrylic colors before being glued to the wreath. Buttons are added to the flower centers.
The finished wreath is a beautiful and recycled fall decoration that can be easily made in under an hour, making it a fun activity to involve kids in as well. Get tutorial here
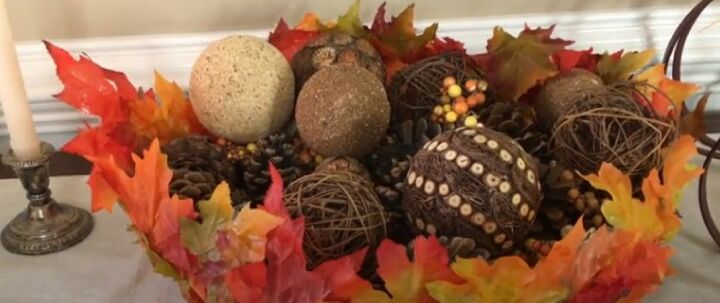
3. DIY balloon ball with faux fall leaves
Kara offers two DIY projects to upcycle materials from your house into beautiful and functional bowls. The first project involves creating a bowl using buttons and a balloon, while the second project uses faux fall leaves and a ball or balloon.
The step-by-step instructions guide you through the process of gluing the materials and creating unique bowls. This project encourages creativity; you can explore different materials for further variations in bowl-making projects. Get tutorial here
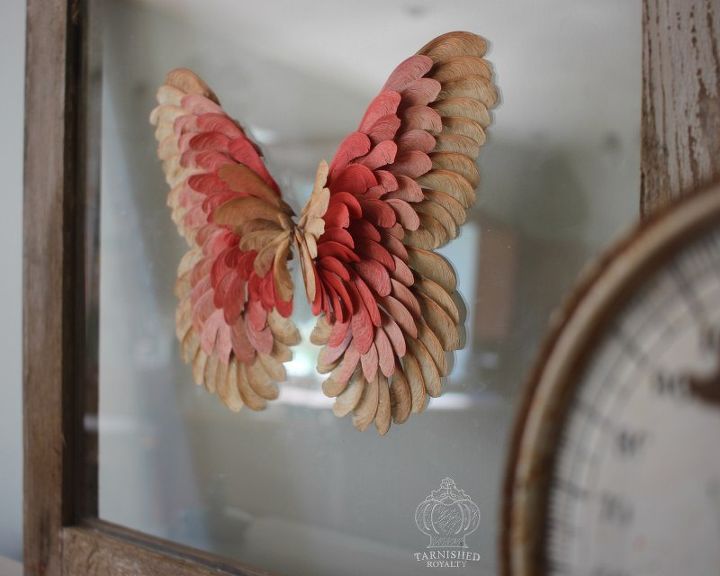
4. Maple seed butterfly art
This DIY project involves creating butterfly art using maple seeds (helicopters). The artist uses an old window, craft paints, and glue to create an ombre effect with the seeds.
The process includes drying and arranging the seeds to form the butterfly shape inside the window frame. The result is a unique and colorful piece of home decor. Get tutorial here
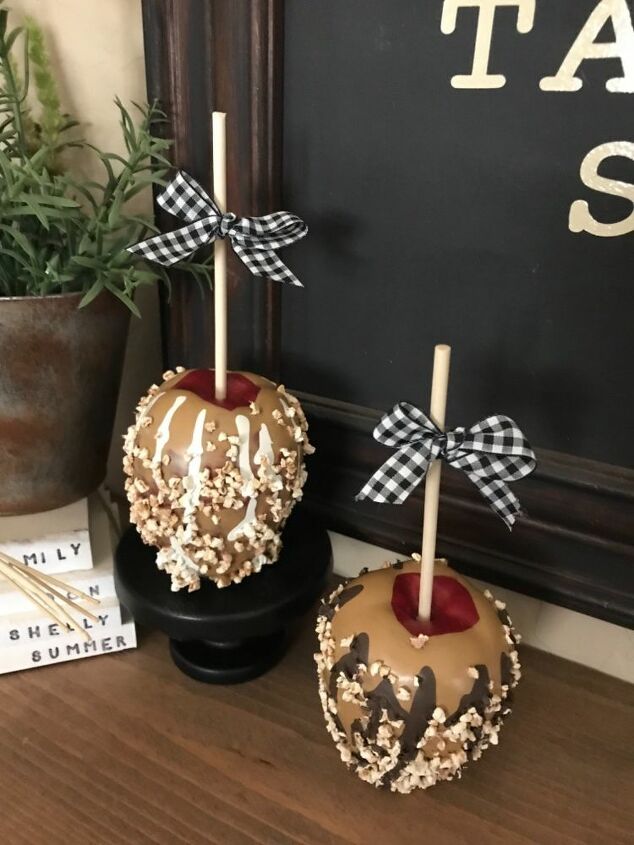
5. Artificial caramel apples
This project involves making fun and realistic-looking artificial caramel apples for fall decor. Fake apples are used from a craft store, and their stems are removed and replaced with wood dowels.
The apples are then dipped in a mixture of corn cob and caramel color paint to create a caramel coating, giving them a delicious appearance. Adding a bow completes the look, making them perfect decorations for the season.
Optional chocolate drizzle can be added using brown or white paint! Get tutorial here
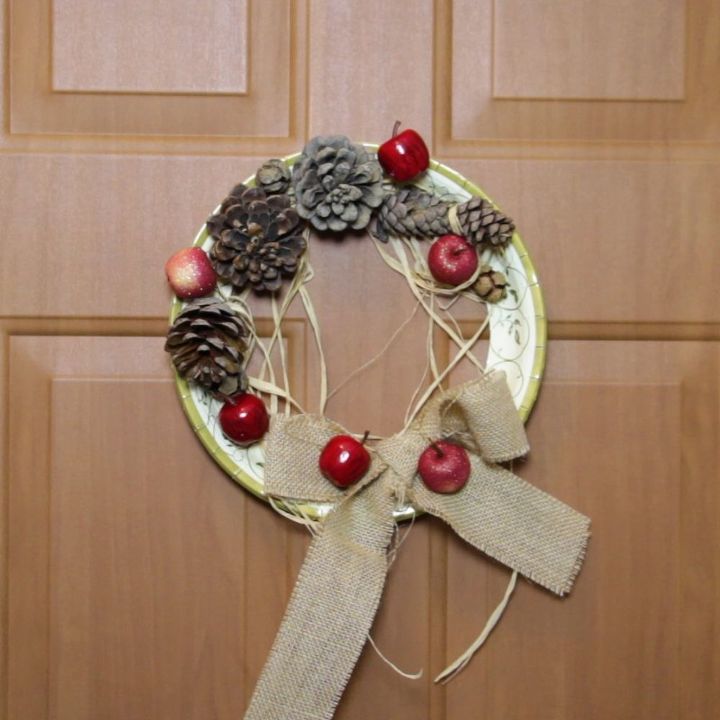
6. Paper plate fall wreath
This project y Shawna demonstrates an easy and inexpensive way to make a fall wreath using a paper plate as the base. The materials needed include craft glue, pine cones, burlap, raffia, faux apples, and scissors.
The center of the paper plate is cut out to create the wreath shape, and then various fall-themed decorations like pine cones and faux apples are glued onto the rim. A burlap bow is tied and added to the bottom of the wreath for an extra touch.
The finished wreath is lightweight and can be hung using double-sided mounting tape. It's a great fall decorating idea that anyone can try without needing advanced crafting tools or skills. Get tutorial here
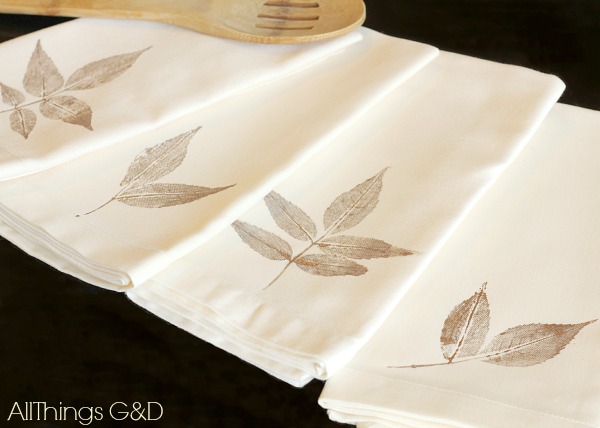
7. Leaf stamped napkins
This next project involves making leaf-stamped napkins to add a touch of nature to your fall dining table. The supplies needed are leaves, napkins, craft paint, a paintbrush, and a rolling pin.
By dotting craft paint on the back of a leaf and using a brush to apply the paint, you can carefully stamp the leaf onto the napkin. Rolling over the leaf with a rolling pin transfers the paint, creating a beautiful leaf design on the napkin.
This is a quick and cost-effective way to decorate your table with a seasonal touch. Get tutorial here
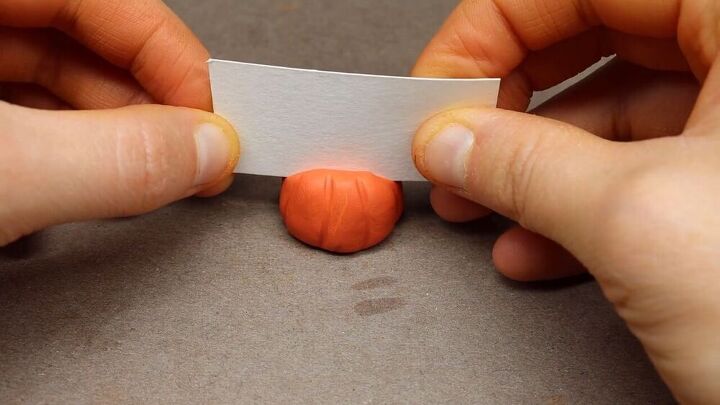
8. Fall pumpkin napkin ring
In this DIY tutorial, you can learn how to create a fall pumpkin napkin ring for your autumn table decor. Using a cardboard tube wrapped in tin foil, Sculpey clay in brown, green, and orange colors, and some basic sculpting tools, you can make adorable pumpkin-shaped napkin rings.
The process involves sculpting the pumpkin vine, adding detail, making the pumpkin, and baking the clay. Once cooled, the tin foil is removed, leaving you with charming pumpkin napkin rings perfect for Thanksgiving or any fall gathering. Get tutorial here
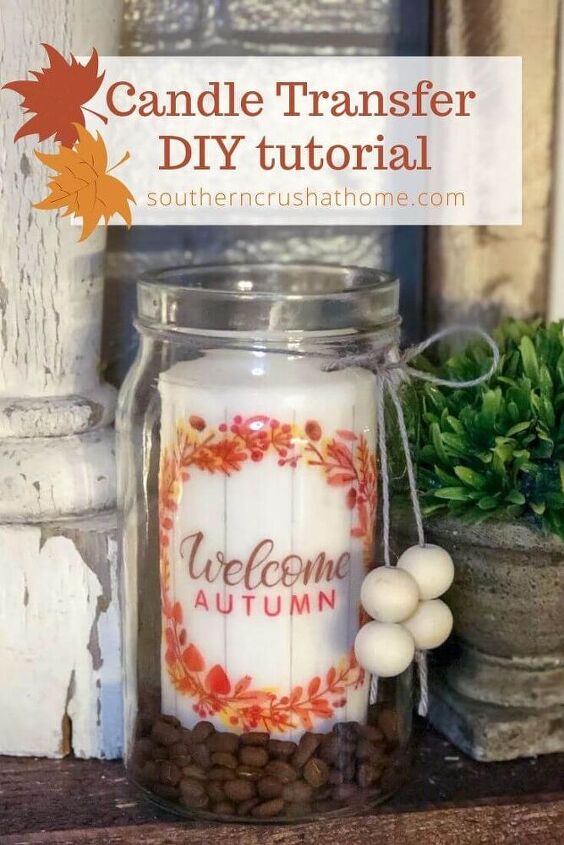
9. DIY candles transfers
Next, Melanie shows us how to transfer images from paper napkins or photos onto plain wax candles. Using an iron or other heating tools, the image is adhered to the candle's surface.
It's a quick and addicting process, and you can use various designs and photos to create personalized candles. The finished candles can be placed in glass jars with added decorations like twine and coffee beans for a charming look. Get tutorial here
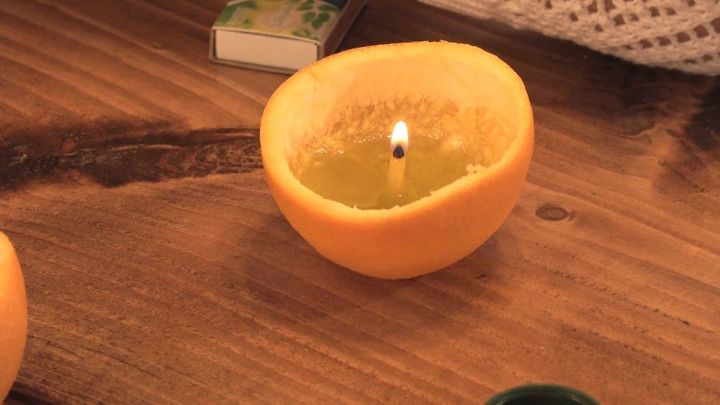
10. DIY orange peel candle
Speaking of candles, this DIY project shows how to make candles using orange peels as the candle holder and a white center stem as the wick. The process involves cutting an orange in half, removing the pulp, and filling the orange peel with oil to create an eco-friendly candle.
By lighting the white center stem, you can have an all-natural green candle that is simple and cost-effective to make. It's a clever solution for creating candles in emergencies or when you're in need of a romantic candlelit setting. Get tutorial here
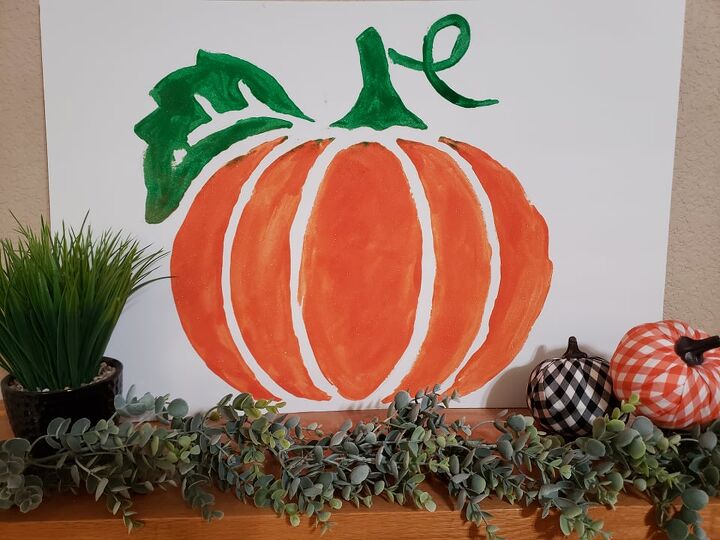
11. Pumpkin sand art
This project involves creating a pumpkin sand art piece for fall home decor. Using foam board, clear glue, and colored sand, the steps include drawing the pumpkin design, applying the glue, adding the colored sand, and shaking off the excess.
The result is a textured and charming pumpkin wall art that adds an autumnal touch to your living space. It's a fun and creative way to celebrate the upcoming fall season. Get tutorial here
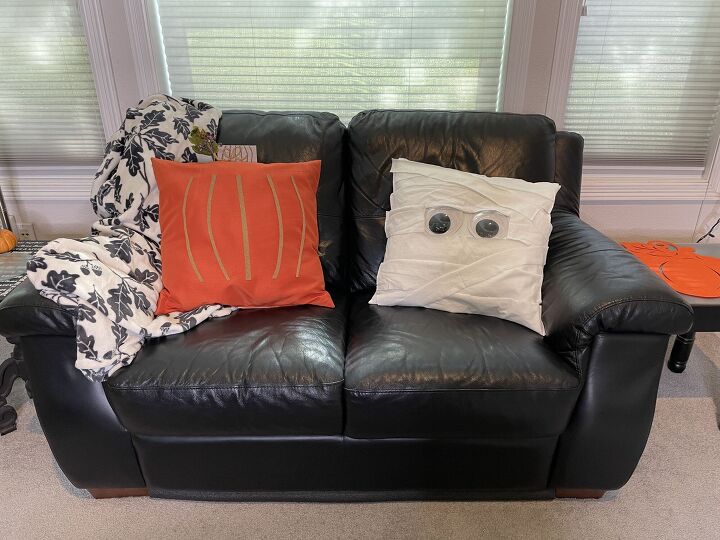
12. Fall throw pillow ideas
Chas shows us how to make two fall and Halloween-themed throw pillows with multiple design options.
For the ghost/mummy pillow, you'll glue googly eyes and add fabric strips to create a mummy effect. For the pumpkin/jack-o-lantern pillow, you can use adhesive cork or other materials to create a textured pumpkin look, add a foam felt stem, and use a stencil to draw a jack-o-lantern face.
The pillows are easily reversible and can be switched up whenever you like, making it a fun and festive addition to your home decor for the upcoming season. Get tutorial here
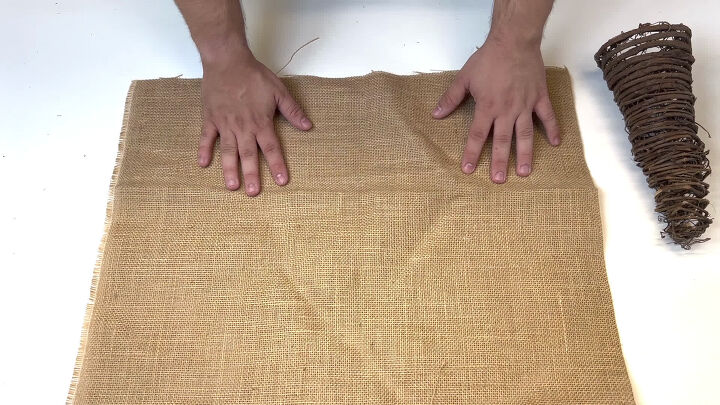
13. DIY fall gnome wreath
Finally, Nick guides you through creating an adorable DIY fall gnome wreath using a grapevine cone, burlap, faux fall leaves, greenery, ribbon patches, and an ornament for the gnome's nose.
You'll wrap the cone with burlap, secure it with florist wire and hot glue, add the gnome's hat brim, and decorate it with faux leaves, greenery, and ribbon patches. Finally, attach the ornament for the gnome's nose and create a pipe cleaner hanger.
The end result is a cute and festive fall gnome wreath that will add a touch of fall magic to your home decor. Get tutorial here