12 Mosaic Masterpieces That Will Bring a Touch of Color to Your Home
Want to bring some color into your home? Why not try these magnificent mosaic ideas? Taking tiling to the next level, this selection of mosaic projects will help you transform anything and everything. From floors and frames to lampshades and more, our colorful collection of DIY success stories will bring a vibrant new look to almost any part of your home.
Delightful DIY Mosaic Tiles
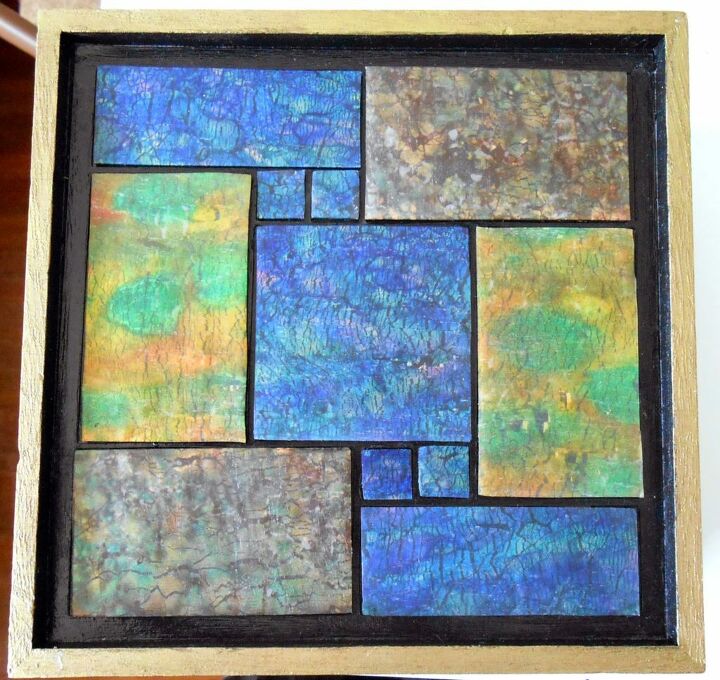
Don’t have the budget for mosaic tiles? Not a problem. Printing out a stained-glass pattern, Beth stuck gold foil to the back of polymer clay. After coating the foil with colored alcohol ink, she added a layer of translucent polymer clay and allowed to dry. Once ready, she used her paper template to cut the clay sheet into tiles. Finally, she glued the DIY tile pieces together and her jewelry box was complete. Get tutorial here
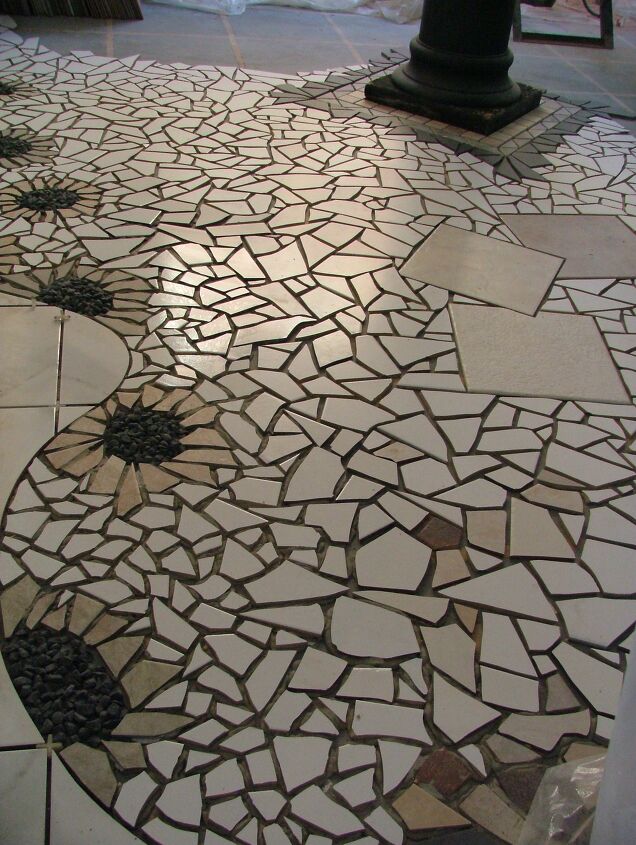
Magical Mosaic Floor
To create this truly magical mosaic, Rhonda used an existing tile floor. Knowing her mosaic would stick to the tiles, she created a raised focal point using broken mosaic pieces and stone. Cutting the shapes using tile nippers, she arranged the pieces into a pre-drawn pattern. The key to achieving this look was to contrast straight edges with irregular cuts and finish with light grout. Get tutorial here
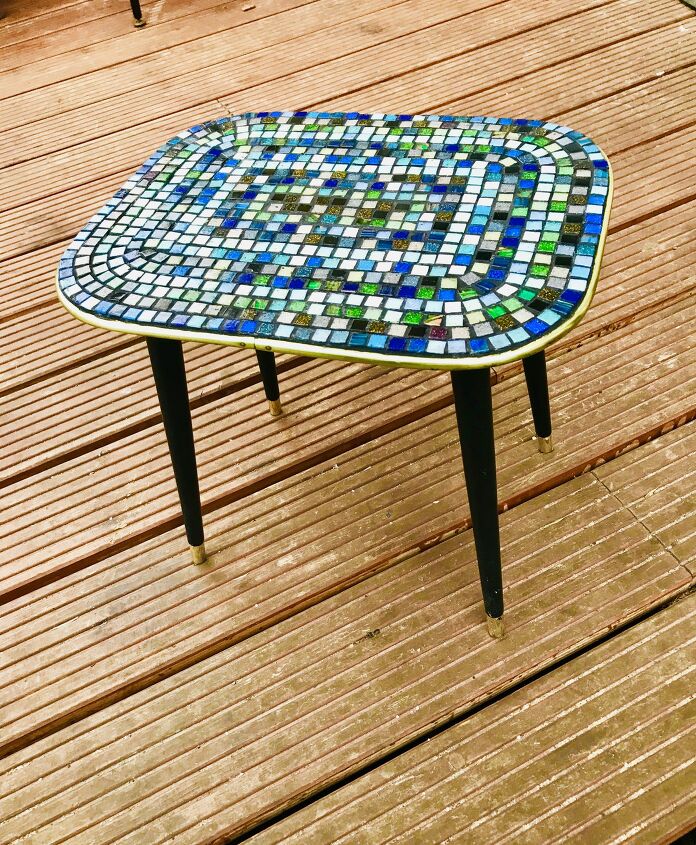
Sensational Seventies-Style Mosaic Table
Retro never goes out of fashion and this mosaic tile table will bring some pizzazz to any home. Using the original tabletop image as a guide, Susan stuck down a sheet of white photocopier paper and arranged mosaic pieces in line with the image. Working from the outside in, she completed the look with black Unibond grout and gave it a quick clean to ensure her mosaic table shone. Get tutorial here
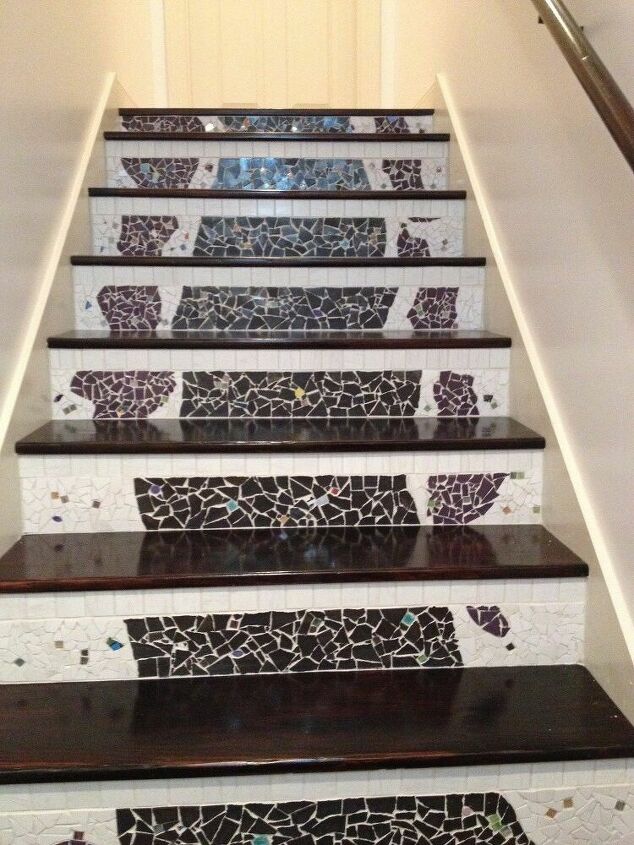
Stylish Stairway Mosaic Steps
Carpet or wood might be standard for stairs, but what about tiles? For this look, Gayle glued 2X2 mosaic strips to the top of her risers using premixed tile thinset. Then, onto paper templates, she arranged broken tile pieces and traced a pattern. Once satisfied, she stuck the paper to ply, glued the pieces in place and added a thin fiberglass cover. When each insert was ready, she glued and grouted for a truly special staircase. Get tutorial here
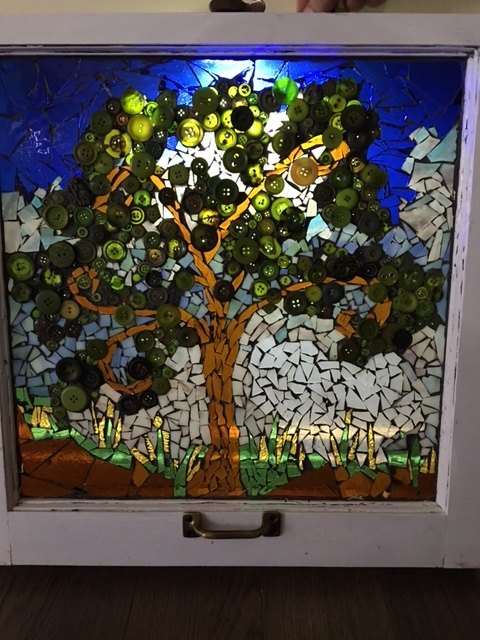
Gorgeous Stained-Glass Mosaic Tiles
Glass mosaic tiles, a window and tons of creativity were all Rochelle needed for this project. After breaking and trimming colored glass, she cleaned her window before drawing a design on the reverse. Then, starting with the main image, she offered up the tile pieces, trimmed any excess using glass nippers and stuck with E6000 adhesive. When the focal point was finished, the background was added and this impressive stained-glass window was complete. Get tutorial here
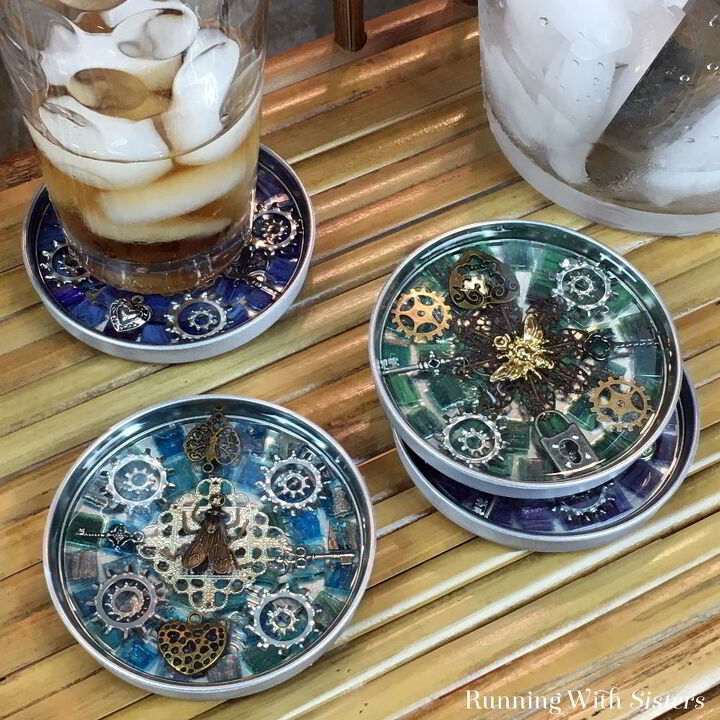
Ingenious Steampunk Mosaic Coasters
Transform your coasters with this ingenious design from Jennifer and Kitty. Starting with jar lids, the duo worked from the outside in, glueing mosaic tile pieces towards the center. Once the base was dry, cogs, metal trinkets and gold bugs were added for the steampunk effect. Finally, Envirotex Lite Pour-On Finish was poured over the top. When the resin was dry, these fantastic coasters were ready to use! Get tutorial here
Step in Style with this Mosaic Walkway
Wanting to jazz up her piecemeal walkway, Eileen used a bag of mortar and some rocks to create this impressive mosaic. Working in sections, she placed smooth rocks between the gaps in her walkway. She then poured over dry mortar, evened the surface and added water. Once the rocks were set, she painted them in a random fashion and finished with a layer of Thompson's multi-surface waterproof sealer. Perfect! Get tutorial here

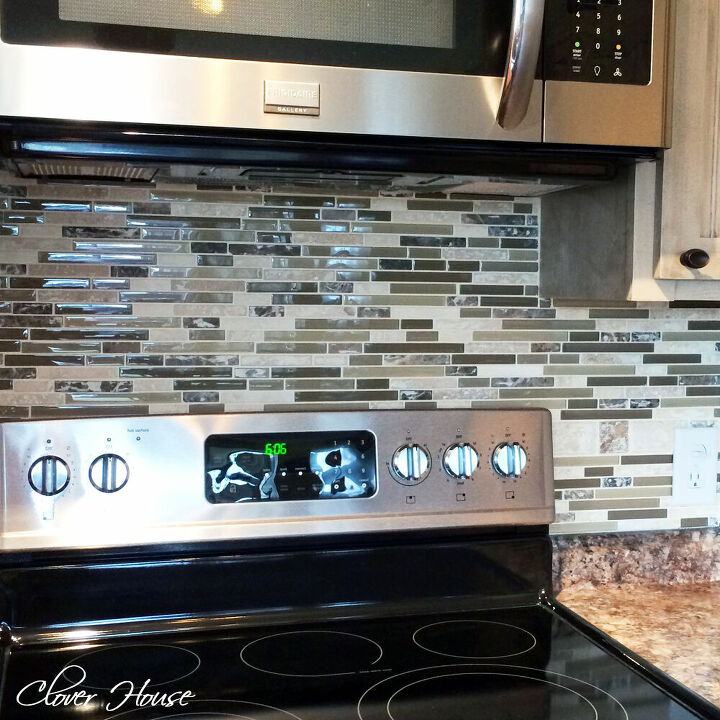
Brilliant Mosaic Tile Backsplash
Sometimes, the most intricate designs take less effort than you think. Starting with mosaic tile strips, DeeDee cut them to size for her new backsplash. The trick here was to use two different sized tile spacers to achieve a subtle contrast all the way around. Once she’d stuck the tiles, DeeDee washed the backsplash, grouted, and then washed it again to reveal an impressive focal point for her kitchen. Get tutorial here
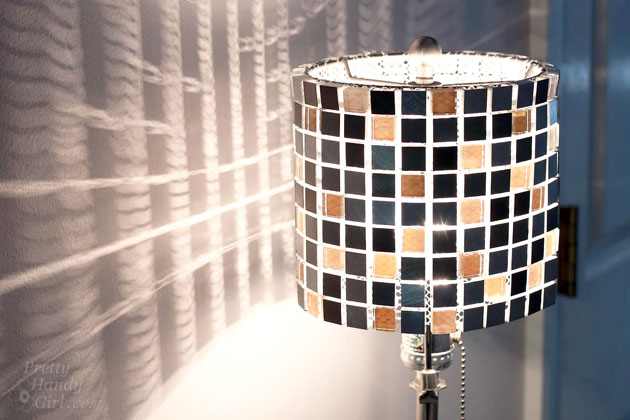
A Mosaic Lamp Made for the Spotlight
Shine a spotlight on your creativity with this simple mosaic trick. Cutting a lampshade to expose the top ring, Brittany then took a mosaic tile sheet and cut to size. Wrapping it around the ring, she then trimmed off any excess. To finish, she stitched the ends together by looping thread through the tile mesh. Finally, she wound more thread around the metal frame to complete this stylish mosaic lamp shade. Get tutorial here
Faking It: A Fantastic Faux Mosaic Frame
If you don’t have tiles, try this neat idea from Jennifer. Instead of adding weight to her mirror, she gave the existing frame a fresh coat of black gloss and used a combination of bright colors to add her own mosaic pattern. By contrasting the dark background with the vivid colors of her fake tile pieces, Jennifer was able to create a fantastic look that required very few materials, time or effort! Get tutorial here
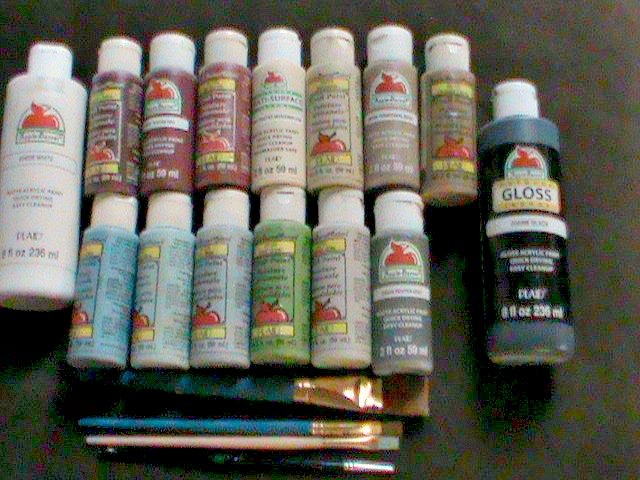
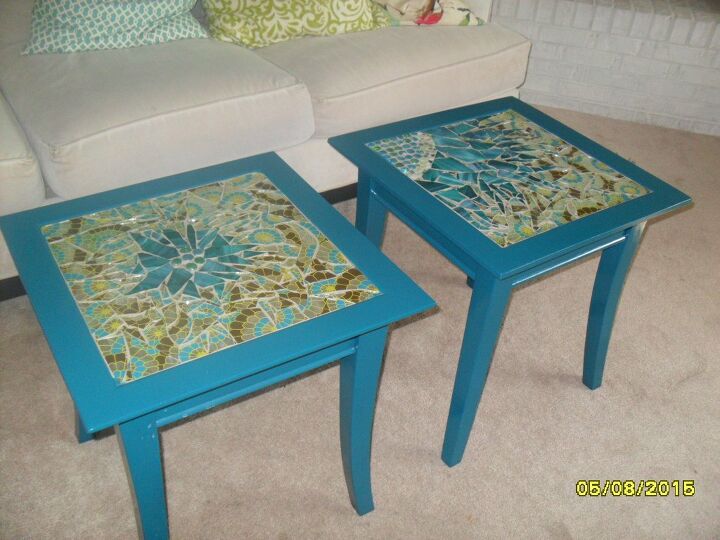
A Dynamic Duo of Tremendous Mosaic Tile Tables
Taking two thrift store tables, Jeanette sanded the tops to create grooves deep enough to hold her tiles. Before marking out her design, she painted the tables blue. From there, she collected broken wall tiles from the 60s along with colored glass and beads. After sketching rough patterns, she pieced together the shards like a jigsaw puzzle and secured with adhesive. A layer of sealant finished this impressive mosaic table makeover. Get tutorial here
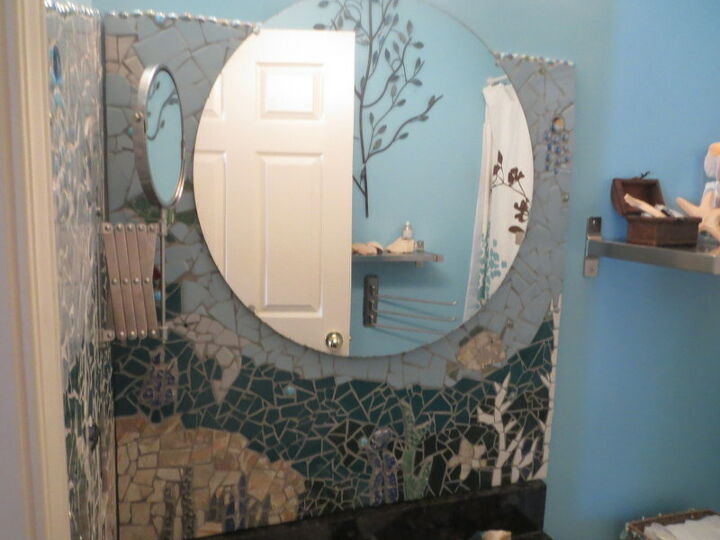
A Picture-Perfect Mosaic Bathroom
To transform your bathroom, try this mosaic idea from Tamara. Starting with a piece of plywood cut to the angles of her wall, she sketched a basic image. Once ready, she collected broken tiles, glass rounds and dish chippings. Working in sections, Tamara arranged the mosaic look before sticking with Weldbond glue. When the piece was ready, she screwed it to the wall, covered any exposed wood and grouted. Simple! Get tutorial here