Raised Garden Beds - Easiest & Cheapest

2 Materials
$29.73
15 Minutes
Easy
These are the cheapest & easiest raised garden beds you can make. We made ours in under 15 minutes for under 30 dollars. You can stain it, or leave it as is. Step-by-step tutorial & cuts.
Ever since starting a family, six years ago, Glen has wanted to have a raised garden bed. My mother-in-law has a total green thumb and has passed it down to Glen. We have always lived in extremely new developments without a yard and in the city and up until recently never had time to make a garden. Well enough was enough. With the climbing prices of electricity, heat, food and basic life, why not grow you own veggies & fruit?


I made this super easy raised garden bed without Glens help. It's a basic box just screws together and I'm pretty happy with the end result. So lets get started shall we?


These beds might not be the most amazing looking beds. But let me tell you, they will cost under 30 dollars for a 510 bed & they will take you under 15 minutes to assemble! Talk about great bang for your buck!


What You Need For Your Raised Garden Bed


-Three 2x10x10 We used pine, and they cost 9.44/board


-One 2x2x8


-Stain of choice, or you can leave plain. We already had stain so this cost us nothing


- Sixteen 2 Screws
How To Make Your Raised Garden Bed


Yayyyyy! So lets get started on the easiest project of all time. I mean, do you really need a tutorial? I'll share anyways. So cut your third 2x10x10 board in half ( make sure you measure to make sure each length is exactly 5 in length ) Sometimes they can be slightly longer or shorter than 10.


Once you've made that cut. Cut your 22's into four 8 lengths. Now it's assembly time!


Here's a shot of me putting the box together.


Once you've screwed all four 22's onto your two end pieces, you want to screw the long pieces on. I drove four screws into each 22 and it was very strong.
Here's the finished box, I then stained it in Early American. The sun will fade the color, but if you're using builder grade pine, anything will look better than faded pine.
Our bed doesn't sit totally flat on our ground as our yard is very unlevelled & lumpy. You can put down cardboard or newspaper prior to putting the soil in the box.


We used a 50/50 mix of fish fertilizer & top soil. A great mix for feeding your plants the nutrients they need. This is the tiring part. We had to fill 11 wheelbarrows with soil. We have a pretty big yard so we had to wheel it around the entire yard to the right side. Phew! Great workout though.


I also made some cute little markers out of some scrap in our scrap pile. I just picked up a sharpie and wrote on the wood. The boys loved sounding the words out to find what one belonged to what seed. They're 4&6, it's so fun to see them read. Yes, I'm totally aware I put an apostrophe on the "peas"... ugh.. it was hot in the sun, okay?!
Then the fun part began! Planting all the goodness in our new raised garden bed! Your seed packets & plants will tell you exactly how far down & how far apart to plant them. It is really made so simple these days to grow your own food. We purchased organic plants & seeds for our garden. Even if you don't buy organic seeds, growing your own produce is literally 99% better than purchasing from a store.
Hope your enjoyed our easy DIY for a raised garden bed. It was so fun teaching the boys how to live off the land with their hands.
Suggested materials:
  • 2x10x10   (Hardware Store)
  • Screws
Jessica-Sara Morris
Want more details about this and other DIY projects? Check out my blog post!
Go
Frequently asked questions
Have a question about this project?
3 of 19 questions
  • Samara Samara on Jun 09, 2017

    What are 22s that you refer to? I don't see them in the top or bottom materials but see them in the instructions twice. So eager to make these. Great!!!!

  • Lynne Webb Lynne Webb on Jun 13, 2017

    OK, here goes. I'm well past my 60's and want raised beds next year. This year I'm trying the straw bale for cukes. They're thriving so I'm doing something right. Now, on to the raised beds. I need something that's at least knee level and higher would be better. Though expensive, but here to stay, would be a 'stock tanks' like you water cattle with. The one's that are long and narrow. To save expense, I am thinking of loads and loads of paper and cardboard in the bottom. Then add good soil. And, as years go by, add soil as the cardboard and paper morph into more soil. I expect a lot of settling will happen. Does anybody see any pitfalls in this? I'm thinking of getting started with this as soon as my 'crop' this year is harvested. I have tomatoes in pots squash in huge ones as well as my cukes in hay. Do I need to drill holes in the bottom of my purposed tank garden? Do you think this will work?

  • Kate Kate on Feb 21, 2019

    I haven’t tried growing vegetables before but I like the idea of raised beds. How deep does the soil need to be to let the roots grow freely? Also I’m a senior citizen and thought I would make them at least 2’ tall. I read that someone used cut up plastic bottles to take up some of the depth and help with drainage. I don’t buy plastic bottles very often so is there something else I could use?

Comments
Join the conversation
2 of 101 comments
  • Jrzy Jrzy on Aug 21, 2017

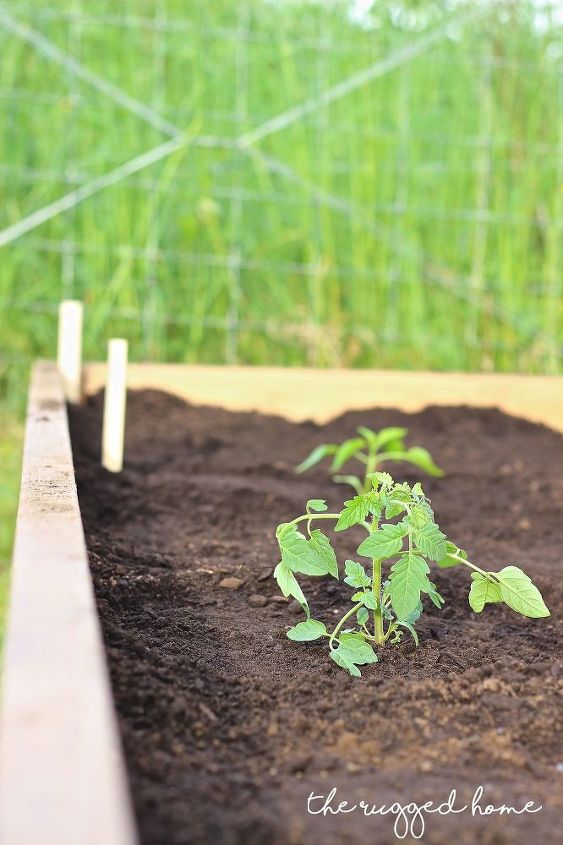
    A few suggestions... the bed shouldn't be wider than you can reach to the center. You won't be able to get those tomatoes in the center or weed when the plants are full grown. 4 ft. wide is good for most. 3 ft. wide if your older and not quite as flexible.

    Also, consider dimensional plastic lumber used for decking. Pine will rot and need replacing in about 3 or 4 years. Cedar wood won't last much longer either. I've had plastic lumber now for 20 years and still looks good.

    Happy gardening!

  • Debbie Grider Barbee Debbie Grider Barbee on Feb 18, 2019

    Remember to check with the lumber yard re: chemicals in the wood i.e. arsenic. Can definI tell be found in old wood used for decks and such. It is not worth the risk to poison yourself or kids. Leave the Roundup at the store and try the natural tricks listed here. Risk of Lymphoma.

Next