How to Build a Quick Outdoor Hairpin Leg Bench (with Storage!)

Amanda C, Hometalk Team
by Amanda C, Hometalk Team
6 Materials
$80-120
3-4 Hours
Medium
This week, I was out in Pittsburgh helping my husband's brother and sister-in-law prep their new old house for their baby-to-be! These two love to sit outside on the porch, but needed more seating for when guests are over. That's why I decided to make them this beauty of a bench with a wheeled storage bin. This project is quick and mostly consists of screwing treated wood slabs together and attaching the correct hardware. It does have a higher price-point because of the hairpin legs, but there are cheaper alternatives you can look to if you are under a tight budget.
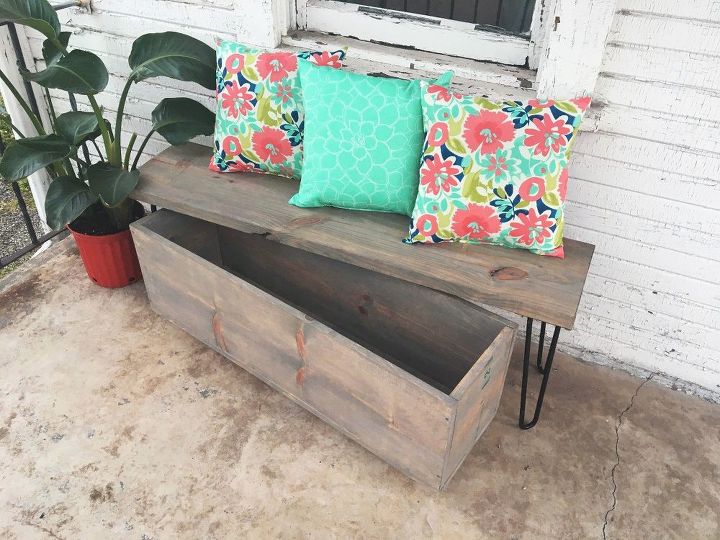
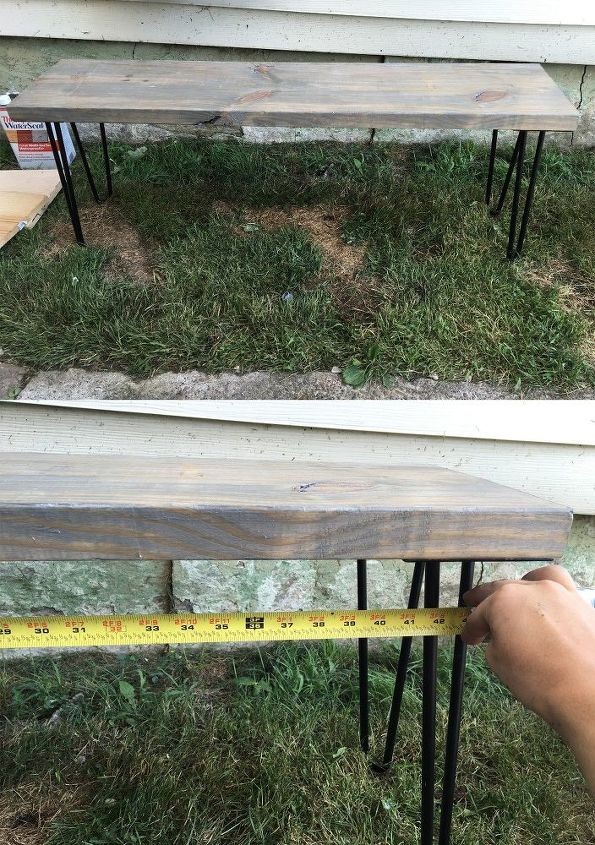
This piece is so great! It adds a touch of character to the porch, and yet offers seating and storage at the same time.
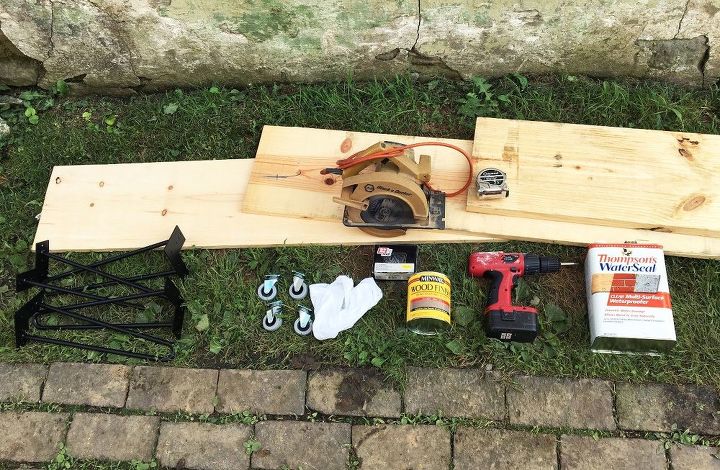
SUPPLIES:


-Outdoor Sealer (only needed if you are using it outside)


-Wood Stain in the color of your choice (optional)


-Rag


-A Circular Saw (or you can have the hardware store make cuts)


-1 2x12x8 plank of wood


-1 1x12x6 plank of wood


-1 1x12x8 plank of wood


-Screwdriver


-Box of outdoor screws (1.5” long)


-4 16” hairpin legs (or the height of your choice)


-4 small caster wheels


-Measuring tape


-A paintbrush (not pictured)


-An old rag or t-shirt


(If your casters don’t come with wheels you will need several small screws as well)


Cut List: *This can vary depending on the length bench you want and also the dimensions of your hairpin legs.


2x12x8 – 1 48” piece


1x12x8 – 2 39” pieces


1x12x6 – 1 39” piece and 2 9 5/8”x11.25” pieces
STEP 1: Cut your wood


If you didn’t get your 2x12x8 cut at the hardware store now is the time! Grab your circular saw and cut the piece in half to get a nice 48” long slab. Once it is cut you can stain the wood using your rag and stain. I did two coats of a gray stain (see supplies for brand) to get a nice color with still a bit of wood poking through. Set aside to dry once you reach the color of your satisfaction. (Remember to rub the stain with the grain of the wood)
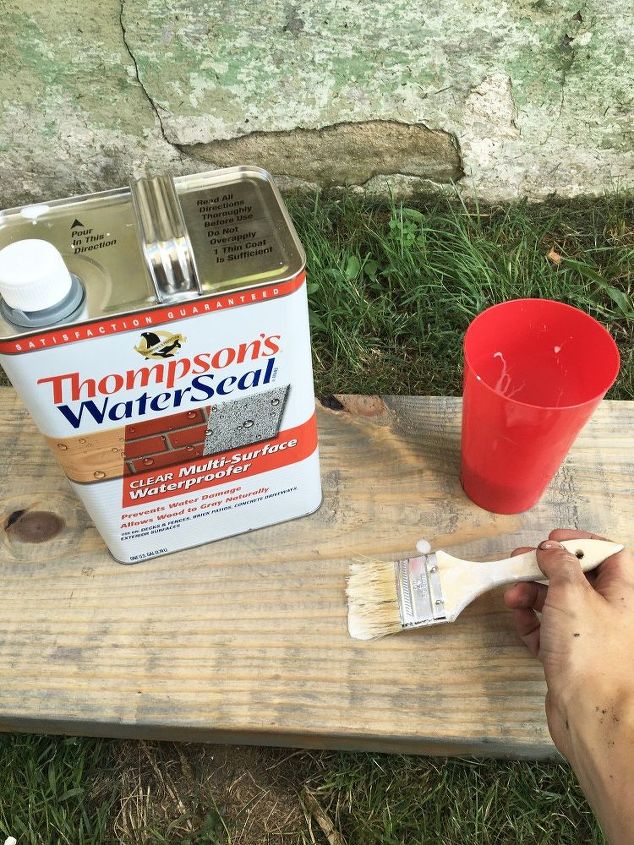
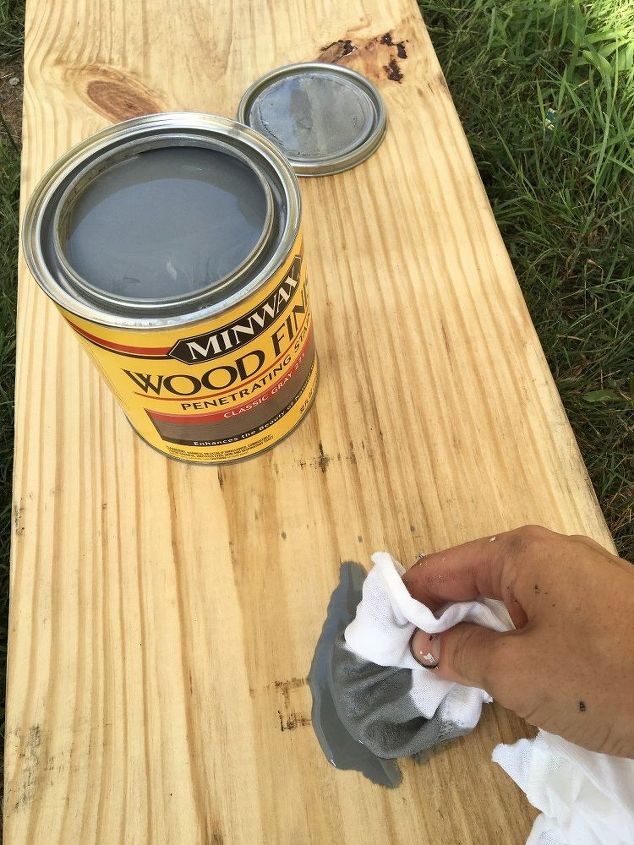
STEP 2: Weatherproof your wood
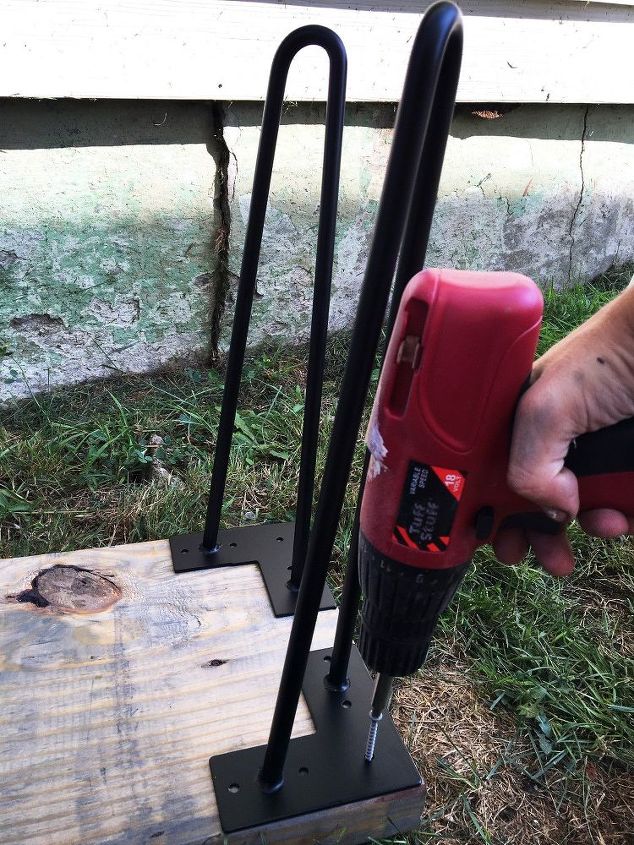

Once the stain has dried, you can coat your wood slab in a weatherproofing sealant. I used Thompson’s, because I knew the piece would be under a porch roof however if you plan to put this out where it will be more beaten by harsh weather there are some better weatherproofing options. There are also stains that have weatherproofing in them, but I didn’t like the color options.
STEP 3: Add legs


Once your sealant has dried (or at least mostly) you can screw in the hairpin legs. You don’t have to use hairpin legs considering they are a pricier option, but they are a nice and secure leg for a bench. You might be able to swoop up some peg legs or something though for a fraction of the cost.
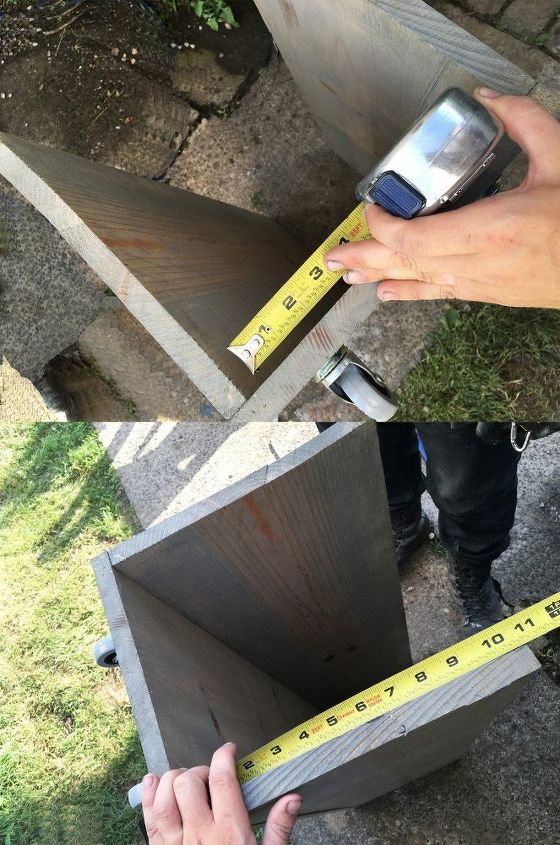
STEP 4: Measure space for storage box


Once you flip over the wood and legs your bench portion is complete! The next step is to measure the distance between each peg leg toward the top. In other words where the leg meets the wood. This measurement will be used to determine the length for the storage box underneath. You want to be sure that the box won’t hit the legs and slides under the bench easily. I measured 40.5” so I decided to make cuts of 39” just to be safe.


You will cut 2 39” pieces from your 1x12x8 and 1 from your 1x12x6. Then simply repeat steps 1 and 2 to each of these pieces of wood. (Stain and seal)
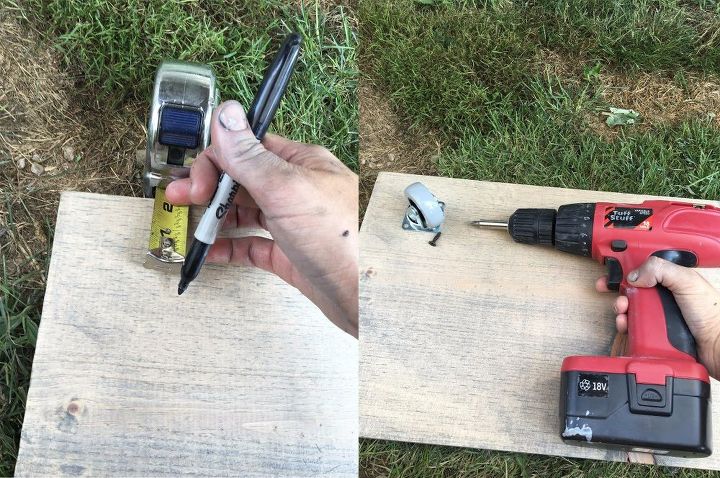
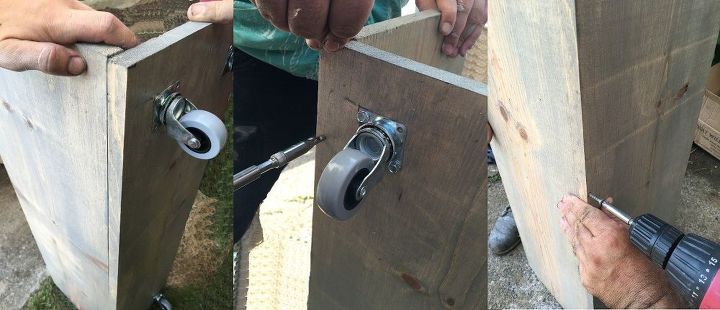
STEP 5: Add your wheels


Grab one of your 1x12x39 pieces of wood that you just cut and treated. Mark 1.5” in from each corner. This is where your caster wheels will go.


Simply screw each wheel into its place and now we have the bottom of our storage bin.
STEP 6: Add the front and back to your box


Now we are going to add the front and backsides to the storage bin. Take your other 2 1x12x39” pieces you cut in step 4 and line them up (one at a time) along the edge of the bottom piece with the wheels you created in step 5. We will be screwing these into the bottom with the wood sitting on top of the bottom plank not to the side. *See picture


To keep the wood from splitting you can drill anchor holes into these pieces and then insert the screws.
STEP 7: Measure and cut the sides for your box


Once you are done attaching both front and backsides to the bottom it is time to move onto the left and right sides. First you need to measure between the front and the back lengthwise and also from the bottom to the top of the front and back height-wise.


Take these measurements and cut 2 pieces for either side. *My measurements were 11 ¼ x9 5/8”
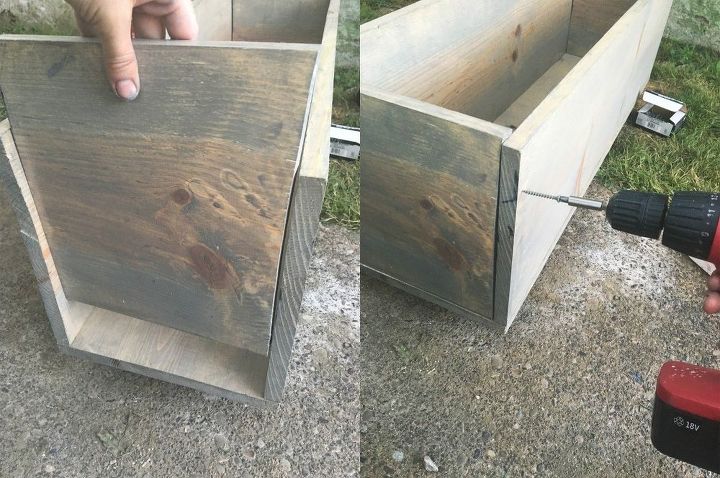
STEP 8: Complete your box


Once your pieces are cut repeat steps 1 and 2 to these pieces.


Now simply insert them into the openings on either side of the bin.


Screw each of them into place from the front and back making sure that each piece is flush against the edge of the storage bin.
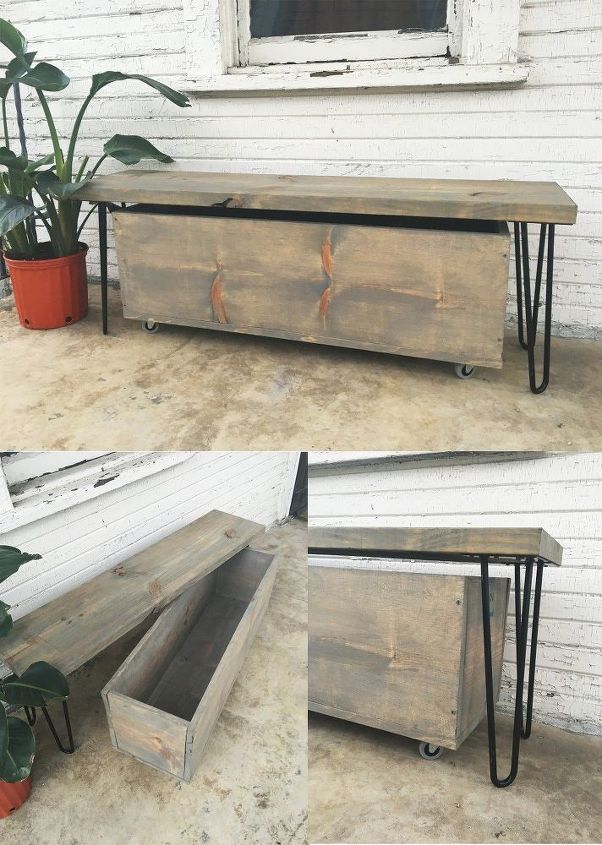
STEP 9: Take a step back and enjoy!
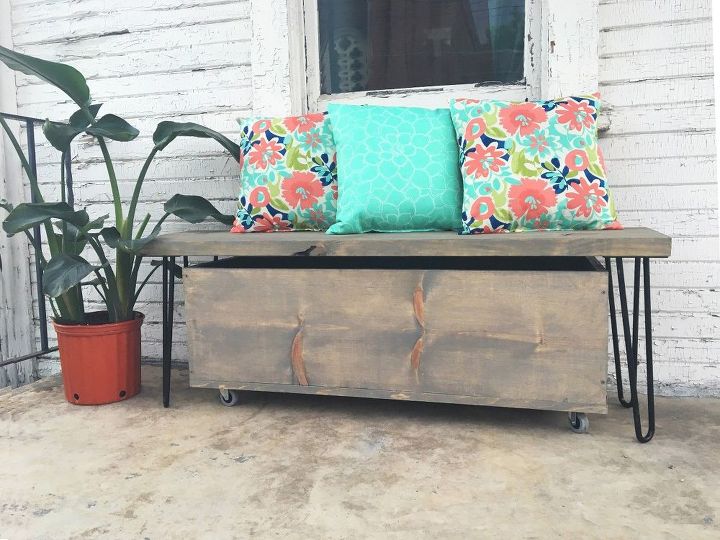
STEP 10: If you want, you can add a couple of colorful pillows (Wal-Mart had outdoor pillows on sale for $2)
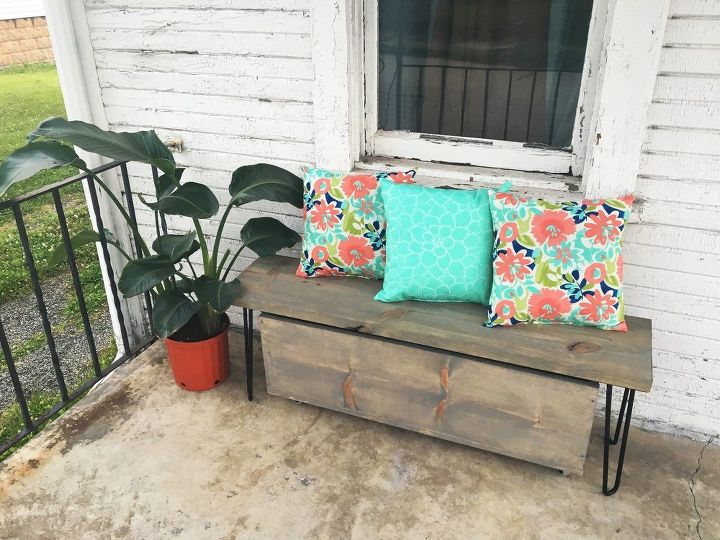
You could store the pillows in the bin when bad weather is on its way or keep small gardening tools inside, really whatever you feel like!
Suggested materials:
  • Wood   (lowe's)
  • Hairpin legs   (amazon)
  • Outdoor screws   (lowe's)
See all materials
Frequently asked questions
Have a question about this project?
  3 questions
  • Dee B Dee B on Jul 17, 2016
    I would like to know about what this whole project will cost. It is so nice and seems not too complicated. I am inspired. Thank you!
  • UpState UpState on Jul 17, 2016
    Besides Thompson's Water Seal...What other products would you recommend for a "harsher" outdoor environment (not under a porch) ??? THX !
  • Sheri Duvall Sheri Duvall on Jul 19, 2016
    where did you get the hairpin legs ?
Comments
Join the conversation
2 of 26 comments
  • Mgu31484850 Mgu31484850 on Apr 06, 2023

    Hi there. A bit confused about what wood I would need just for the bench without the rollout storage. Would really appreciate your help. Perfect extra seating for my deck and even a quick make shift coffee table. Thanks so much!

  • Isa82595089 Isa82595089 on May 17, 2023

    I love haïr pin legs; however they are so expensive and I have f done extensive research on them; the other difficulty is that most of the items cannot be delivered to Puerto Rico

Next