


Halloween Outdoor Decor: How to Craft a Whimsical DIY Pumpkin Topiary

If you're someone who has always admired those picture-perfect porches adorned with topiaries straight out of a home design magazine, this DIY project is your chance to create a Halloween pumpkin topiary that will make your neighbors green with envy.
In just a couple of hours, and with a touch of creativity, you can craft a unique and festive masterpiece to celebrate the season. Join us in bringing this charming Halloween pumpkin topiary to life!
We want to help you DIY, so some of the materials in this post are linked to sellers. Just so you know, Hometalk may collect a small share of sales from the links on this page.
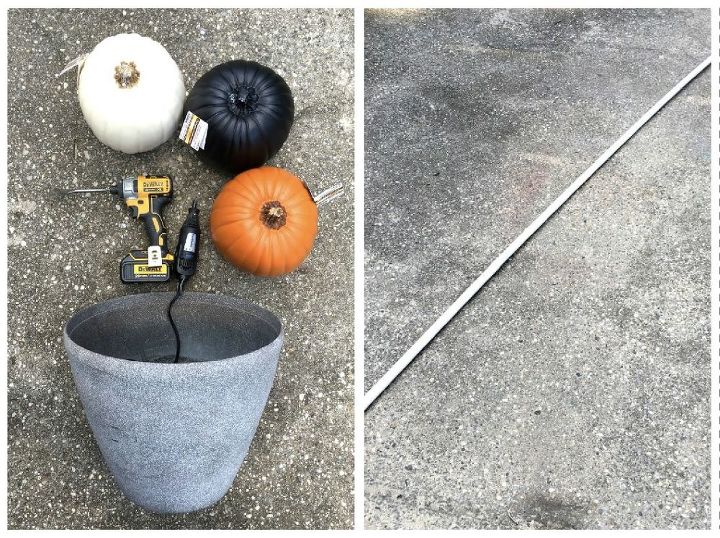
SUPPLIES:
- Plastic HOLLOW pumpkins
- ¾”x10’ PVC pipe
- Drill
- ¾” paddle bit
- Dremel (and/or box cutter—not pictured—I used both for this project)
- Planter
Not pictured:
- Fairy lights
- Potting soil
- Chop saw
- Pencil
- Plants
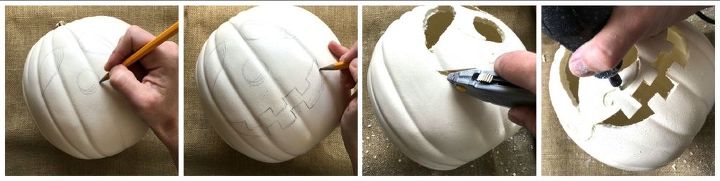
1. Give Your Pumpkins Personality with Fun Faces
First, take your pumpkins and grab a pencil. Draw a cute, funny face on each pumpkin – no need for spooky jack-o'-lanterns here. I went for round noses, droopy eyes, and big smiles to add a playful touch.

2. Carve Faces with Care
Before diving into the pumpkin carving, make sure you're protected by wearing safety glasses and a mask. Especially when dealing with a Dremel, the dust can fly everywhere, and it's better to be protected.
Now, onto the fun part. I grabbed my Dremel, setting it to a gentle speed, and started working on hollowing out the inside of the pumpkins' faces. However, I soon decided to switch things up. I swapped my Dremel for a box cutter to carve the faces, and it turned out to be a smarter choice. It saved time and made the whole process smoother.
Once the faces were carved out, I revisited the Dremel. I used it to fix any rough patches and perfect the cuts. But let me share a little tip: the Dremel can be a bit unpredictable at times. It might go off track, and you might lose control a bit. This happened to me a few times. But hey, I turned those moments into something special. I embraced the mishaps and transformed them into whimsical designs on the pumpkins.
When I stepped back to admire my finished work, I couldn't help but see a bit of my family in those pumpkins. The one with white features, like a mustache and beard, reminded me of Rob. The orange pumpkin, with its artsy patterns, felt just like me. And the black pumpkin, grinning with a tear, captured our son Bo's spirit. He's turned two, and even though he has his moments of tantrums, he's a happy little trooper. That tear? It's a reminder of his joyful heart, and I can't help but smile.
Remember, this is all about adding that personal touch and having fun. So, get your gear on, carve those faces, and let your creativity shine!
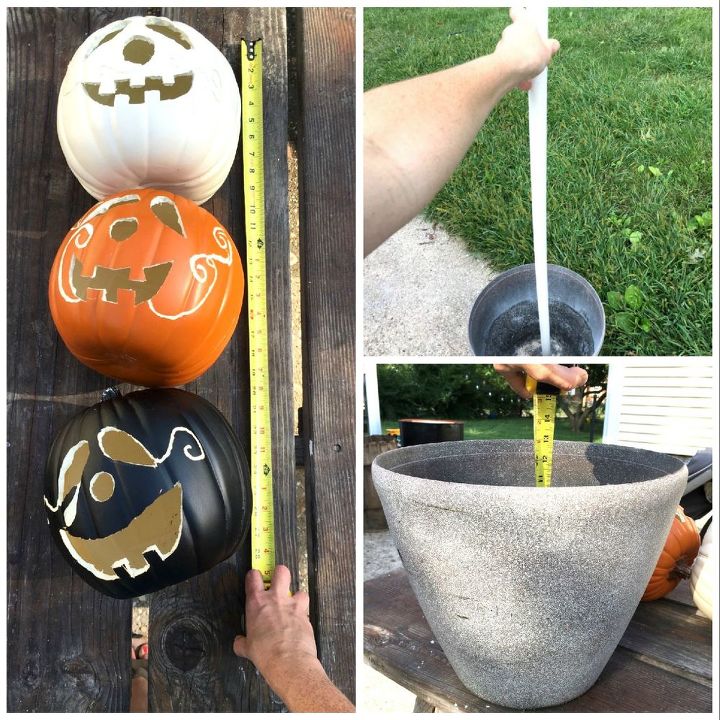
3. Determining the Right Height
Let's tackle the height of our topiary next. I began by arranging my carved pumpkins approximately how I envisioned them stacking on top of each other. From there, I measured the distance from the top pumpkin to the bottom one.
To gauge the desired height for my topiary, I placed the 10-foot PVC pipe inside the planter and estimated what would look best.
Lastly, I measured how deep the planter was.
Taking all of this into account, I made the decision to cut my PVC pipe to a length of 42 inches. This choice allowed me to partially bury the pipe in the planter, create space for planting mums around it, and ensure the pumpkins would be visible without being hidden too low.
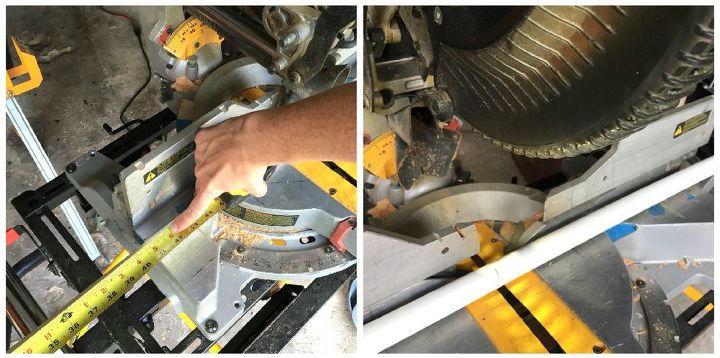
4. Precise PVC Pipe Cutting
Once I had my measurement, I moved on to cutting the PVC pipe. Carefully, I trimmed it down to 42 inches. I took my time, making sure to use slow and steady movements.
This way, I prevented the saw from causing any damage to the plastic or accidentally yanking the pipe out of my grip.

5. Assembling the Pumpkin Stack
Now it was time to stack the pumpkins for a sturdy topiary. I started by positioning the lower two pumpkins and checking where they'd fit together best. Then, using a paddle bit, I drilled holes in strategic spots.
For the bottom pumpkin (black), I drilled a hole in the center at the bottom and another on the upper left side. Similarly, I created holes for the middle pumpkin (orange) on the bottom left and top right corners. As for the top pumpkin (white), I only drilled a hole on its bottom right side. While you have the option to add a hole to the top of the uppermost pumpkin, I found that the bottom hole sufficed for stability. I toyed with the idea of placing a hat on top, but in the end, I favored the elegance of simplicity for my topiary.
A quick note: I opted for a ¾” paddle bit, matching the size of my PVC pipe. However, when I attempted to fit the pipe into the pumpkin holes, it became clear they were a snug fit. So, I carefully enlarged the holes with the same paddle bit, just slightly. You might consider using a larger paddle bit for this step if you encounter a similar situation.

6. Preparing the Planter Base
Now, let's get that planter all set up. I'm sure the gardening experts out there might have some advice, but I'm not exactly a pro in that department. (Maybe I've come up with a new term – "brown-thumber"? Just kidding!) Anyway, I asked Rob for some input and decided to go ahead with my planting plan.
The planter already had a few holes at the bottom. Plus, because I had used it for another project before, there was a hole on the side near the top. So, instead of filling the entire planter with potting soil, I took a different route. I put sand from Bo's sandbox in the bottom half of the planter. Then, I completed the rest with potting soil. It's my own way of doing things, and it seemed like a good fit for this project.
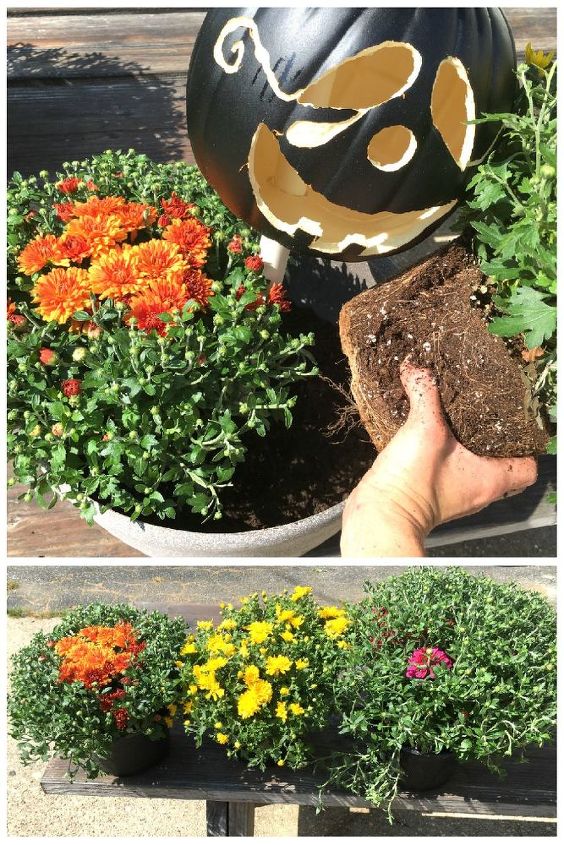
7. Plant flowers/plants.
Lastly, it was time to place my three lovely mums around the stacked pumpkins. This caused the PVC pipe to tilt a bit. However, after I carefully planted all the mums and gently pressed down the soil, the pumpkins found their balance and stood tall and strong.
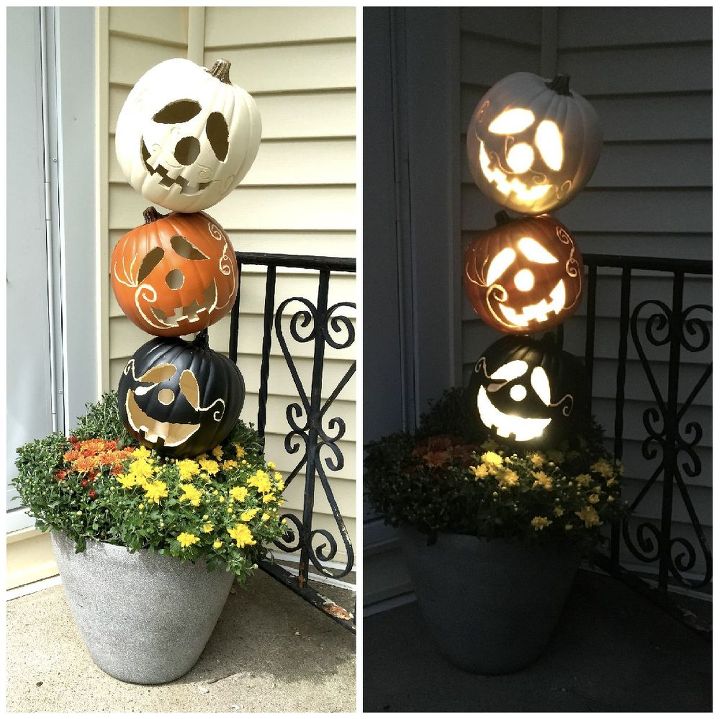
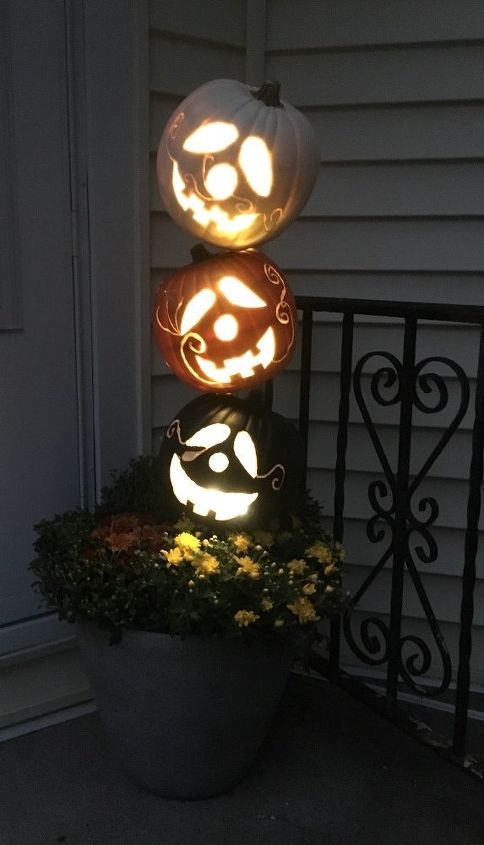
8. Add Fairy Lights (OPTIONAL)
I wanted my pumpkin topiary to be seen at night so I added some fairy lights inside each pumpkin. I'm really happy with how this pumpkin topiary came out.
Halloween Front Yard Inspiration
DIY Halloween Pumpkin Topiary
Voilà! With just a few hours and a dash of creativity, you've crafted a captivating Halloween pumpkin topiary that encapsulates the essence of the season.
Have you created your own Halloween pumpkin topiary? We'd love to see your unique take on this project! Share your thoughts, photos, and experiences in the comments below.
DIY Halloween Decorations


Comments
Join the conversation
-
Now this is an idea I could go for!!!
-
I love this and I’m so inspired that I just ordered 6 pumpkins! I can’t wait to work on this project. I doubt I’ll get it finished for this year but there’s always next year! I’m going to try but I have topiaries I’m working on for the Xmas holiday and many other things I want done for Xmas. I love the faces you created!


Frequently asked questions
Have a question about this project?
are these water proof??
Did you use spray paint?
where did the fairy lights turn on buttons go and how did you turn them on each night?