


So I Painted Our Ugly Linoleum....
6 Materials
$50
Medium
I saw a this picture on Joanna Gaines' IG a few months back and I had major heart eyes over this floor, but replacing the tile in our guest bathroom wasn't/isn't an option for us. Fast forward to last month and I was still drooling over this tile so I did what any reasonable person would do - I went on Pinterest.
I looked at more floors and the caption on one of them caught my eye.... "The Girl Who Painted her Tile...WHAT?!" I found myself on Remington Avenue's blog and then the next thing I know I am at Hobby Lobby buying paint! I looked at their stencils too but our linoleum was 12x12 and I didn't find any big enough there so I ended up ordering one online through cuttingedgestencils.com. I followed the steps on Mysha's blog but did a few things differently/use a few different products so I thought I'd share my experience with you.

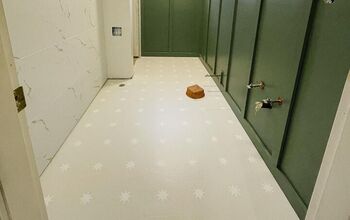
Joanna's Instagram picture

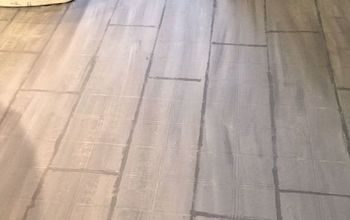
Before: Our bathroom had ugly sheet linoleum made to look like 12x12 tile and grout. I started by cleaning our floor. I swept at least 5 times and then cleaned it some more. You want to make sure there is nothing that is going to get in the way of your paint adhering properly and you certainly do not want dirt or anything else getting in your paint either.
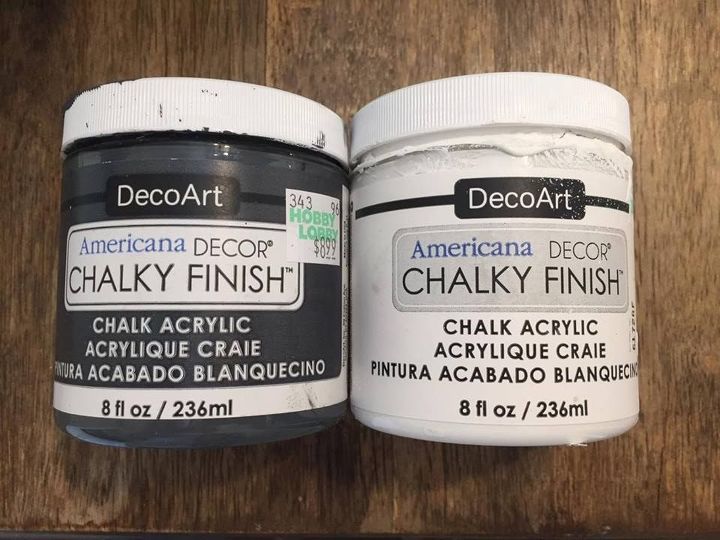
Here are all of the products I used: DecoArt's Chalk Paint in Everlasting & Relic (sold at Hobby Lobby) and Minwax's Polycrylic, a foam roller, painter's tape, and a stencil. If you are using white, you want to be sure to buy a water based sealer - an oil base will yellow and tint your finish.
I used a paint brush for the first coat of paint so I could get it in all the "grout" line and make sure it was really worked in to the floor.
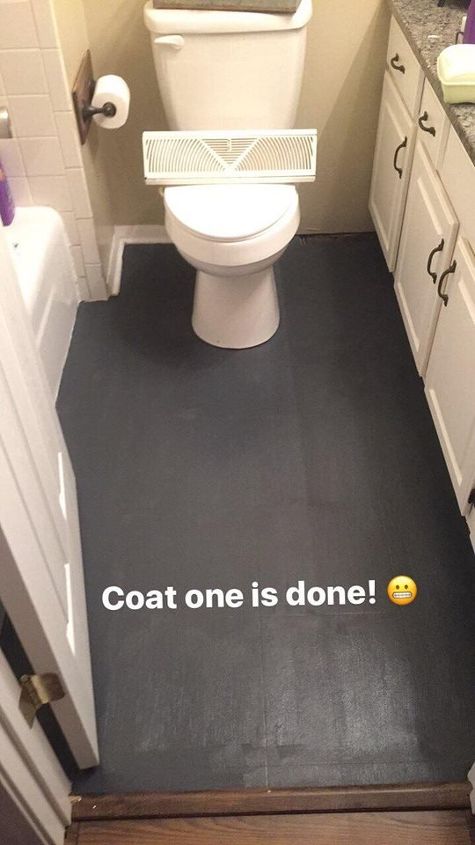
Here is what it looked like after the first coat - better already! I let the first coat dry for about an hour and then I rolled a second coat of gray. I let this coat dry for 2 hours before I came in with the stencil.
You can read the rest here, including how to seal the floor! http://www.livingthelifeofrileyblog.com/blog/so-i-painted-my-bathroom-floors
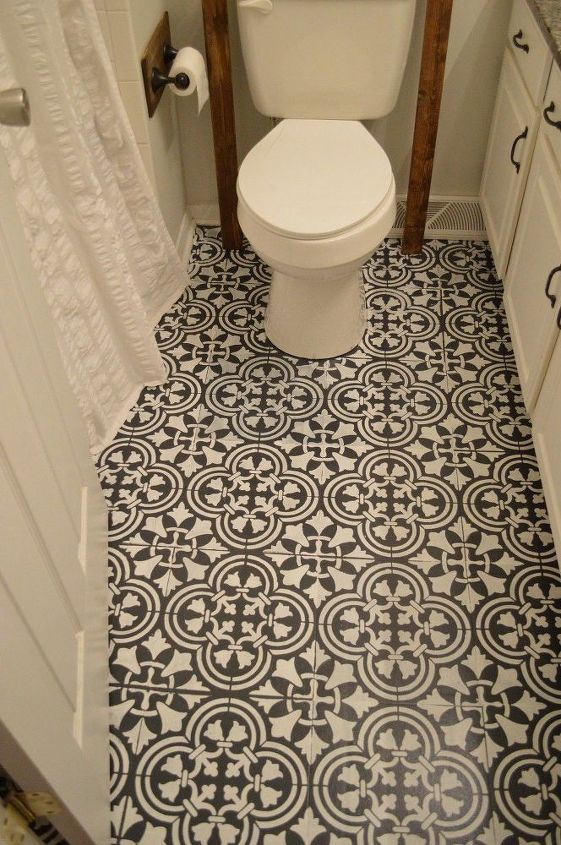
Click here to purchase yout Augusta Tile Stencil or to browse Cutting Edge Stencil's many options! https://www.idevaffiliate.com/33076/7-4.html
{
"id": "3701066",
"alt": "",
"title": "",
"video_link": "https://www.youtube.com/embed/HVXAAtMgW0A",
"youtube_video_id": "HVXAAtMgW0A"
}
{
"width": 634,
"height": 357,
"showRelated": true
}
Here is a clip from when I painted our laundry room floor - I got a lot of questions about how to go around places like the toilet and edges. I hope this helps - more video tutorials available on my channel!
Resources for this project:
See all materials


Any price and availability information displayed on [relevant Amazon Site(s), as applicable] at the time of purchase will apply to the purchase of this product.
Hometalk may collect a small share of sales from the links on this page.More info

Want more details about this and other DIY projects? Check out my blog post!
Comments
Join the conversation
2 of 529 comments
-
Yowza!
-
WOW! WOW! Guess I'm just crazy, but your original floor looked liked 2023 tile. I remember my Mom had the tile with a design, light green with dark green!!!


Frequently asked questions
Have a question about this project?
Can you stencile white tile bathroom floor?
Now that it's been down a while, how is it holding up to foot traffic and routine cleaning?
the blog doesn't exist. is there a typo?