


Turning Wood to Stone: Using Peroxide and Unicorn SPiT

14 Materials
$180
3 Days
Easy
Ever looking for a piece of functional art that looks as good in the living room as on the wall at a gallery- without breaking the bank? Why not use furniture as a form of art? As a college student passionate about art, I was looking for just that: something useful, yet unique and interesting to put in my new apartment. To start, these tables (of which I’m going to show the creation process of just one of the total three) were a yard sale buy that my mother kindly purchased on my behalf and saved over the course of about two years. The table shown here is the coffee table that matches two small end tables, which were done using the same techniques.
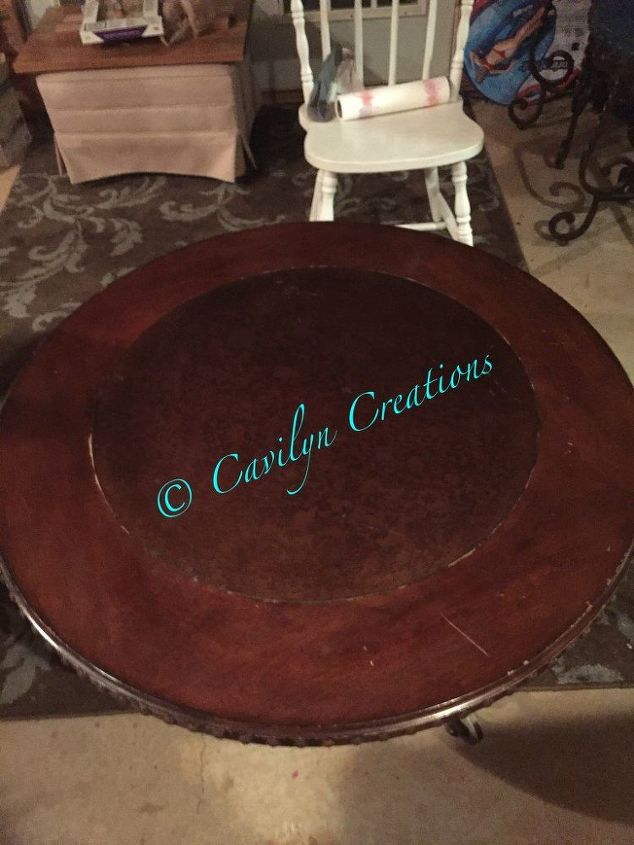
The first step to getting this effect is to clean your surfaces really, really well. This table is primarily some sort of pressboard, so I had to take some precautions and make sure to clean it before I painted on it so the paint would “stick” well to the table surface. For the initial cleaning, I used KrudCutter and left it on the top for a few minutes before applying elbow grease and some paper towels, removing layers of grime. Once I did that, the table was ready to paint/SPiT!
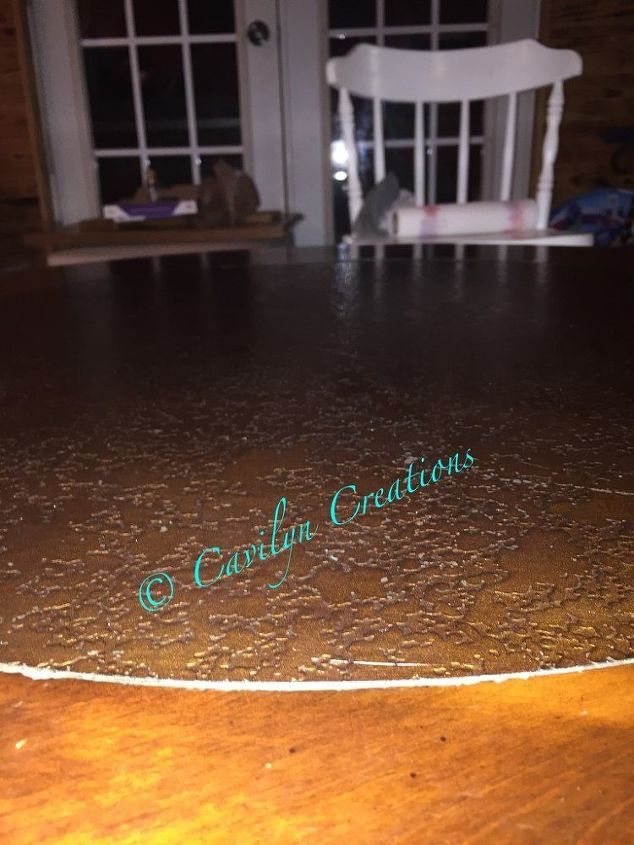
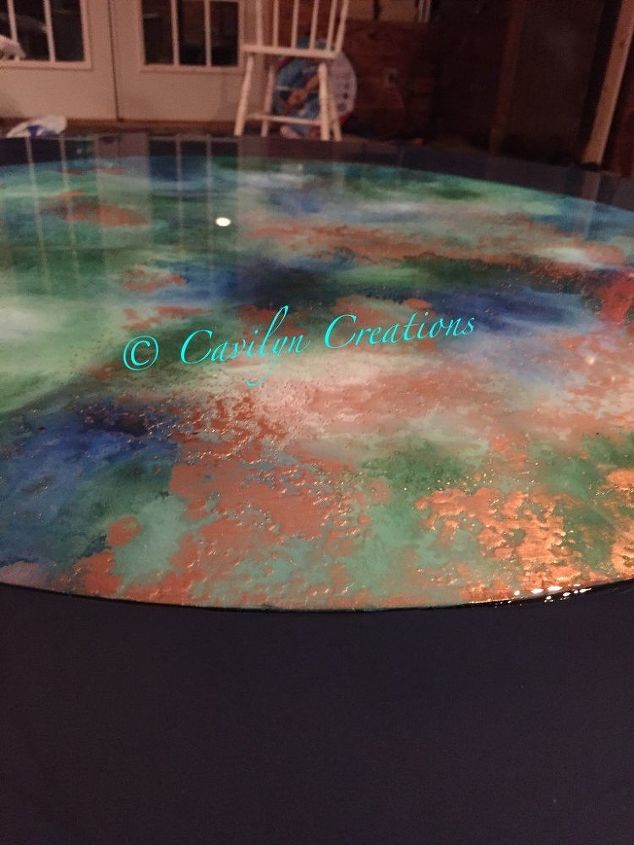
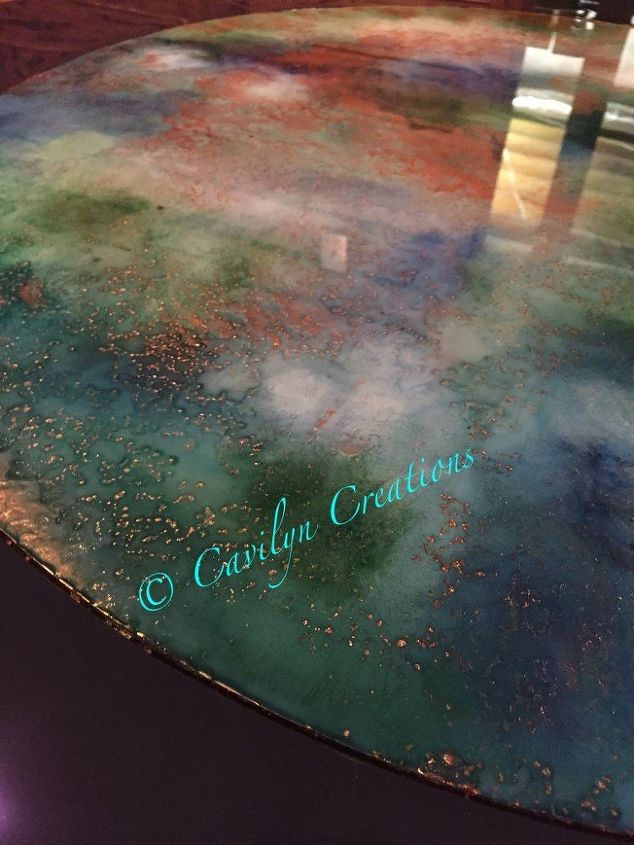
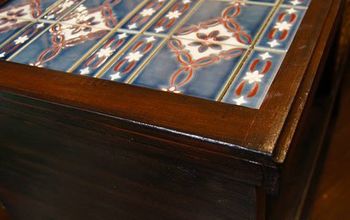
It is important to note that this table is TEXTURED! A portion of the “islands” as I like to call them were due to the fact that when the peroxide was added, the spit collected in the lower regions of the texture, making the higher regions turn copper due to the underlying paint.
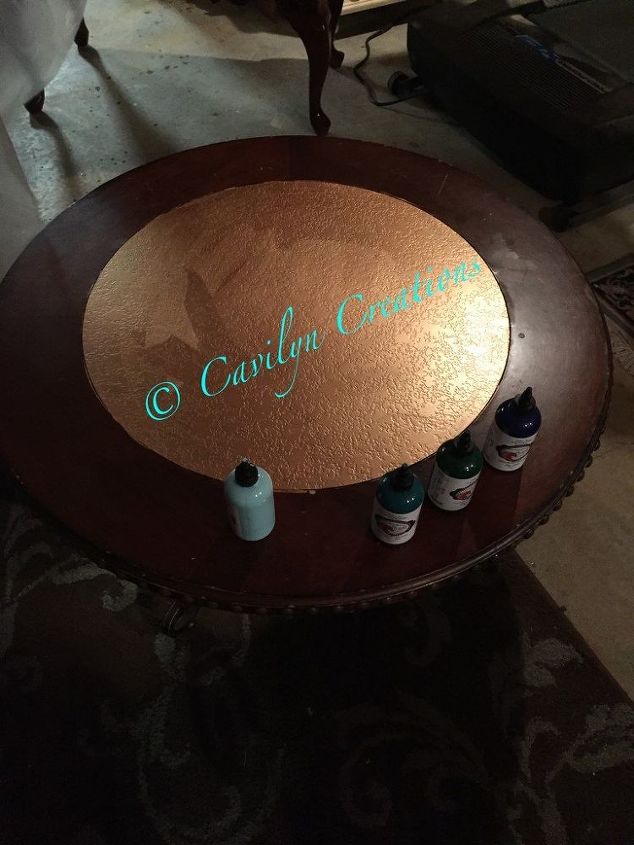
After cleaning, the table is ready to be painted. I used a copper metallic paint called Devine Penny, and I only painted the center section in the copper. Shortly after painting, the surface (when dried successfully) is ready to use SPiT and a technique called a stain press.
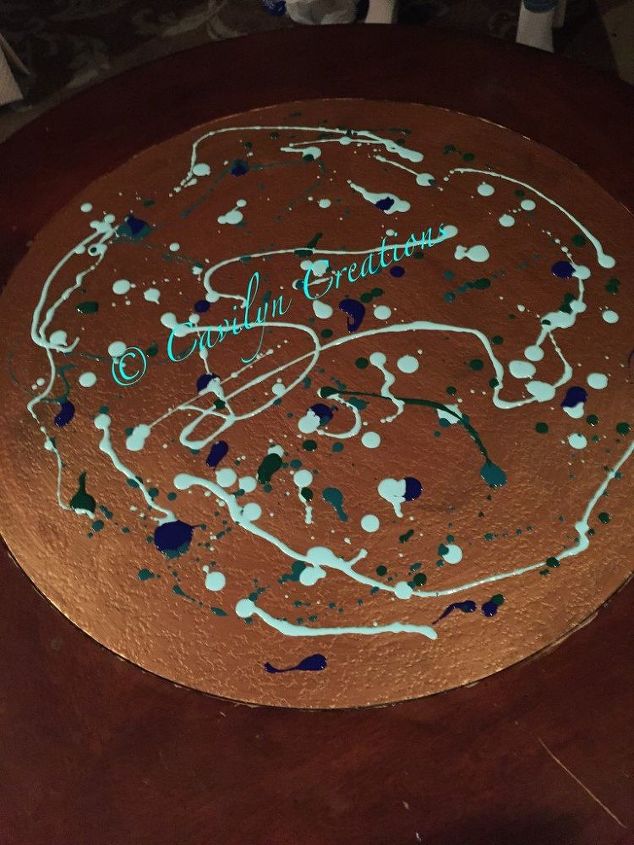
The idea behind the stain press is to create a way to move and blend the spit and create a watery or marble effect. As people started using the SPiT in new ways, the stain press technique was born, using only ones hands, a bit of imagination and a plastic drop cloth or tarp to generate the effects when used with spit. By randomly dropping spit colors in no particular order on the center section and by adding water, when you put the plastic tarp down, the spit will “move” and blend as you manipulate it through the use of your fingers. After the SPiT is mixed to your satisfaction, you can remove the tarp, lifting the edges towards the center and eventually fully removing the tarp.
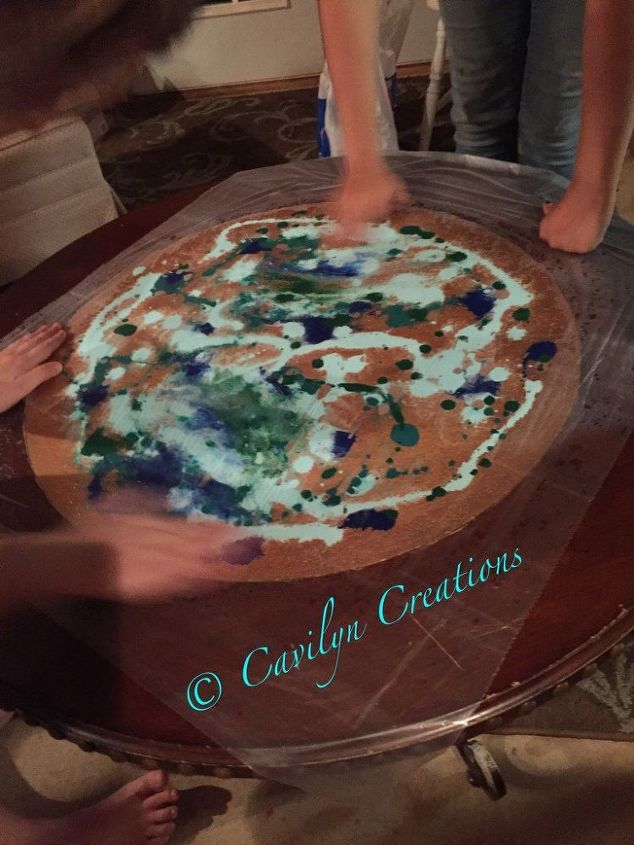
TO make it easier to manipulate the tarp and squish the SPiT around underneath, we like to add water to the top of the tarp to make our hands slide easier. We like to use a spiral motion to blend the spit through the tarp. By pushing the spit towards the edges and then using the spiral, we maintain a fairly good amount of control of the spit at all times. Don't be afraid to get in there and move the spit around! If you don't like it, you can always wipe it off and start over with a different pattern/ ratio of colors.
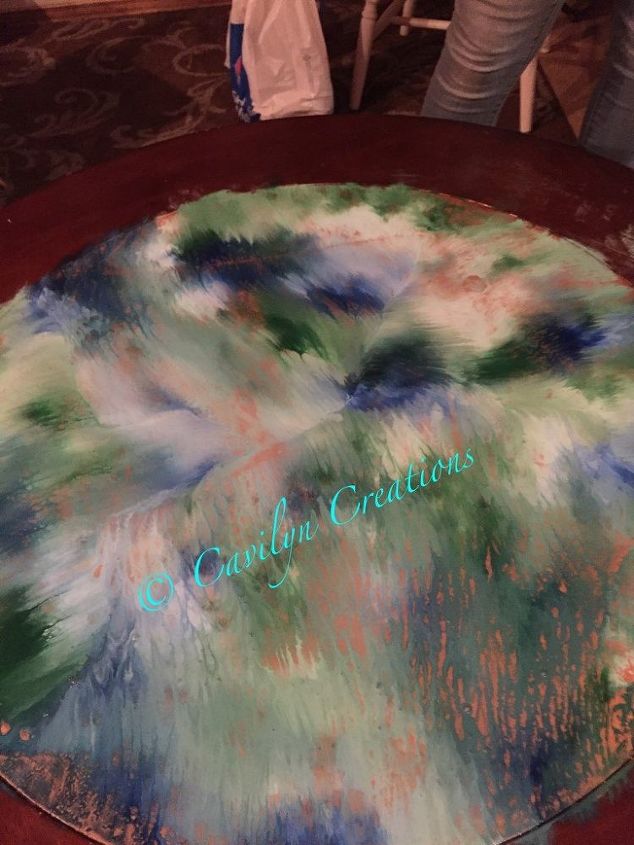
After removing the tarp, spritz some water onto the SPiT. This should reduce the drawlines (shown above) that come from lifting the tarp. After things are blended to your satisfaction, switch out the water for the peroxide. HEAVILY spritz the surface, and leave the peroxide to do what it will. The initial time periods of this phase don’t show much difference in the pre-peroxided table and its appearance shortly after peroxiding. This technique takes time, so leave it alone and don’t touch the surface, no matter how tempting it is to move the spit around some more.
The above picture is about 15 minutes after peroxide application. See a difference? The islands are very prominent, with tiny flecks between them from where the paint rippled underneath. The effect was slow to arrive, and didn't bubble or anything. The SPiT just slowly moved away from the top region.
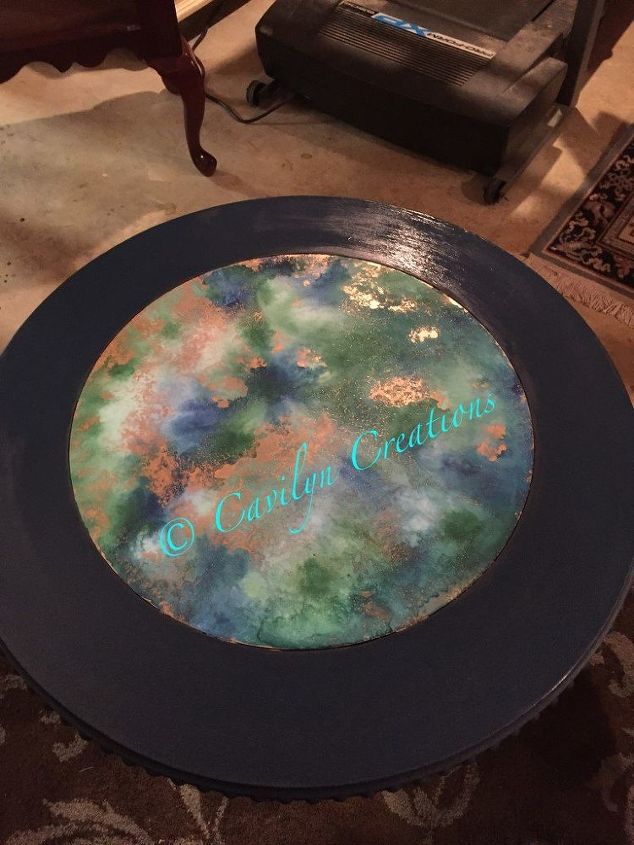
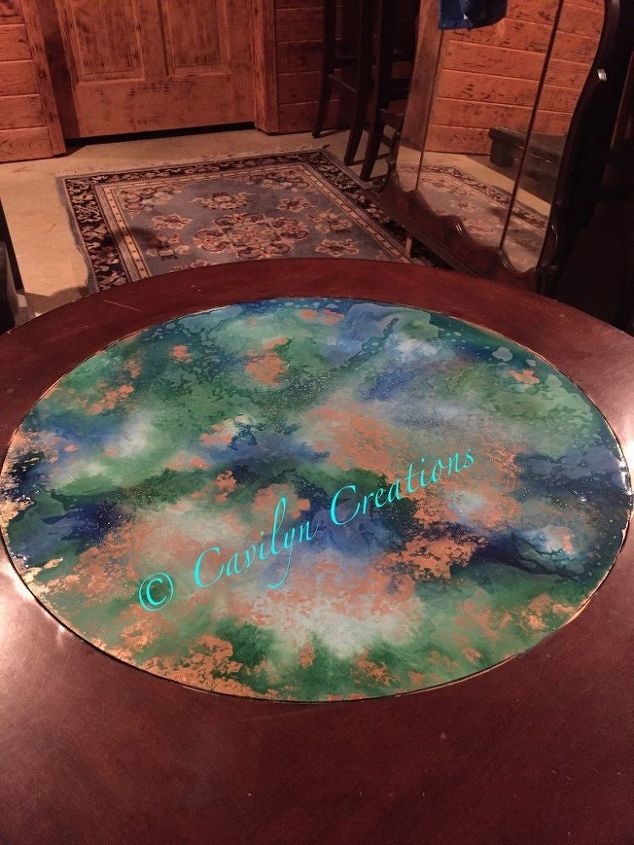
After it fully dries overnight, the edges are now safe to paint.Be careful, as it may or may not be fully dry due to the amount of peroxide and water you add so check everywhere on the piece. However, to protect the center from any possibility of the paint reacting with the spit, I spray lacquered the center section. Later, I chose a chalk paint for the sides because I didn’t want to distract from the center. Using a Cling-On brush, I applied the chalk paint Anchor in wide patches around the center and the sides of the table. I think that after about 3 coats, I had relatively good coverage around the center.
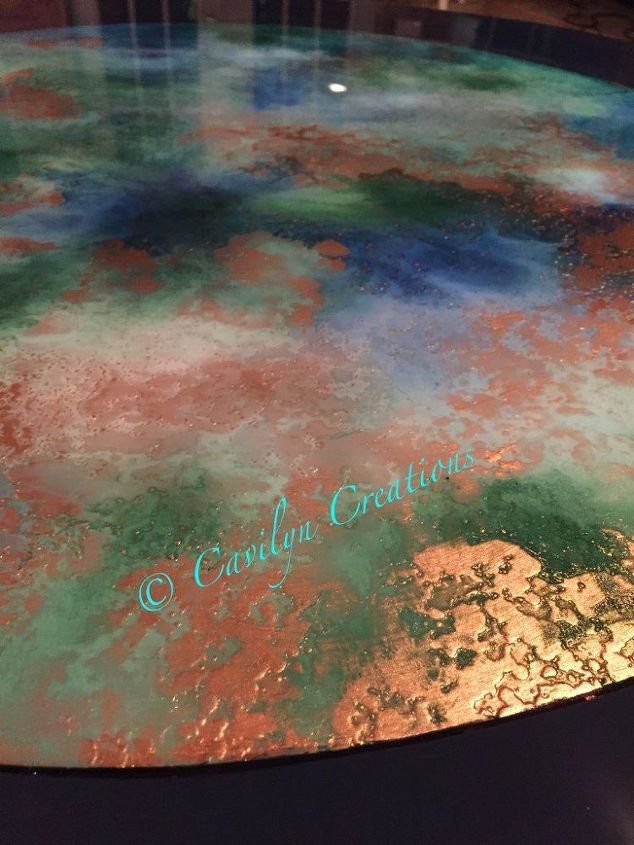
After painting, the piece is ready for epoxy! Although epoxy is not for the faint of heart due to patience it requires, the effect it gives is by far the best of any finish when added to any Unicorn SPiT piece. Follow the directions carefully on the box, and remember not to rush things! The more the rush, the greater the number of bubbles. Once you pour the epoxy, then you must use a heat gun to heat the wet epoxy to force the bubbles out. After heating, leave it to cure for 24 hours at least in an area with little traffic, and especially very little interaction with animals, otherwise you’ll get small hairs all in it. This piece was a bit tricky epoxy wise, as the center section was separated from the sides in some places, which later generated ripples in the epoxy. If I were to change anything about the way I did the piece, I would have taped up the sides to prevent the draining/dripping of the epoxy through the cracks between the chalk paint and the SPiT section. If I had done that, I may not have had to do 2 pourings, just to level out the top!
In terms of functionality, this piece is great. However, the appearance of this piece might have been greatly changed if the textured center piece were smooth. As such, not every piece will look exactly the same as its partner, or the things we base our ideas off of.
Comments
Join the conversation
2 of 19 comments
-
Love it and plan to try it! Excellent demo and photos.
-
i will also try this.


Frequently asked questions
Have a question about this project?
What is scientific reason for peroxide? Does it react with SpiT or the copper paint?
How do i texture the table?
Did you spray lacquer the case yet if the table before you added the US?