Pallet Coffee & Tea Drink Station

by
Mother Daughter Projects
(IC: blogger)
Previously, we've shown you how to deconstruct a pallet, in this post we share an idea of what to make with those pallet boards. It's important to point out that working with pallets is not for those who like right angles and nice straight edges--pallet lumber is definitely neither, but that is what people like about it. Pallets are usually free, pretty plentiful, and offer up a good amount of usable lumber. Embrace the imperfections that come along with using pallet wood.
If pallet wood is not your thing, then feel free to substitute purchased lumber in the same approximate size. Finish it with a weathered affect and you've got the rustic look without the imprecision!
If pallet wood is not your thing, then feel free to substitute purchased lumber in the same approximate size. Finish it with a weathered affect and you've got the rustic look without the imprecision!
{
"id": "3661932",
"alt": "",
"title": "",
"video_link": "https://www.youtube.com/embed/TtweM6cgguw",
"youtube_video_id": "TtweM6cgguw"
}
{
"width": 634,
"height": 357,
"showRelated": true
}
Watch the video!
Materials:
Tools:
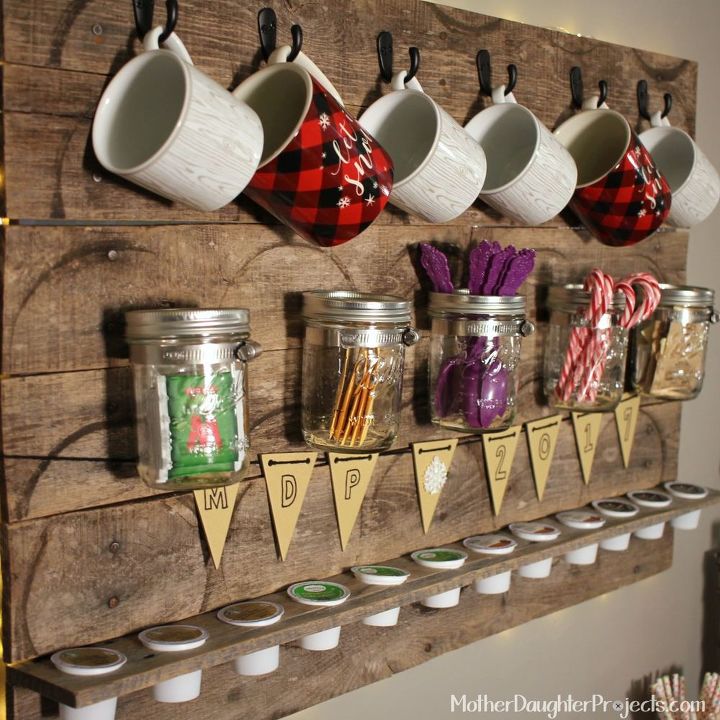
Part of the coffee/tea station will be a place to store K-cups. Clamp one of the pallet boards and a scrap piece of wood and secure it to your workbench with clamps.
We purchased a small piece of MDF to attach the slats to but we still needed to cut it to size (22x34"). Tip: Ask when you're at Home Depot to have the cuts made.
Once everything was dry, we started glueing with wood glue the boards into place, starting with the bottom two in which the K-cup holder was sandwiched between.
We used Rapid Fuse to glue the K-cup holder into place.
The remaining boards were glued and clamped into place and allowed to dry overnight.
The hooks were positioned across the top. We hot glued them in place just to hold them temporarily and then screwed them into place.
Drill a hole into each of the five hose clamps.
We removed the inner metal lid from the jars but replaced the ring. This is optional, but we like the finished look it give. Place the jar into the clamp and tighten the clamp with a screwdriver or drill.
This is a project that lends itself to creative interpretation. Your version, I'm sure, will be very different from ours based on the materials you use, the size that works for your space, and what you want to store in yours. Steph's version is perfect for her space. It replaces a mirror and is just what the space right above her new new live edge buffet table needed!
Enjoyed the project?

Want more details about this and other DIY projects? Check out my blog post!
Published December 28th, 2016 6:02 PM
Comments
Join the conversation
3 of 28 comments
-
 Pam LoCoco
on Aug 21, 2017
I LOVE this idea! What a way to think outside the box. Thank you for the inspiration.
-
-
 Bonnie Hamrick
on Nov 05, 2021
Gives me an idea or two! Great job! Thanks for sharing!
-
 Mother Daughter Projects
on Nov 06, 2021
Thank you
-
-


Frequently asked questions
Have a question about this project?