


Installing Base Molding

14 Materials
$100
3 Hours
Medium
As many of you know, Rob and I are on the homestretch of a little kitchen/living room renovation in our small home. Thankfully, Rob knows construction quite well as he owns his own subcontracting/carpentry business, but for the past 21+ months, he's been the project manager on a huge residential job for a well known manufacturer owner. Between him being on the dream job he's currently on and me working with Hometalk, our wheels have been spinning on how we could improve the space (or lack thereof) in our own humble abode. Instead of adding a full blown extension, we thought it was be more beneficial financially for us if we re-worked the space we already had. With this decision, we had to knock down some walls, make a few new ones, and add in things like base molding. Rob took the lead on this project as he knows what he's doing (and let's face it, I don't when it comes to construction!) and I was his little helper. 
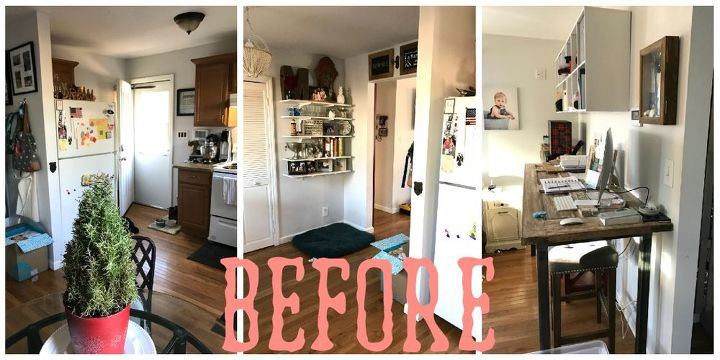
Here's a shot of our eat-in kitchen and the main wall of our living room before. We use our side door so it comes straight into our kitchen; there was a small half wall that our fridge was tucked into but it was the front thing you would see when you walked into our house which made things feel cramped. On the living room side, I had a long work table/desk and hanging cubbies (that was a Hometalk project a while back that I did with Rob) but as I mentioned in my basement makeover tutorial, when you work from home, it's nice to have a bit of division of the two. This is why we felt we had to open up this space, move my work stuff to the basement and basically have an area for just our computers and office items, but also a space that we could have extra seating if we have guests over.
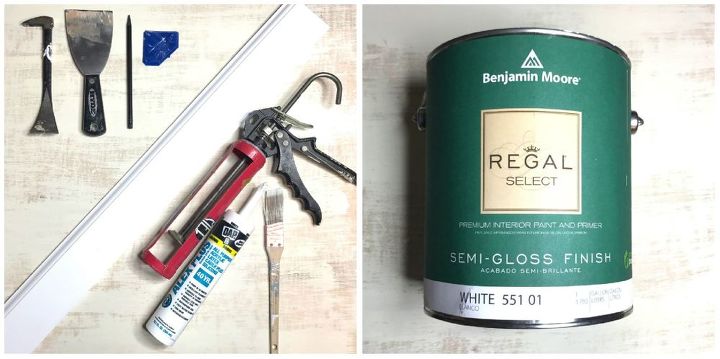
SUPPLIES:
-ARAUCO WM 623 9/16 in. x 3-1/4 in. x 192 in. Pine Primed Finger-Jointed Base Moulding (This will vary depending on what type of molding you already have in your house. You'll want to match whatever you already have in your house.)
-DAP Alex Plus all purpose acrylic latex caulk plus silicone for doors/molding
-caulk gun
-paint brush (Rob used a 2 1/2" brush to pre-paint the molding and I used a small 1" angled brush to feather in over any blemishes after the molding was installed.)
-pencil
-caulk sealing tool (it's the little blue thing in the picture...we had this on hand from a DAP PRO Caulking Tool Kit)
-putty knife
-pry bar
-Benjamin Moore Regal Select Semi-Gloss white paint
Not pictured:
-measuring tape
-chop saw
-box cutter
-18 gauge finish nails
-DeWalt nail gun
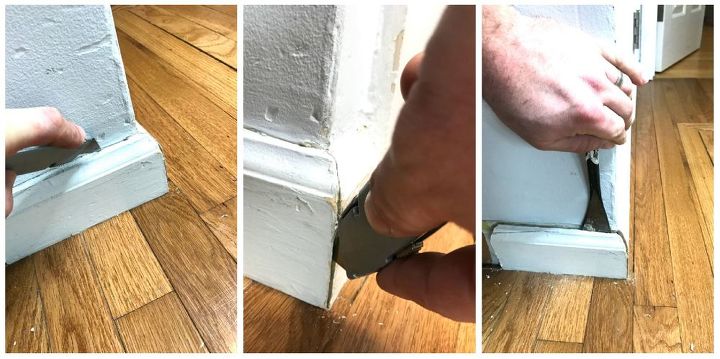
STEP 1: Remove old molding and debris/hardware
There was one wall that had some existing base molding on it so before Rob could start putting up any new molding, he had to remove the old stuff. He did this by using a box cutter to cut the seams, then pried the old molding off using a pry bar.
[*Note: as part of our reno, Rob essentially moved the doorway that leads from the living room to the kitchen over a little so that our new fridge could be tucked nicely in the corner which meant that we had to remove the existing base molding to that one wall and add new molding.]
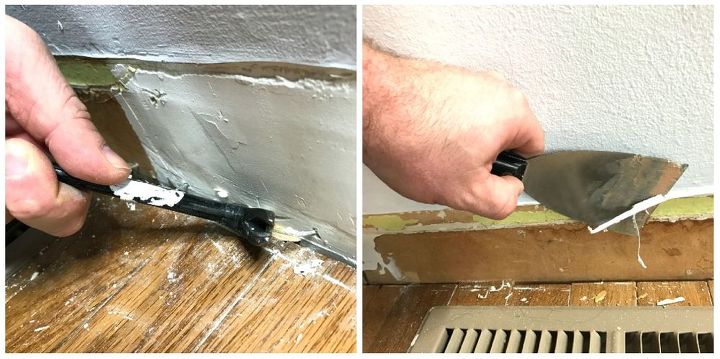
Next, he removed all existing nails and scraped off any debris or residue from the base molding site. You want as smooth of an area as possible so that your new molding sits flush against the wall.
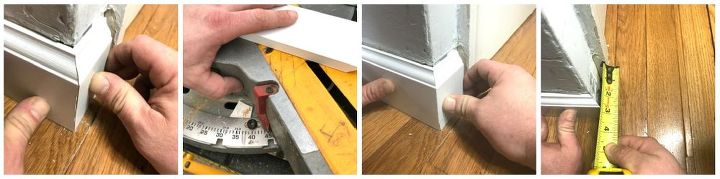
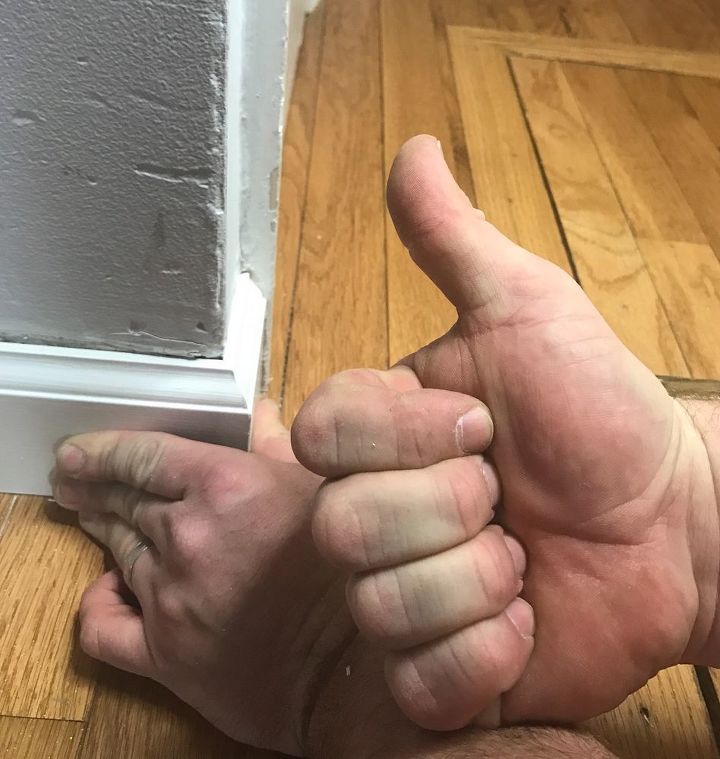
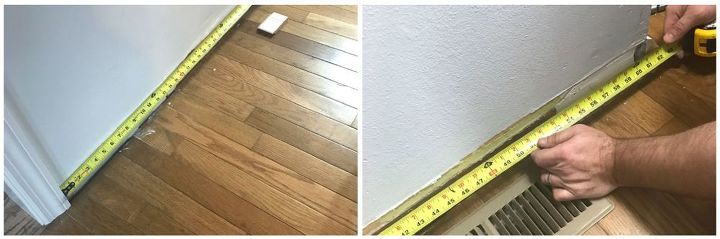
STEP 2: Test fitting (optional)
If you want to jump into cutting your base molding, you can ignore this step but Rob is a bit of a perfectionist when it comes to projects like these so before he started with measuring and cutting, he first used two scraps of base molding to figure out our corners. He started at a 45 degree cut for the corner but there was some open space so he knew he had to change the angle slightly more than 45 degrees because of the gap. He increased the angle by 1/2 a degree and that was perfect. Then, he measured from the outer edge of base molding to the casing of our hall/linen closet door.
*Note: The base molding Rob purchased came already white with primer, however, before we started taking pictures of the process, he applied 2 coats of the Benjamin Moore white paint.
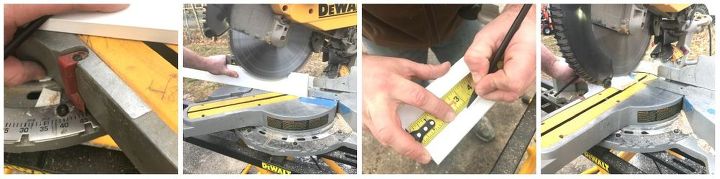
STEP 3: Measure and cut molding
After he finished testing the fit of the molding to the corner of our wall, he made sure the chop saw was at 45 1/2" degrees and that the angle was on the correct side, then he cut the angle side of the molding. Next, he measured and marked the molding where it would meet the casing of the door and cut that side at a 90 degree angle.
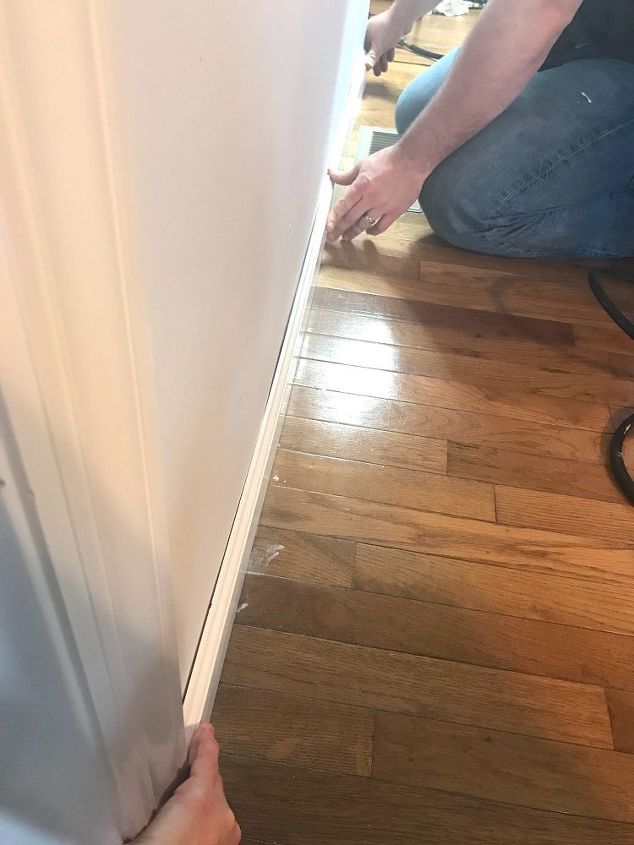
Before installing the molding, he checked the fit to ensure that all the cuts were correct/accurate. Good to go!
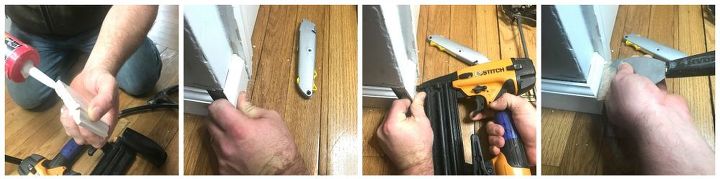
STEP 4: Install base molding
Finally, Rob applied a small line of caulking to the casing-side of the small piece of molding and applied it to the wall, then added a few finish nails. Once the nails were in, he took a putty knife and scraped off the excess caulking that seeped out.
After he installed the small piece of molding to the other wall in our hallway area, it was time to do the same to the front wall (this is the wall that our sliding barn door is on in our living room). He measured from the casing of the door opening to the outside [small] piece that he installed.
Once his measurements were done, he marked, cut and caulked both ends of the base molding and added finish nails.
*Note: we had a few walls of base molding to do but whether you're doing inside or outside corners, the steps are the same as above. You need only to change the direction of your saw when making your angle cuts.
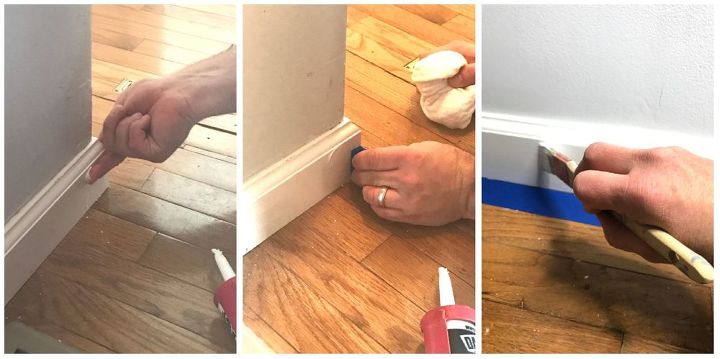
STEP 5: Fill in holes, paint
After all of the base molding was installed, Rob used a dab of caulking to fill in the nail holes, then he scraped off the excess with the small plastic caulking tool we have. Lastly, once the caulking was fully dry, I went back and touched up the paint on the molding where the nails were filled.
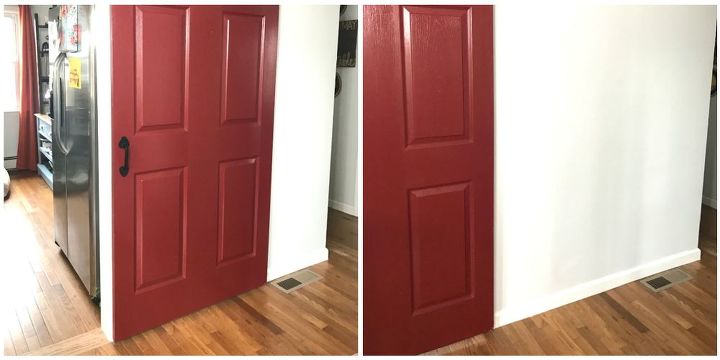
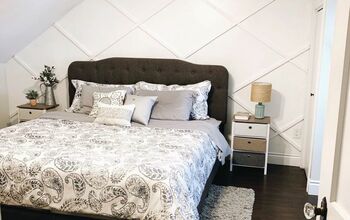
It's amazing what molding will do to your home! It makes things look so nice and clean. This is the wall that this tutorial was done on...so much better!
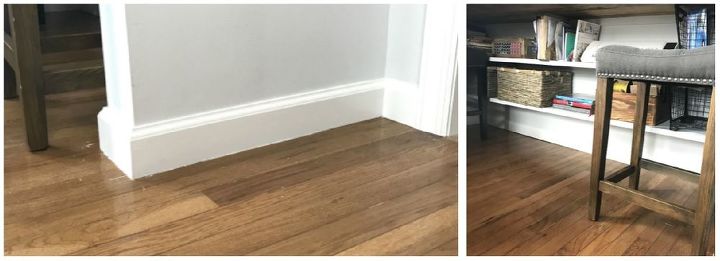
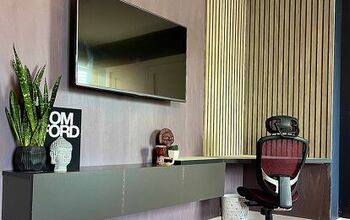
L: This is a shot of the outside wall of our built-in desk/additional seating area. It's a completely new structure so it needed base molding all the way around.
R: Rob also installed base molding underneath our new built-in desk.
And yes, I know the floor needs a good cleaning! haha! We still have to do a final deep clean to remove spackle, paint, etc. once the entire reno is finished. 
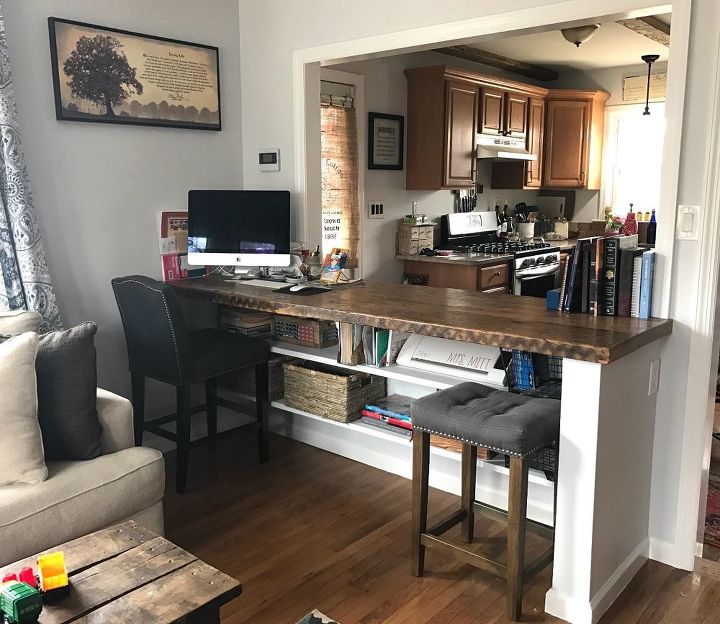
I'm totally in love with this area!!! I feel like the white base molding against our light grey walls and the new built-in desk top look so nice and clean. By the way Rob made the desk top out of wood we purchased from upstate NY--I'm so in love with it! 
*Side note: those kitchen cabinets are coming down next!!! Can't wait to show the results in a few weeks!
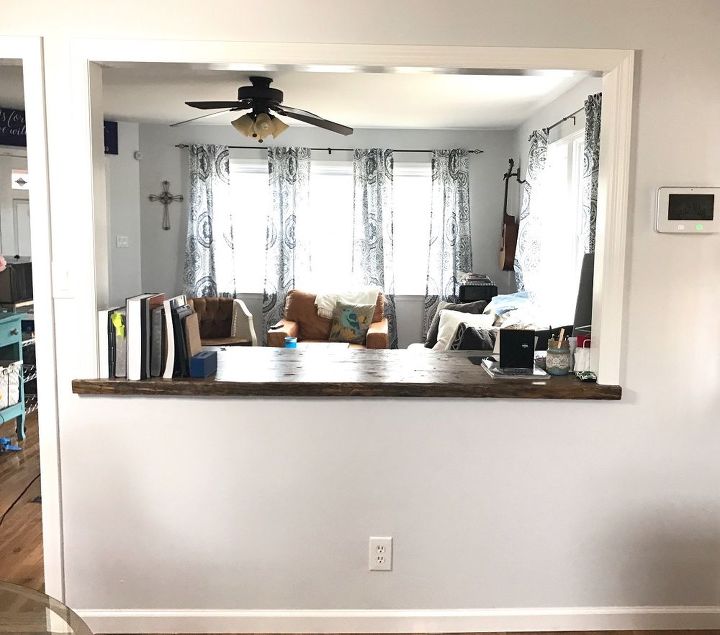
And finally, here is what our built-in desk/additional seating area looks like from the kitchen (our side door that we use to access the house is to the right)...this is where the little half wall came out and where our fridge sat before. Such a huge difference and it opens up our house so much!
*Note on the cost: Because we had all tools and paint on hand, it only cost us about $45 to do base molding on the walls that needed it in our living room and kitchen (we really only had to purchase the molding and the caulking). The cost will vary depending on how much materials and supplies you need.
We want to help you DIY, so some of the materials in this post are linked to sellers. Just so you know, Hometalk may collect a small share of sales from the links on this page.


Any price and availability information displayed on [relevant Amazon Site(s), as applicable] at the time of purchase will apply to the purchase of this product.
Hometalk may collect a small share of sales from the links on this page.More info
Comments
Join the conversation
2 of 29 comments
-
The finished project looks wonderful and speaks for itself. The before picture are nothing we can compare to though. They are cluttered shots with very little base board showing.
-
Perfect!


Frequently asked questions
Have a question about this project?
I have been searching for the right color of wood floors to put in my living room and dining room, and I found it in your house! Can you tell me the color of the wood floor that you have? Can you tell me also where you bought it? You and your husband make a great pair... love what you did!
DO YOU SINK THE FINISH NAILS IN THE MOULDING AND THEN FILL IN WITH PUTTY--HOW DO YOU SINK IN -WITH A REGULAR HAMMER ?
Would love to know where you purchased the wood to make that desk.