


Creating the Crackle

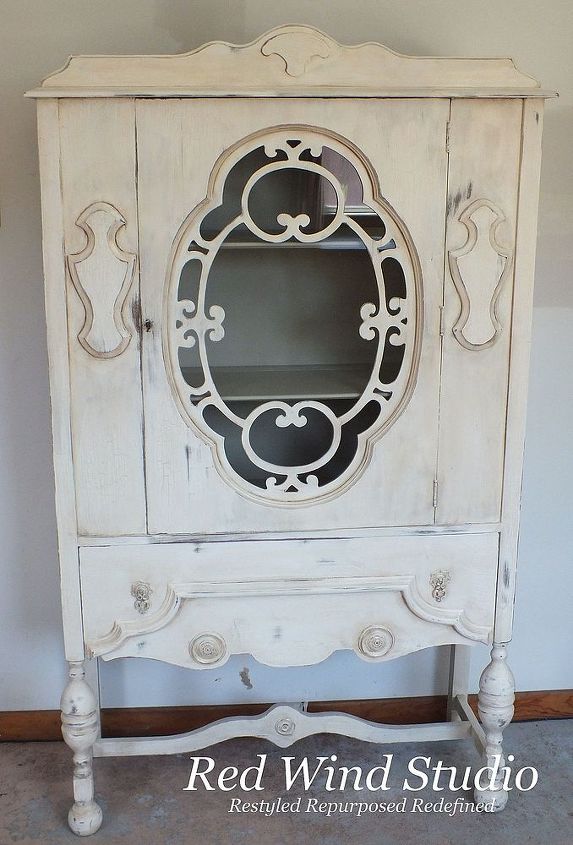
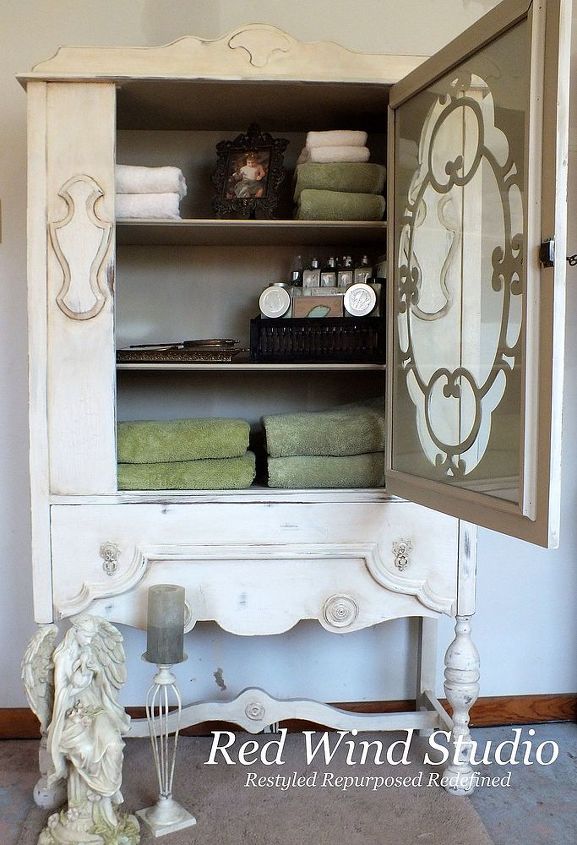
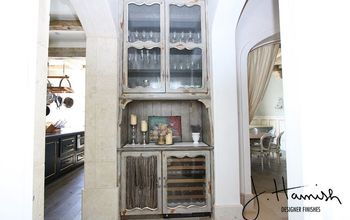
I purchased a beautiful small china cabinet that I wanted to give a very old, over painted and distressed look to, but didn't want to spend lots of money buying special additives or mediums to get the affect. I searched the internet for ideas, and one day when I wasn't looking for an alternative, what pops up in my Facebook newsfeed but a beautiful mirror frame with the look I wanted.
While I read the post I was amazed how easy this sounded and it was a technique used with Annie Sloan Chalk Paint ™. I cannot take credit for this oh so easy technique and wish I had saved the link so I could credit the lady I received this information from. Well here we go anyway. First you need to pick two colors for your piece, usually good contrasting colors, although my choices were more subtle. For this cabinet I chose Country Grey for the first coat and a custom OldWhite/Pure White mix for the second coat. First you want to make sure the paint you chose for your second/top coatis nice and thick so you may want to leave the top off the can over night, or as suggested in the post, I read leave it in the fridge with the lid off for a couple of hours.
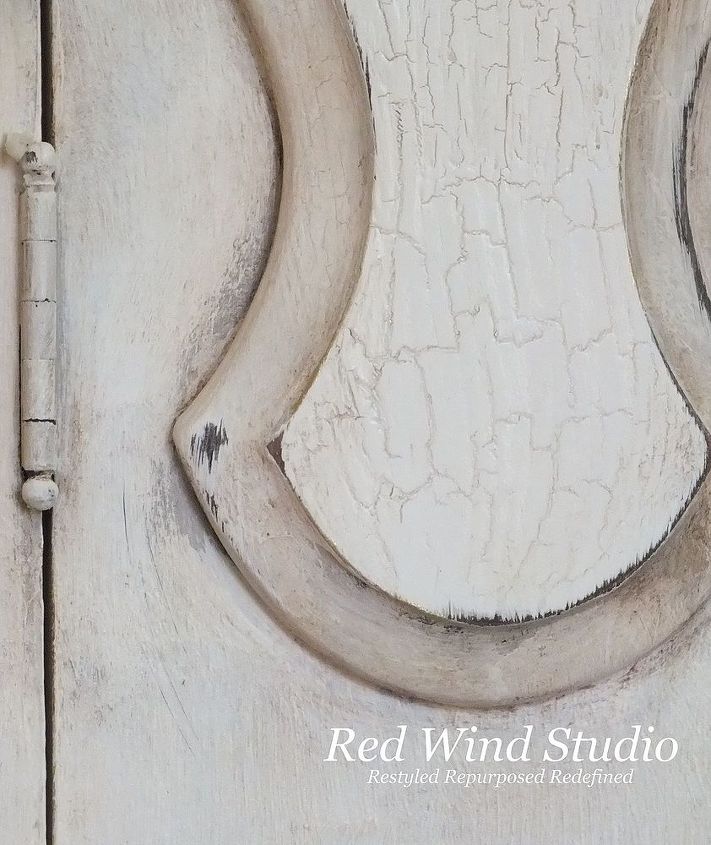
Once you have a good base coat on and dried you are ready to have fun making magic! Get out your can of paint for the top coat you have allowed to thicken up a bit and a hair dryer. Yes, I said a hair dryer. The trick to this technique is to get the paint to dry too quickly which makes is shrink and crack. Apply the paint in small areas relatively thick and use the hair dryer on hot to the area you just painted. Within a second or two you should start to see the paint cracking. You can certainly practice on a scrap piece of wood before attempting this on an actual piece of furniture.I would suggest picking and choosing where you want the crackle to be, as you can overdo it just the same as you can overdo distressing.
Have fun but be patient as the bigger the piece the longer this is going to take. Remember to do small areas at a time. Once the entire piece is painted and you are happy with the crackling you will want to wax it.
Now you have two options just apply a clear wax and leave it or use a dark wax over the clear wax to enhance the crackle. I went with the second option and used the dark wax. I was a little more generous with the dark wax in the heavily crackled areas and around the wood detail trim. I typically do the distressing after applying the clear wax. I like to do this so that if I happen to sand a little too deep and get into lighter wood thanI want the dark wax can bring back that deeper contrast I was intending.
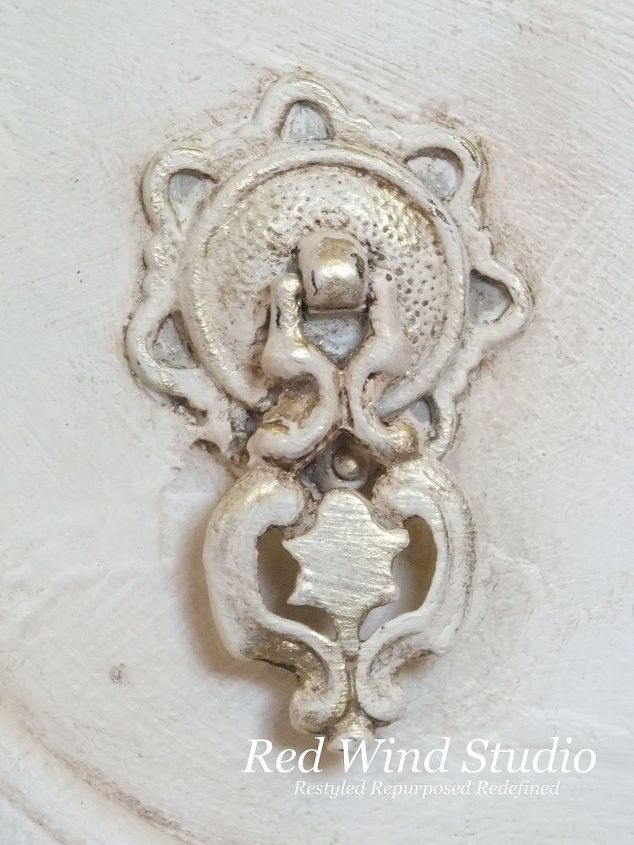
In the picture below you can see that the crackle is not everywhere and the dark wax as well is more intense in certain areas. As you work keep stepping back and look at the piece as a whole. Sometime we get tunnel vision and overdo a small area which isn't in keeping with your overall design idea. She is such a pretty piece I had to give her some jewelry. With a small artists brush I added some gold gilding wax to the handles, and a couple key wooden details.I had a great deal of fun restyling this vintage china cabinet and would use this technique again in a heartbeat. She didn't stay in my studio for very long and now sits happily in a home in Montreal.
http://redwindstudio.ca/store/2014/01/08/creating-the-crackle/
While I read the post I was amazed how easy this sounded and it was a technique used with Annie Sloan Chalk Paint ™. I cannot take credit for this oh so easy technique and wish I had saved the link so I could credit the lady I received this information from. Well here we go anyway. First you need to pick two colors for your piece, usually good contrasting colors, although my choices were more subtle. For this cabinet I chose Country Grey for the first coat and a custom OldWhite/Pure White mix for the second coat. First you want to make sure the paint you chose for your second/top coatis nice and thick so you may want to leave the top off the can over night, or as suggested in the post, I read leave it in the fridge with the lid off for a couple of hours.
Once you have a good base coat on and dried you are ready to have fun making magic! Get out your can of paint for the top coat you have allowed to thicken up a bit and a hair dryer. Yes, I said a hair dryer. The trick to this technique is to get the paint to dry too quickly which makes is shrink and crack. Apply the paint in small areas relatively thick and use the hair dryer on hot to the area you just painted. Within a second or two you should start to see the paint cracking. You can certainly practice on a scrap piece of wood before attempting this on an actual piece of furniture.I would suggest picking and choosing where you want the crackle to be, as you can overdo it just the same as you can overdo distressing.
Have fun but be patient as the bigger the piece the longer this is going to take. Remember to do small areas at a time. Once the entire piece is painted and you are happy with the crackling you will want to wax it.
Now you have two options just apply a clear wax and leave it or use a dark wax over the clear wax to enhance the crackle. I went with the second option and used the dark wax. I was a little more generous with the dark wax in the heavily crackled areas and around the wood detail trim. I typically do the distressing after applying the clear wax. I like to do this so that if I happen to sand a little too deep and get into lighter wood thanI want the dark wax can bring back that deeper contrast I was intending.
In the picture below you can see that the crackle is not everywhere and the dark wax as well is more intense in certain areas. As you work keep stepping back and look at the piece as a whole. Sometime we get tunnel vision and overdo a small area which isn't in keeping with your overall design idea. She is such a pretty piece I had to give her some jewelry. With a small artists brush I added some gold gilding wax to the handles, and a couple key wooden details.I had a great deal of fun restyling this vintage china cabinet and would use this technique again in a heartbeat. She didn't stay in my studio for very long and now sits happily in a home in Montreal.
http://redwindstudio.ca/store/2014/01/08/creating-the-crackle/
Comments
Join the conversation
3 of 47 comments
-
Gosh, I get so tired of this back and forth debate about paint vs stain. I am open-minded enough to enjoy both in my home. It depends on what is best for individual pieces. Makes for a more interesting look to have a combination rather than everything painted or everything stained! This piece looks beautiful painted!
-
I SO agree Donna!


Frequently asked questions
Have a question about this project?