


Lighted Tomato Cage Angel

I love repurposing items! So a couple of years ago when I spotted tomato cages in a garden department, my mind went wild with ideas. The one I got most excited about was lighted yard angels. I always wanted Christmas yard art but I am not crazy about what is on the market and if I did like it the price was too high. Plus I don't like my stuff to be the same as everyone else!!
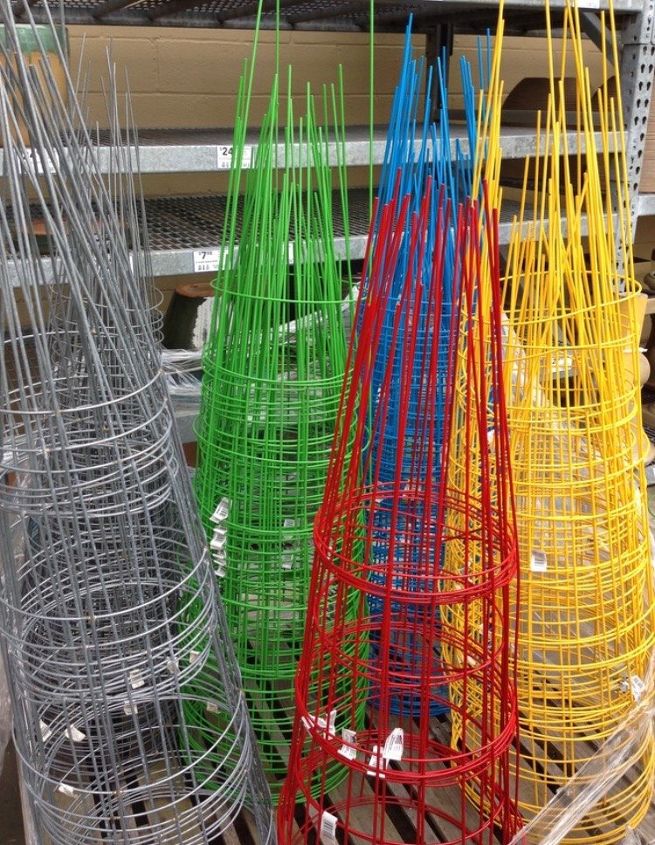
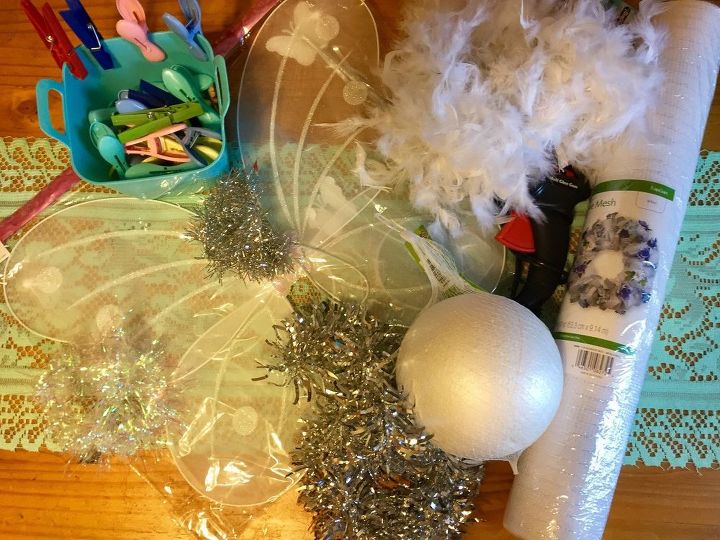
I gathered supplies (enough for 3 angels cause as a decorator I follow the odd number rule), shopping at places like dollar tree, king dollar, and of course the garden department of lowes. I already have my tools on hand like plastic clothespins, zip ties, and glue gun. I learned a long time ago when using a hot glue gun, clothespins come in handy not only to hold things in place where you need them but to keep you from burning your fingertips off! Anyone that has used hot glue has burnt themself trying to hold something in place while it dries. *Plastic clothespins work better than wood because they come off easier at the end.
I begin by wrapping the tomato cage with string lights using clothes pins to hold them in place while I'm evenly spacing them out. I made sure I kept the plug-in to the bottom of the angels body which is the larger end of the tomato cage. If you use solar lights you need to make sure your panel is at the bottom so it can come out and catch the sun and if you use battery operated lights you need to make sure you can get to the battery pack. *Obviously if your angel is going outside you need to make sure your lights are rated for outdoor use. Once lights are in place I secure them randomly with zip ties in various places.
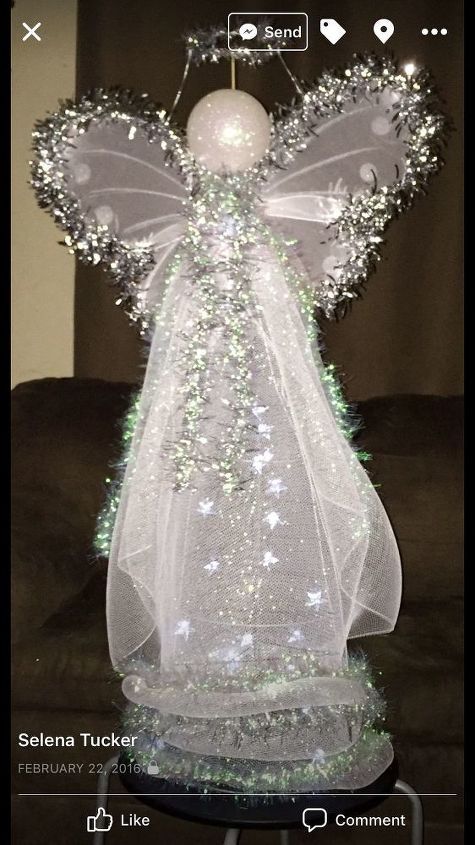
Next using the floral mesh, create a dress on your angel's body. Again use the clothespins to hold it in place and then to help you glue it on when you're finished with your design. It helps keep the dress on the cage by lipping the material around the wire and gluing like a seam.
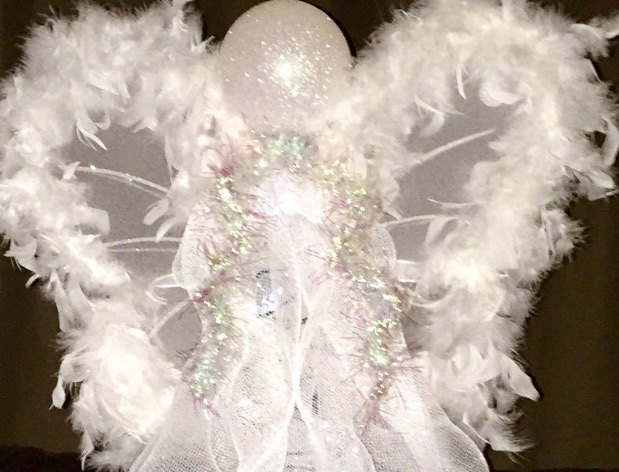
Now time for the beautiful wings. This is another time you can add your personal touch! You can use feathers, garland or any other material you want to make it more like an angel than a fairy or a butterfly. Start by outlining using your clothes pins to hold In place then as you glue. If you would like you can fill the entire wings with garland or feathers. Keep in mind they will get heavier than more stuff you use. You are ready to attach them to the body using hot glue and zip ties to secure tightly.
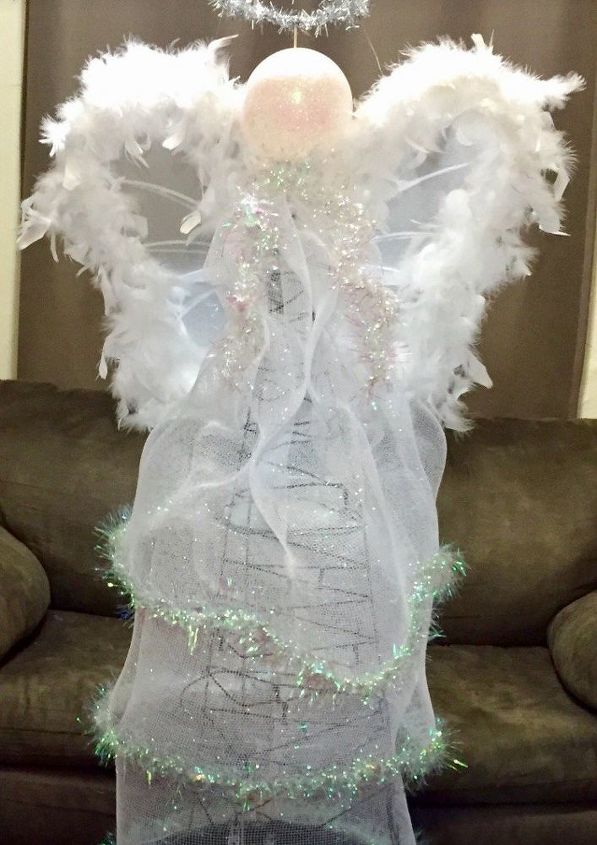
She of course now needs her head! I found a large enough glittery ornament that I was able to glue on and zip tie securely. My back up plan was a large foam craft ball that could be painted with glittery glue or with foam safe glitter paint. If you go that route and she's going to be outside you should weather proof with a clear sealant. **You would also need to do this before anything else so her head can be dry when you get to the step.
Using either shimmery pipe cleaner or floral wire wrapped with garland, form a circle a little larger than the angels head. Make a tripod using floral wire attached to the halo. Glue the middle leg of halo tripod to the back of the head and the other two are attached to the wings and secured with glue.

We all accesorise ourselves when we dress up so we should do the same to our angel! This is another time you get to personalize to your taste. You can use flowers, boas, whatever you like, just be sure you secure it with zip ties, glue, or both.
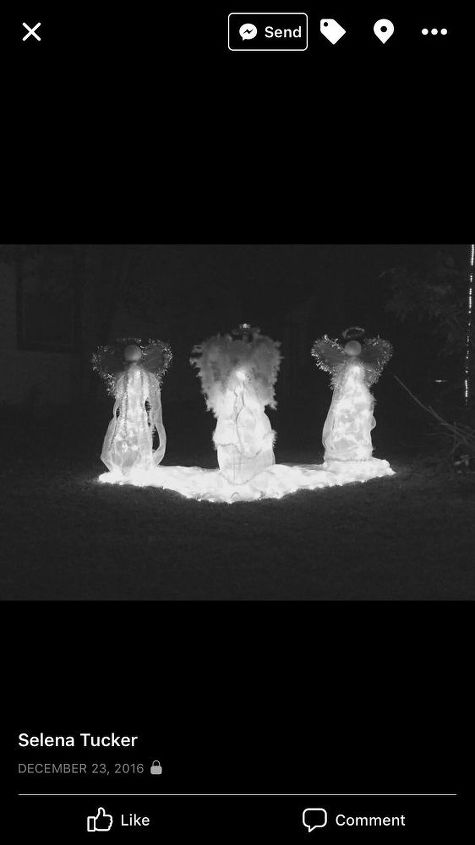
Now you can set your angel (or angels) up in the yard. I used tent stakes to secure to the ground. You can use any kind of garden stakes to keep her in place on those windy days. Of course if you're keeping her inside to enjoy you don't have to stake her down, you just find a good spot to place her. Plug her in and light her up and stand back and be proud of what you created...and be ready for people to ask where you got her!!
We want to help you DIY, so some of the materials in this post are linked to sellers. Just so you know, Hometalk may collect a small share of sales from the links on this page.
Resources for this project:
See all materials


Comments
Join the conversation
-
Beautiful absolutely beautiful! I’m going to make one and hopes it looks something like yours. Did you make your own wings or did you buy them already made?
-
Thank you😊! I bought wings at dollar tree and hot glued feather boa and garland around the edges. Hope you enjoy! I’m sure it will be beautiful!!


Frequently asked questions
Have a question about this project?
This is really cool... then you can store the christmas decoration and use it for tomatoes in the summer!
Hi! How did you get the head to be steady? Did you zip tie the legs of the cage together then glue the head on top or something else?
Did you do anything to feathers for waterproofing when it rains?