


Hexagon Wall Treatment

by
Alicia W
12 Materials
$40
5 Days
Advanced
I’ll let you in on a little secret...hexagon is going to be a huge trend this year wether it’s the shape of a light fixture or the pattern of fabric, it’s gonna be hot!
I have a wall in my office that really needs to be updated so I thought I would jump on this trend. I saw this idea on Vintage Revivals and decided to give it a try!
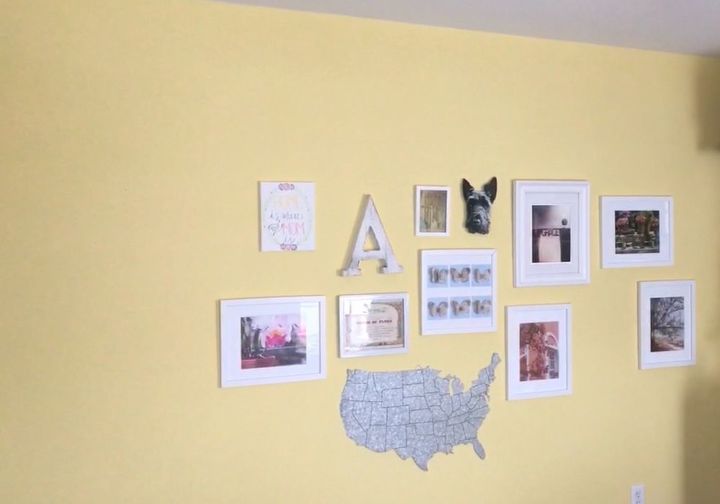
This is my wall before - boring but perfect for a makeover.
I started by painting the wall a flat white.
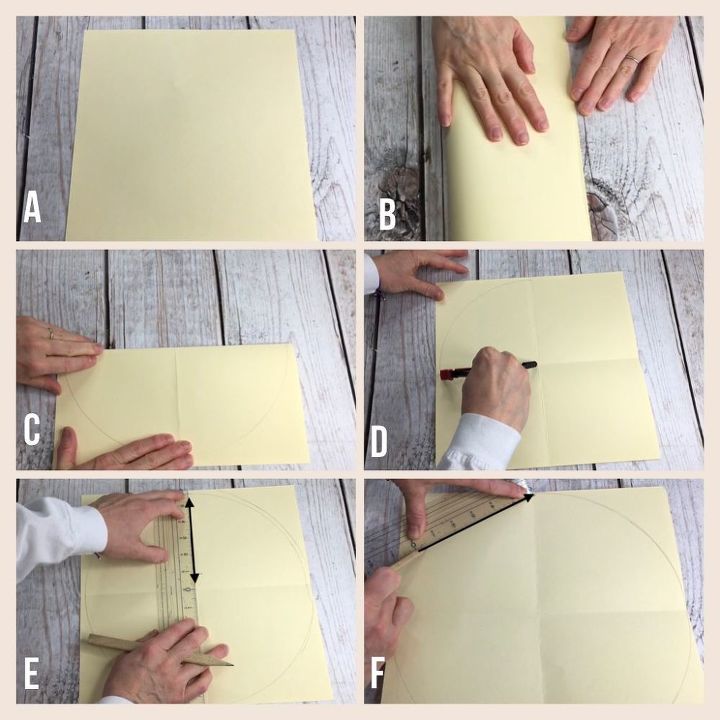
I started by deciding how large I wanted my hexagons to be. After measuring my wall, I decided that 12” x 12” would work. I’m not a math wiz so I had figure out how to make a perfect hexagon.
A-I began with a square piece of 12”x12” paper
B-I folded the paper in half diagonally
C-I folded it in half horizontally
D-I opened the paper and placed a compass in the center, making a circle
E-I measured from the center to the edge of the circle which was 6”
F-Using that measurement, I drew six lines along the outside of the circle making a hexagon
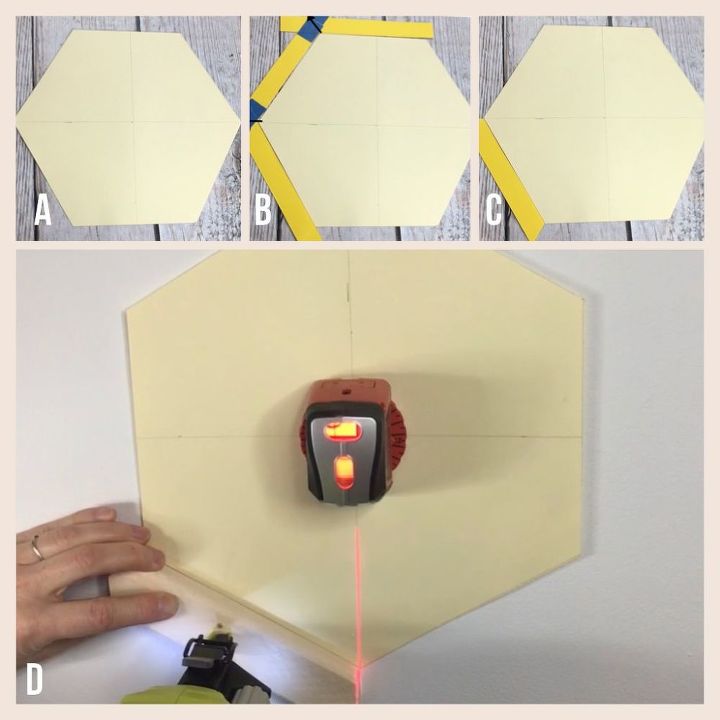
A-I cut out the hexagon
B-I cut out 1” pieces of paper
C-And laid them along the outside of the hexagon. I cut the strips as a template
D-Once the wooden pieces were cut, I used the hexagon template as a guide.
Now to cut the wood. I used 1”x2” pine.
A-I began by cutting the straight end at a 30 degree angle
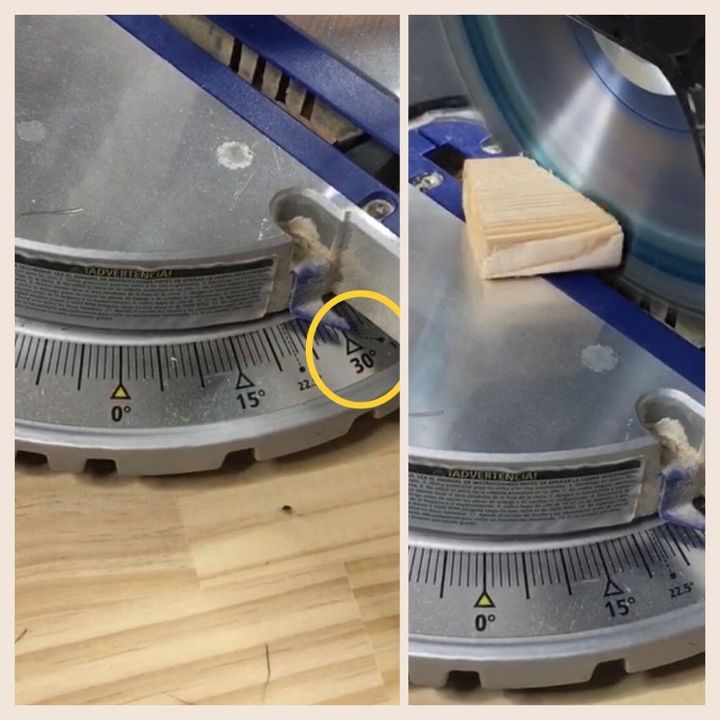
Now to cut. I used 1”x2” pine.
I set my miter saw at 30 degrees.
I cut the first piece creating a 30 degree angle on one end.
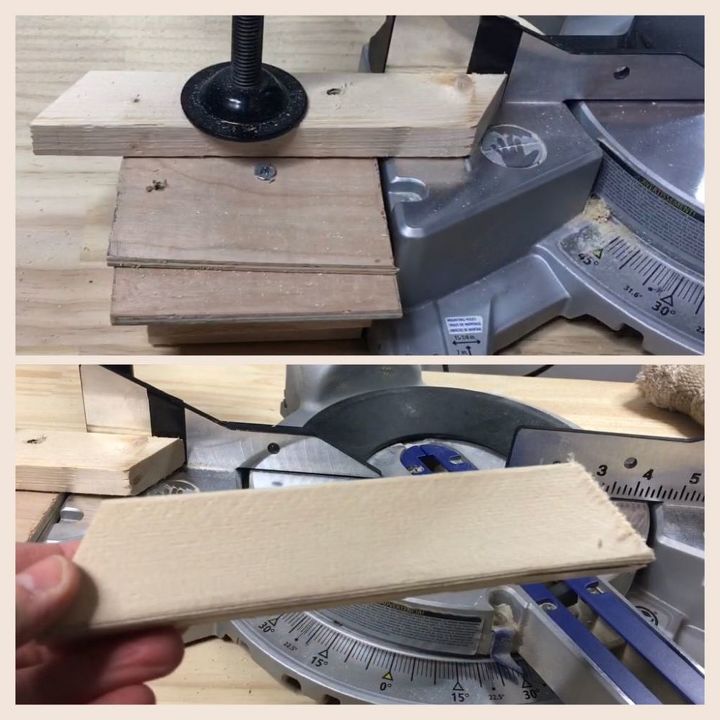
Using a template that I made, I placed the cut edge in line with the template and cut. Now I have a piece exactly like the template I made with paper.
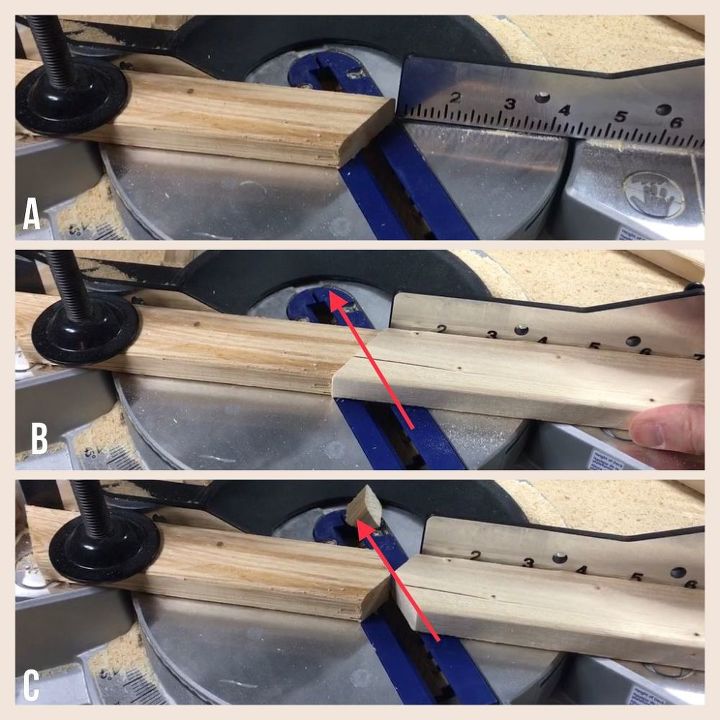
After cutting a lot of pieces, I needed to cut them again so they would fit together.
A-Using the wooden template, I lined up one piece of wood and clamped it to the saw.
B-I then lined up a second piece of wood to fit against the first piece
C-And cut along the red line.
All of the pieces needed to be cut like this.
After cutting all of the pieces were sanded.
My wall was yellow so I painted the wall white.
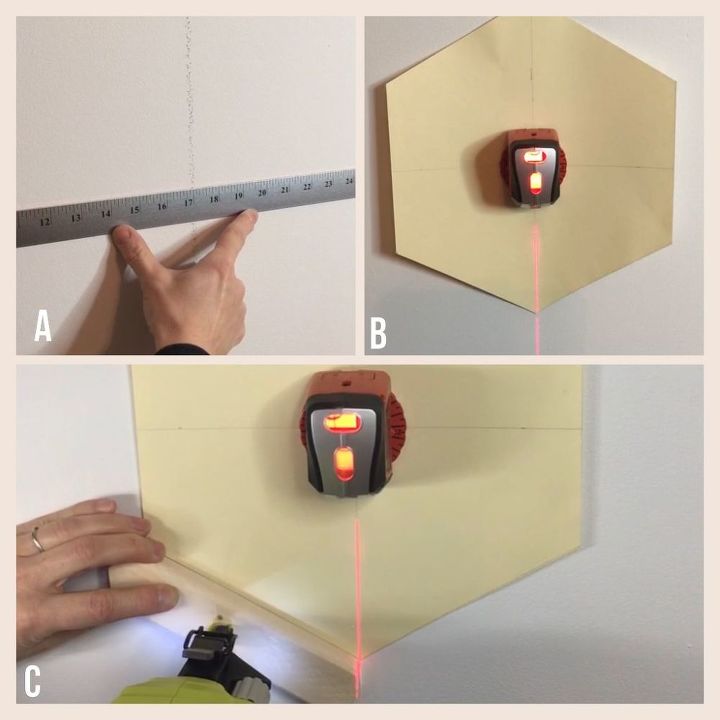
A-Using a laser level, I found the center point on the wall and marked it.
B-I placed the laser level in the center of the hexagon template and attached to the center point in the wall.
C-I placed the first piece along the edge of the template and then continued to add pieces and make hexagons.
After all of the wood was on the wall
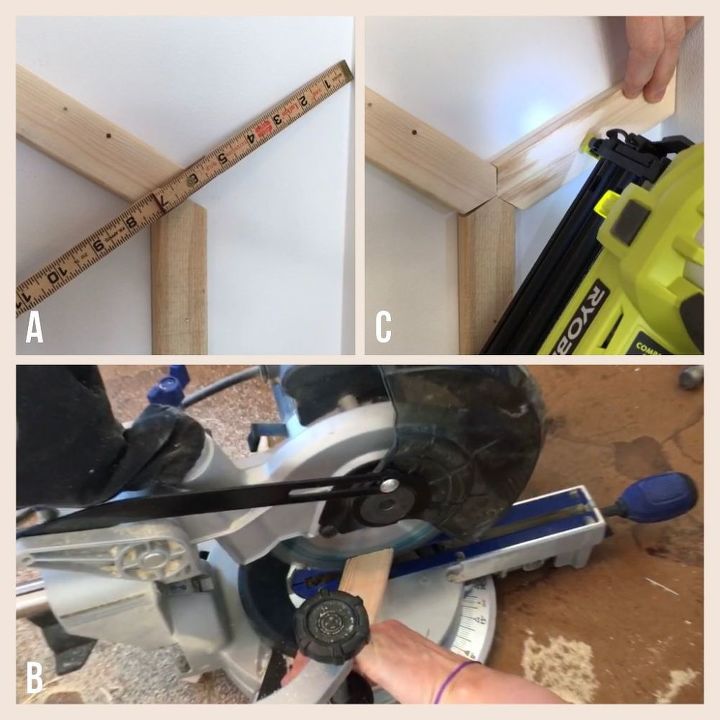
To finished along the edges,
A-I measured from the corner of the hexagon to the wall
B-And cut those measurements using the miter saw set at 30 degrees
C-And attached those pieces with a air nailer.
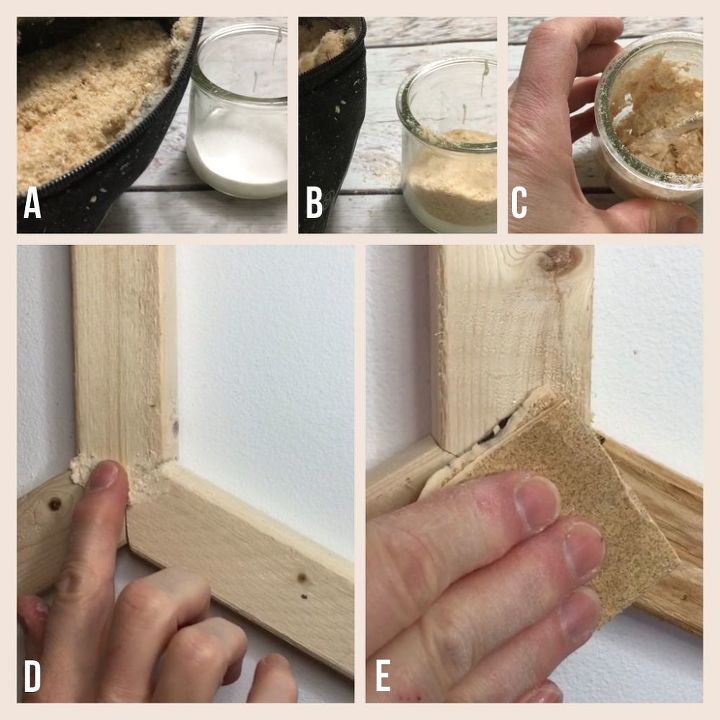
After all of the wood was on the wall, I needed to make a wood filler because, as I said above, I’m not a math wiz and some of my wood didn’t meet perfectly.
A-Using white glue and sawdust
B-I added even amounts
C-and mixed until the consistency of oatmeal
D-I used my finger to fill in the cracks
E-and when it was dry, I sanded with fine grit sandpaper
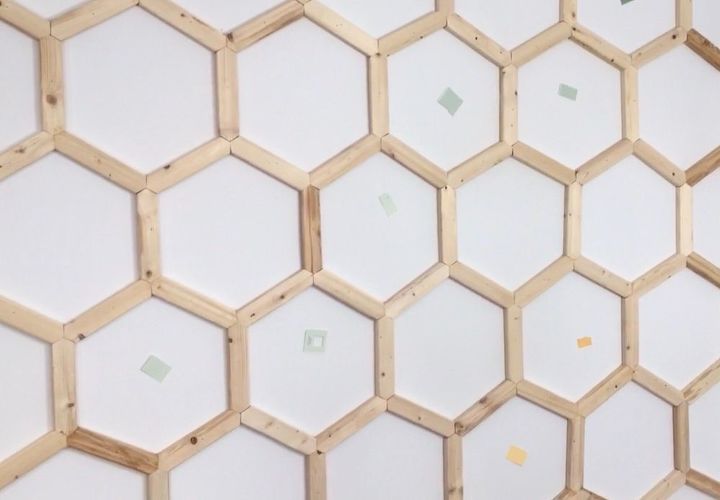
I wanted to paint the wall with several colors, making it look like falling confetti.
I cut the paint samples and taped them to the wall to decide how to place the color.
I taped off each hexagon with painter’s tape.
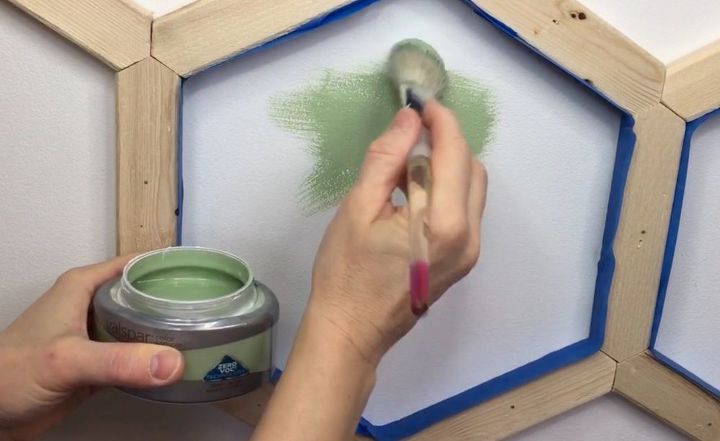
I began by painting the darkest color. I used sample sizes which were the perfect amount.
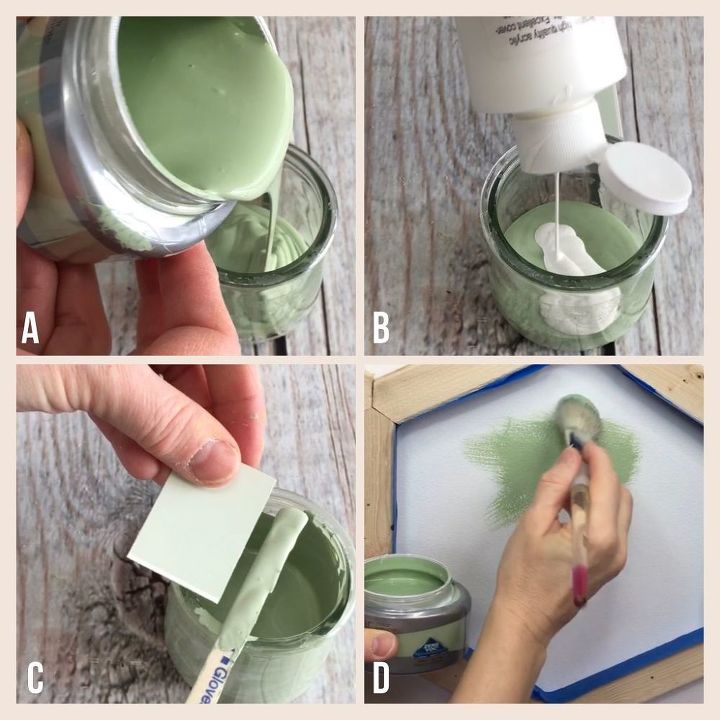
I also wanted to do two lighter shades of each color. For the medium shade,
A-I poured the dark color into a container
B-I added white to the dark color
C-I mixed it until it was the color I was looking for
D-Then I painted a few hexagons that color
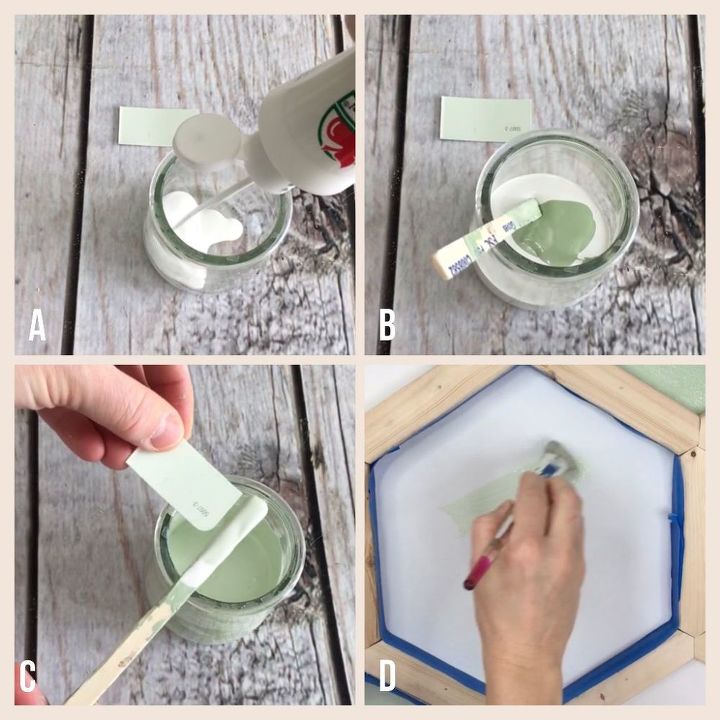
For the lightest color,
A-I poured white into a container
B-and added the dark color
C-I mixed the paint until it was the color I was looking for
D-Then I painted a few hexagons that color
I ended up using four different colors
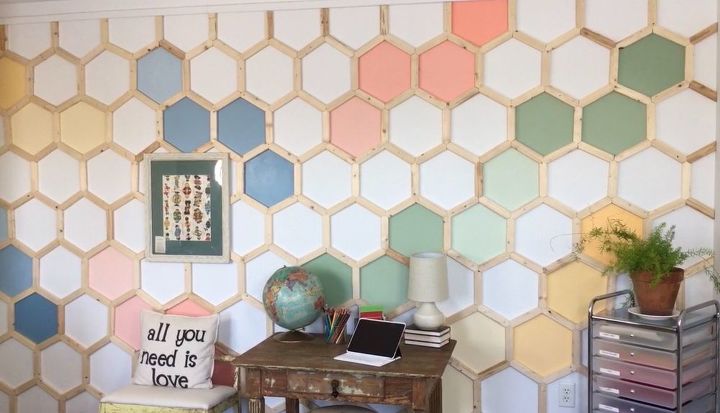
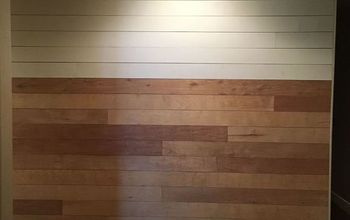
And here is the finished wall. I’m so happy with how it turned out. It’s so different and really shows my personality.
While this is was a time consuming project, it was well worth it.
{
"id": "4627740",
"alt": "",
"title": "",
"video_library_id": "7132",
"thumbnail": "https://cdn-fastly.hometalk.com/media/2018/01/29/4627740/hexagon-wall-treatment.jpg"
}
{
"width": 634,
"height": 357,
"showRelated": true,
"noautoplay": ""
}
Resources for this project:
See all materials


Any price and availability information displayed on [relevant Amazon Site(s), as applicable] at the time of purchase will apply to the purchase of this product.
Hometalk may collect a small share of sales from the links on this page.More info
Comments
Join the conversation
2 of 222 comments
-
Just gorgeous - so effective!!!
-
It looks beautiful n need lots of patience.


Frequently asked questions
Have a question about this project?
That is pretty cool. How long did it take you to finish? You could if you want, measure out random ones and make random small shelves. They would just pop out and give the wall a 3d look. This would look really cool in a teenagers room to or backsplash in a kitchen or bathroom, or even that dead space on the shower/ bathtub area, with small shelving. I really like this idea alot. Thank you for sharing this idea.
How difficult is this to keep clean? I would think the unfinished wood would be dust and grease catchers
You want giant bees? Because this is how you get giant bees. 🤣🤣🤣
great job! Very unique look.