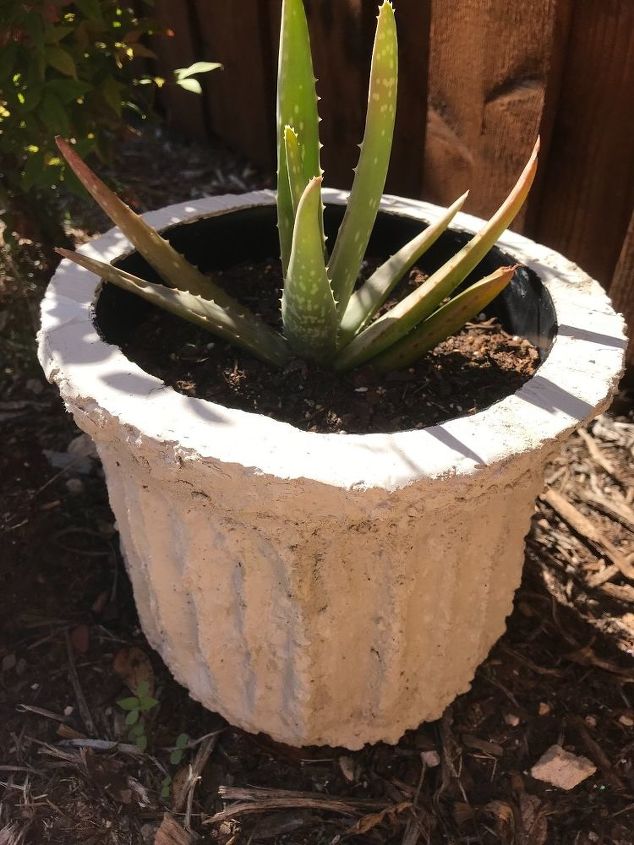
Concrete Pottery - Yep You Read That Correctly

Lisa L Hall
by Lisa L Hall
7 Materials
$15
2 Days
Easy
So I was in search for some pots for my back yard. I want to get those huge ceramic types.....until I saw the price tag. I don't know how to do pottery, although it looks like it would be fun to learn. I also don't have a kiln.

So while I was at Home Depot looking for ways to keep the bunnies out of my pool equipment, it hit me.

Concrete and clay have similar properties. So I bought a small bag of quick dry concrete and started my experiment.

Unlike pottery clay, concrete or cement need a form. That was step two. What could I use for a form?

My son goes through protein powder monthly so I have these huge plastic tubs sitting around the house just waiting to be recycled. Now they can be reused.

I'm really happy with the result. After doing my experiment I have to say working with cement is much easier and much smoother of an end product than concrete.

Ok...some people aren't aware there is a difference between the two. Concrete will have small pebbles in the mix. Cement is just the powder with no stones. So depending on what look you want to achieve you can pick either one.

It was fun. It did take a while. As you will see below, none of the steps take a long time but you do have to wait for set up before moving on to the next step.

Have fun....I'm doing to try to color in another batch.
So here are all the things I used. Empty protein container, concrete mix, trowel, and a .


I used rubber gloves and water as well but they are not pictured.
So step one was to cut the top off the container. It was easily done with a utility knife. PLEASE BE CAREFUL. NOT SOMETHING A CHILD SHOULD DO.


Once I got the top off, I used the same knife to poke drainage holes in the bottom. I would suggest a large nail or use a drill bit. I took a lot longer used the knife.


On to the fun part
Mix your concrete or cement per the instructions on the bag. They are all pretty standard, mix in water slowly unit you get the consistency of mashed potatoes.


I used some wax paper initially...It soaked into the concrete so I switched to setting the project on aluminum foil.


The container is upside down, open side to the bottom. I built the top edge and let it set for 15 minutes. I'm using quick dry concrete so it sets up fast.


Once it is set up you can lay it on the side (keep it on the aluminum foil) and proceed to put the concrete around the rest of the container.


You will need to wait 15 minutes for the set up before moving it to the next section. I waited an hour just to be safe. I didn't want any sliding.


I split the container into 4 sections.
So you can see that as I'm working around, I'm fluting the sides to give it a design. You can leave it smooth too.


The concrete is really hard to get perfectly smooth due to the pebbles. But it is a cool look with the pebbles too.


I didn't cover the bottom completely due to needing the drainage but I did extend the concrete so the pot would be up off the ground a bit so it would drain better.


If you want a perfectly smooth pot, use cement.


So to get the design, I smoothed out the concrete using the trowel first and then I was able to use the convex jointer and in a back and forth motion create the look you see above.


It doesn't take much pressure to achieve the look.


I did let each section dry for an hour before going on to the next section. My seams were not noticeable since both materials are forgiving, in that you can smooth one section over another.


I waiting 24 hours before putting in the potting soil or plant.
Here is the finished product in my planter. If you have a drip system in your yard you can add a section to that hose and put in smaller drips for your planters. I haven't gotten to that yet so I just have to remember to water them.


These are nice because when winter hits, I can bring my plants inside.
Resources for this project:
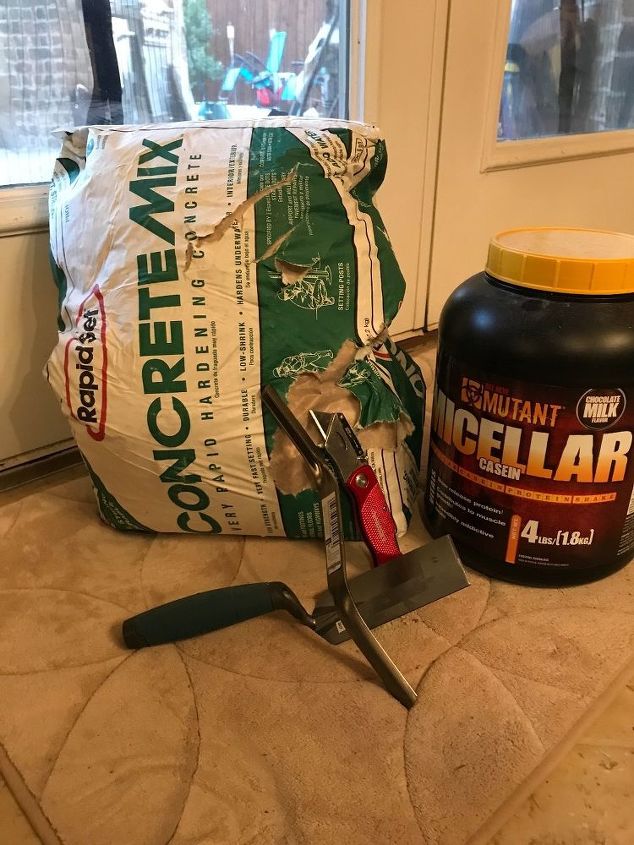
See all materials
Any price and availability information displayed on [relevant Amazon Site(s), as applicable] at the time of purchase will apply to the purchase of this product.
Hometalk may collect a small share of sales from the links on this page.More info
Frequently asked questions
Have a question about this project?
3 of 7 questions
  • BSalamone BSalamone on May 16, 2018

    Did you plant directly into pot. Or allow time for the cemen t to cure. Does it not harm plants if not cured?

  • Tamara Corwin Tamara Corwin on May 27, 2018

    Love this! Just wondering...how did you finish the bottom and how did u do the drainage holes, etc. Thanks

  • Regina and Brian Regina and Brian on Jun 05, 2018

    what size was the pot? looks looks 6". will that work on 10" as well?

Comments
Join the conversation
2 of 30 comments
  • JudyH JudyH on May 27, 2018

    Love your technique! You can also make large concrete planters using two sizes of cheap styrofoam ice chest. Pour a batch of quickcrete in the bottom of the larger container. Set the smaller container on top of the quickcrete and center it. Use plastic drinking straws to poke holes through the bottom of the smaller container, the unset quickcrete, and the bottom of the larger container. This makes your drain holes. Mix another batch of quickcrete and pour it between the sides of the two containers up to the top edge. Let quickcrete harden, then peel away the larger container and remove the straws. If you want your container aged and covered in moss, paint the outside with buttermilk and rub on some dirt. Seal it up in a heavy plastic bag for two weeks and moss will grow on it.

  • Kim Kim on Jun 03, 2018

    You talked about the pebbles not giving a smooth surface. I like it with a rough finish but you can use Portland cement sold at Lowe’s .That will give you a smoother feel. Great job. 😊

Next