


DIY Faux Galvanized Wall Planter
12 Materials
$20
3 Hours
Easy
When I first saw galvanized wall planters I fell in love, and I just knew I had to have them… But then I realized that to get the same look as in the photo, I would need 6 or 7 of them… So I took a second look at them, and I thought to myself “hey, those kinda look like cookie tins!” And that’s when I knew, I just had to make my own.
See the full post including additional photos here:

So, I buzzed down to our local thrift shop and picked up 6 cookie tins for under $5 bucks… total… not each. I was feeling high on the horse after landing such a good deal that I carried on straight to the garden center. Once there I loaded up on modern-looking plants to fill my soon to be knock-off galvanized wall planters.
Let’s jump right into how to make a DIY Galvanized Wall Planter
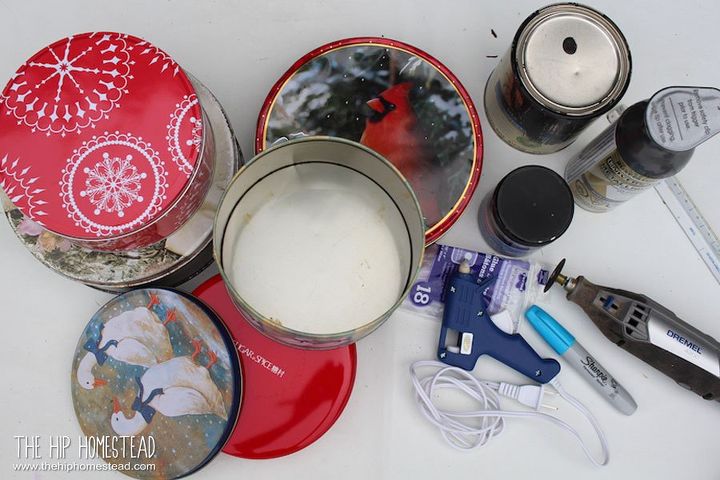
Here's what you'll need:
- Cookie tins – I chose various sizes but your’s could be all the same
- A ruler & Sharpie marker
- Tin snips
- A Dremel hand tool with a metal cutting blade
- Safety goggles
- Sandpaper – I used a fine grit
- Hot glue gun & glue
- Spray paint – I used Dark Metal, but you could easily use bright fun colors
- Craft paint – I used black & silver to create the aged metal look
- Sponge – For the faux metal finish
- Potting soil
- Plants of your choosing
- Decorative or wildcrafted moss
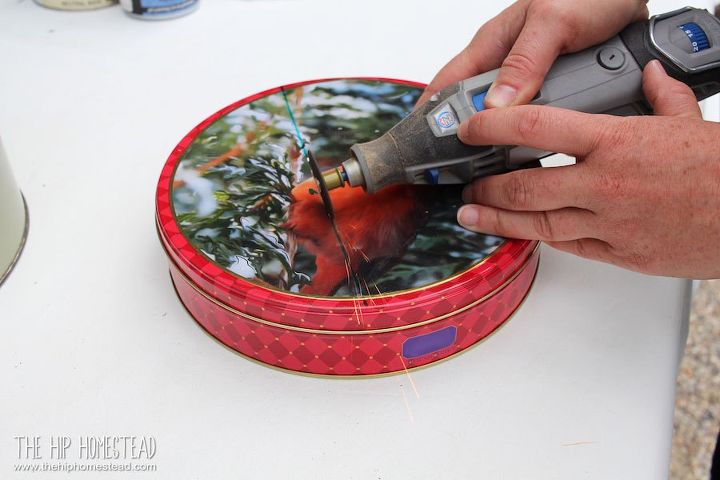
Prepare the cookie tin by measuring and marking your cutline on the lid. I chose to cut mine at about 60% the overall height. Feel free to mix it up, but that’s what I did.
Put on your safety glasses. Using your Dremel on low speed & with a metal blade, carefully cut the cookie tin lid along your marked line.
Tip: work slowly, and use a delicate plunging motion to move the blade along. Don’t move too fast and don’t plunge too deep, the blade will bind and kick, remember safety first!
When you get to the edge, remove the lid and cut the edge with tin snips. Be careful for sharp edges. With a fine grit paper or pad, sand the new cut edges, taking care not to cut yourself on the sharp tin.
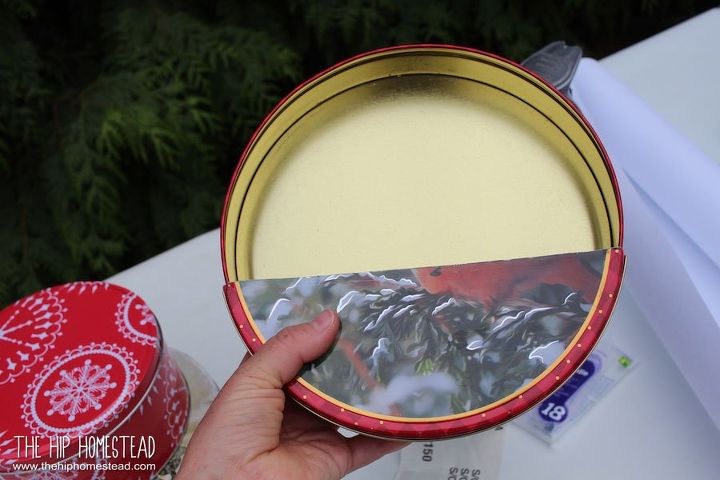
With your hot glue & working fast, apply a generous bead of hot glue along the rim of the lid and quickly place it back on the cookie tin.
Use pressure to make sure the two are joined. Then use the hot glue to seal up the inside of the tin where the lid and base meet
(does that all make sense? let me know if it doesn’t).
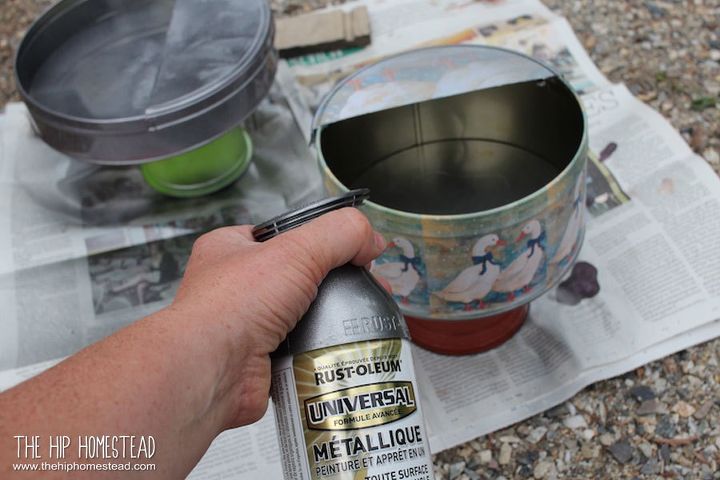
In a well-ventilated area apply 1-2 coats of the base layer Dark Steel Metalic spray paint to the tin, making sure to get the back of the tin too. Allow the paint to dry before moving on to the faux finishing.
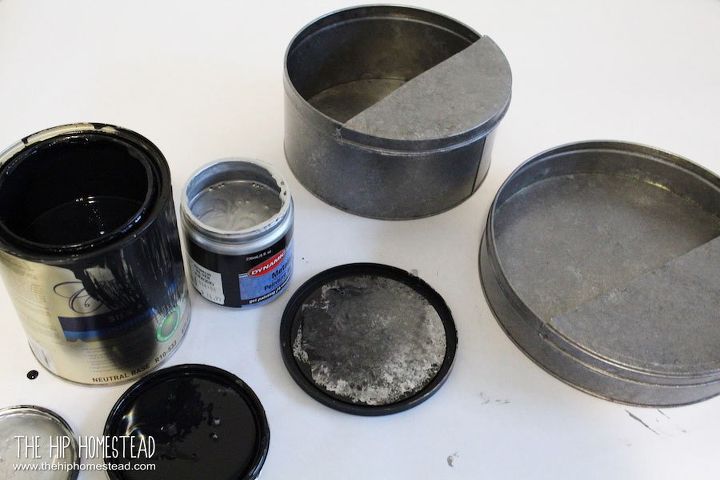
You heard me right! FAUX FINISHING! And sponge painting to boot! 90’s STYLE.
Dab your sponge in a bit of paint and begin dabbing all over the cookie tin, working all over the tin to set a base layer. Layering tones of paint, continue to dab and blend the paint until the desired “zinc or galvanized” look is achieved. Let your hanging planter dry at least 30 minutes before moving on to planting.
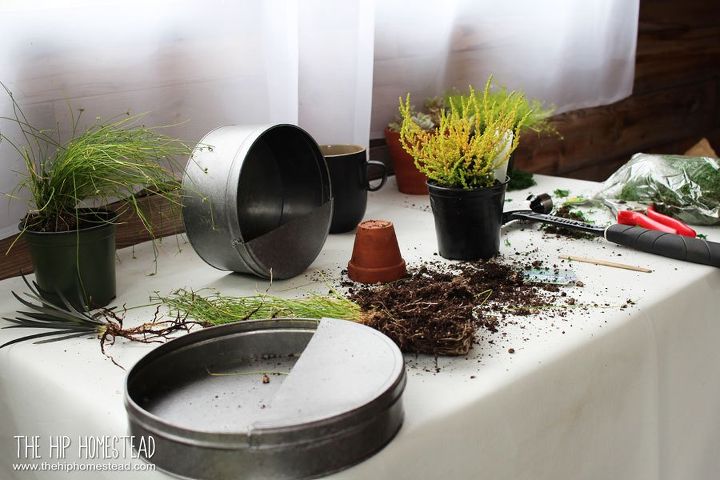
Blend up and slightly moisten your soil mix. I made a custom blend of soil that will be lightweight and porous, while still providing aeration and drainage. This blend works well in this type of DIY hanging planter because we won’t be adding drain holes.
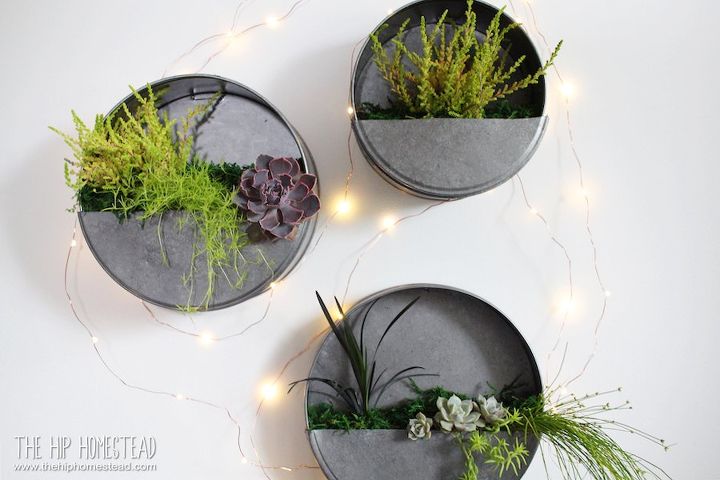
Add a bit of soil bend to fill the bottom of the wall planter and begin filling with the selected plants. Mulch with moss to hide any visible soil and keep the plants moist.
Hang your galvanized wall planters with a nail and locate them out of direct, hot sun to prevent the tin from getting too hot and damaging the plant roots.
Water often, even small plants need regular water in hot weather. I would suggest watering every 2-3 days depending on your weather. You’ll be the best judge if the soil feels dry add some water, but if the soil feels cool, then watering can wait another day.
That's it! Aren't they pretty?
For further details on this project or to see more like it, pop over to The Hip Homestead and creep around a bit ;)
Resources for this project:
See all materials


Any price and availability information displayed on [relevant Amazon Site(s), as applicable] at the time of purchase will apply to the purchase of this product.
Hometalk may collect a small share of sales from the links on this page.More info

Want more details about this and other DIY projects? Check out my blog post!
Comments
Join the conversation
2 of 117 comments
-
They sell these precut and already painted at the dollar tree store
-
I just have to try this, it's a genius upcycle! Thank you for sharing such a trendy flip!


Frequently asked questions
Have a question about this project?
How did you keep from cutting yourself on the cut edge?
How many tones of paint did you use?
To protect the inside of the cans: Can you just put the paint on the inside instead of outside it? I noted that you said that you don't have to paint the cans but the moisture might do something or other to them. Using a protective paint should work Right? just inside though so as not to damage the pretty cans .