


How To Use Old Fence Boards on a Wall
In this hometalk post, I show you how my wife and I used old cedar fence pickets as wood planks on my workshop wall. Additionally, I explain how an existing pool at our new house my family and I recently purchased triggered this entire project.
Please consider for more projects and other fun stuff.
Why I Had to Tear my Fence Down
My wife and I moved into a new house in December of 2015. Ultimately, this house has everything we wanted – more land, separate garage/workshop, and many other amenities.
However, the above ground pool in the backyard was the one thing we could have done without.
So, what does a pool have to do with an old cedar fence? Keep reading and it shall be revealed.
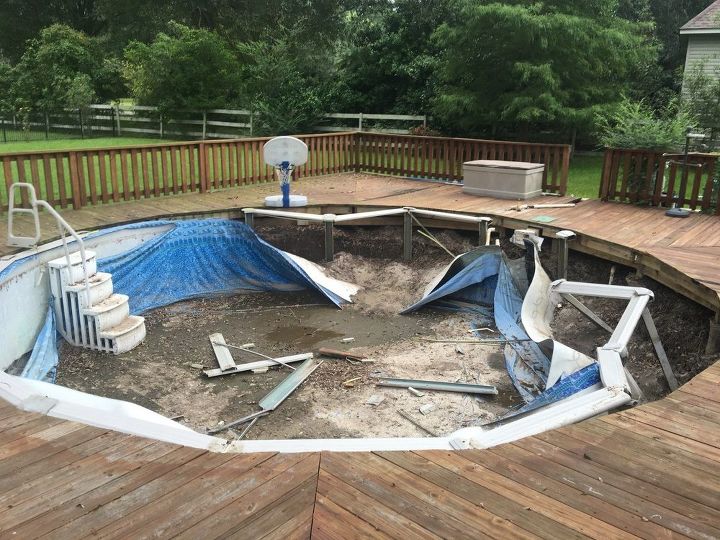
Dear Mother Nature, Thank You for Destroying our Pool
In late August of 2016, south Louisiana experienced an enormous amount of rain which caused flooding and catastrophic damage to many areas.
Consequently, the excessive water in the ground caused my empty pool to collapse inwards. I emptied the pool in early June before leaving to spend the summer in Florida.
Thank you, Mother Nature! Now, the pool removal moved from the bottom to the top of our priority list.
Remove Old Fence To Access Backyard Pool Area
In order to properly remove the pool, we hired a professional to remove the deck, remove the pool debris, fill the massive hole, and put down new sod.
So, the first thing we did was remove 2 sections of our cedar fence. In turn, this gave the contractor enough room to drive the skid-steer in our backyard.
After removing 2 sections of the fence, I decided to remove the remaining sections of the fence and replace the entire fence. The fence just would not look right with half of it being new and the other half 10 years old.
Reclaimed Fence Board Project
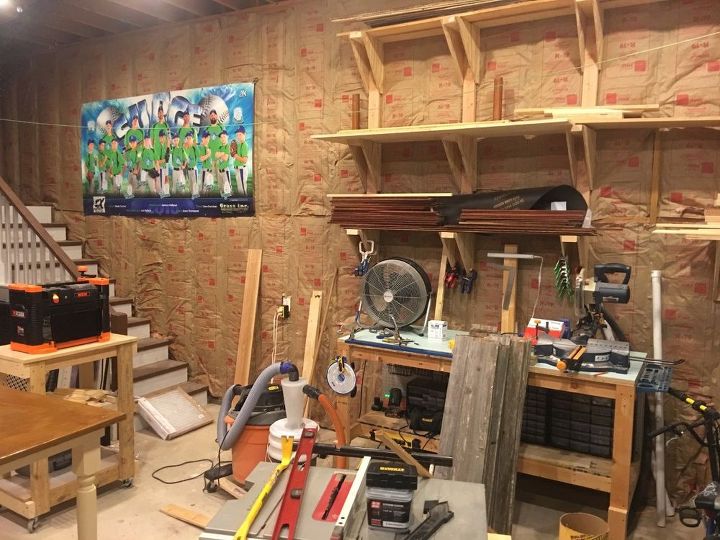
While removing the remaining sections of the fence, I thought about the unfinished wall in my workshop.
In short, these old fence boards on a wall were perfect to cover my wall I recently insulated.
It is now time for me to stop blabbering and get to the true purpose of this Hometalk Post and show you how to use old fence boards on a wall.
Step 1: Determine Type of Wood and Number of Fence Boards Needed
First, determine how many fence boards you need for your project before removing your fence (if you have a choice).
The best way to ensure you have enough fence boards for your project is determine the square footage of your wall. Next, determine the square inches of 1 fence board. Then, convert the square inches to square feet. Finally, add 10% to account for any mistakes.
For example, my workshop wall is 25' x 14' and 1 fence picket is 72" x 6" (or 6' x .5').
- 25 * 14 = 350 square feet on wall
- 72 * 6 = 432 square inches
- 432 / 144 = 3 square feet for 1 picket
- 350 / 3 = 116.7 pickets needed
- 117 + 10% = 129 total pickets
To save time with this formula, simply measure the fence picket in feet instead of inches. Furthermore, a typical fence board is 3 square feet so divide the total square footage of the wall by 3.
Type of Wood
Now that you know you have enough fence boards to complete your project, it is important to identify the type of wood used for your fence.
Most fences are made with Cedar or Treated Pine, so it is likely one of these types of wood. Luckily, cedar is easy to identify considering it's distinct smell and vibrant colors.
How to identify the type of wood used for a fence?
First, remove a fence board and cut a piece off to ensure fresh wood is exposed. Next, smell the wood. If the fence has a pleasant smell, the fence is cedar. If the fence does not, it is likely treated pine.
Cedar or Treated Pine Fence and Why it Matters
If your fence was made with treated pine, you don't want to make an attempt to reclaim this wood for an interior space. Chemicals were used to treat this wood in order to slow decay and termites. Consequently, you don't want this in your home.
Conversely, cedar fence boards are perfect for a reclaimed fence board project for many reasons. Most importantly, cedar fences last 15 to 25 years while pressure treated pine fences lat 7 to 15 years.
Why is cedar the best wood to use for a fence?
- Natural oils help repel insects and resist decay
- Minimal shrinkage to stay straight
- Oils maintain appearance longer
- Ages nicely compared to pressure treated pine
- Accepting and maintaining a wide range of finishes
- Removes greenhouse gases from atmosphere
- Renewable and biodegradable
- Vibrant colors such as reddish brown with touches of pink
- Repels water
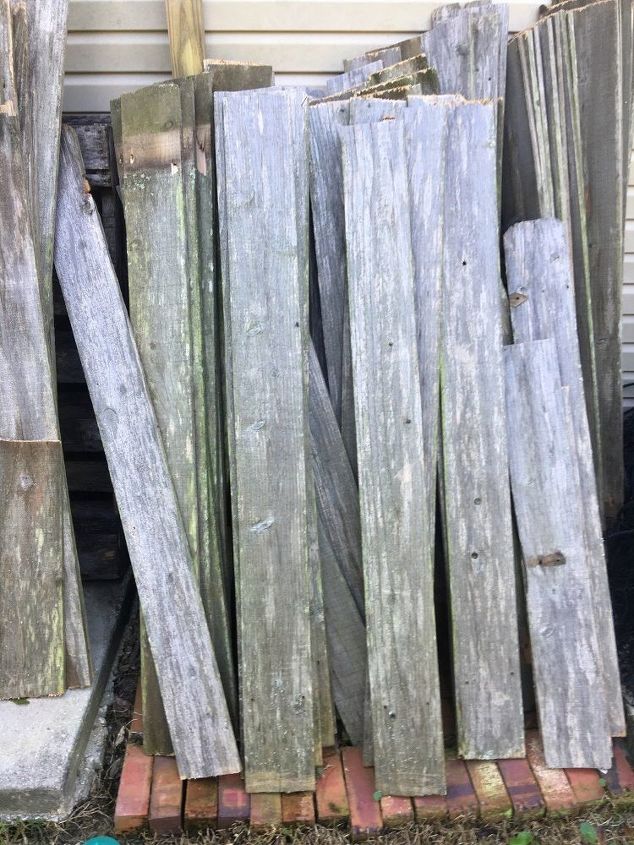
Step 2: Remove Fence Boards without Damage & Square Them
There are 3 ways to remove fence boards without damage. In other words, remove fence boards so the boards can be repurposed.
Ultimately, some fence boards will get damaged during the removal process. This is not a big deal as the undamaged part of the board can still be used as long as the board is 16" long. More on this later.
Before I review the best ways to remove fence boards without damage, I am presuming the fence boards are nailed to the fence board runners. If the fence has stainless steel screws, you are very lucky or very smart if you installed your fence. Ultimately, stainless steel screws are removed by simply unscrewing. Most, if not all, fence installers and homeowners use nails to install fences because it is cheaper and quicker.
First, a crowbar can be used to either remove nails if the head of the nail is accessible or pry the fence board away from the runners (boards that run horizontally and hold the fence boards in place). Of course, the most time consuming method is the best way to remove fence boards without damage.
Second, a reciprocating saw with a metal cutting blade is a popular option. With this method, the nail holding the fence board to the runner is cut by running the saw behind the fence board. Ultimately, this method is faster than using a crowbar; however, it is likely the fence board will get damaged by the blade with this method.
Lastly, a jig saw or circular saw can be used to cut the fence below the top runner and above the bottom runner. This method is definitely the fastest way to remove fence boards. However, this method does require a section of fence (part of fence between fence posts) be removed unless the person cutting the fence can safely cut sideways. Additionally, this does waste approximately 25% of the fence board.
Ultimately, I used each of the above 3 fence removal methods in this project.
Remove Nails and Square Old Fence Boards
Once the fence boards are clean, the nails, staples, and imperfections become more visible.
First, use a pair of needle nose pliers to remove the staples. The fence boards normally have 1 or 2 staples in them because they were used to attach the price tag to the board.
Next, use a nail remover or hammer to remove any nails.
Square Each Fence Board
First, determine what tool you have at your disposal to square each end of the fence boards. Ideally, a miter saw is best for this step. However, a circular saw with a speed square OR a hand saw with a speed square will work just as well.
Ultimately, you want to preserve as much of the fence as possible to for your project.
To square an old fence board, cut the bottom at a point on the board where the chipping, splintering, or rotting stop.
Next, cut just below the 'dog ears' at the top of the fence. The 'Dog Ears' on a fence picket refers to the top of the fence where 2 small 45 degree angles are cut on each side.
Step 3: Clean Old Fence Boards
This is an important step to repurpose old fence boards for an interior wall. Ultimately, the last thing you want to do is introduce bugs or mold into your home.
First, pressure wash the boards to remove the loose dirt and debris. In order to save time, line all the boards on your driveway and wash them down. Next, flip the fence boards over and repeat.
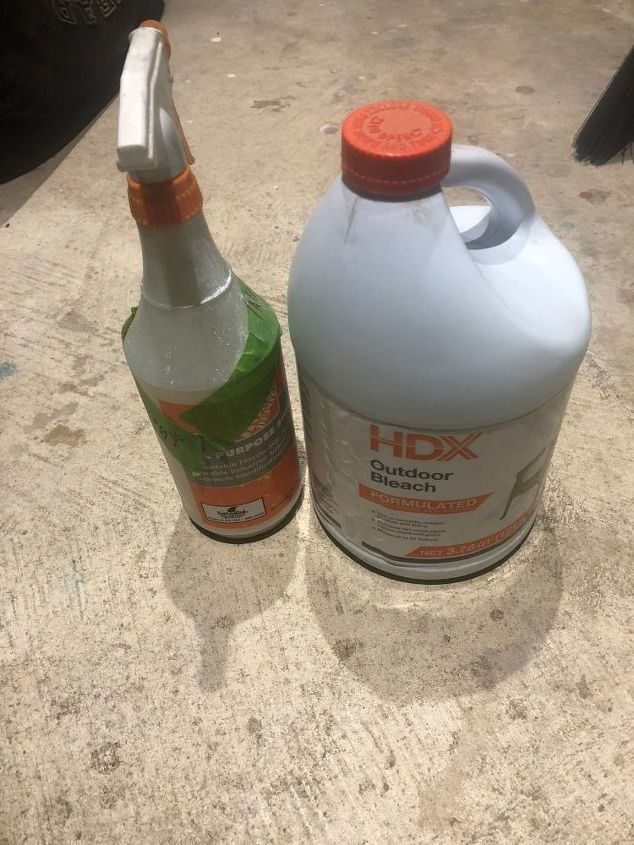
Second, mix bleach with water in a 4:1 ratio (4 parts water to 1 part bleach) in a spray bottle. Next, spray the mixture on one side of the board and rinse off with a hose. Then, repeat on the other side of the fence board.
Allow the fence boards to dry for 24 hours indoors. A box fan helps expedite the drying process.
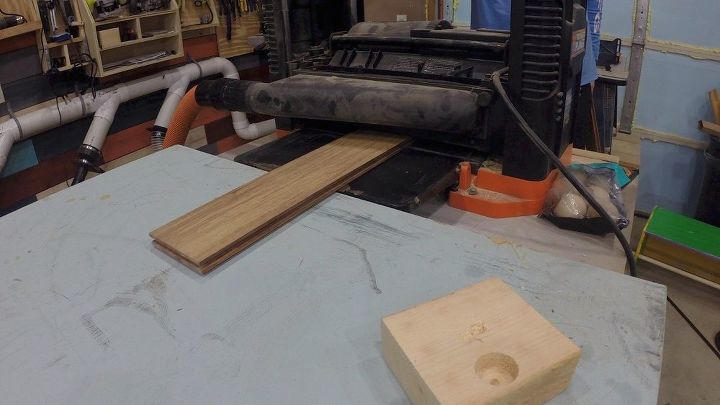
Step 4: Sand or Plane Fence Boards
Once the fence boards are dry, it is time to sand and/or plane the fence boards.
Quick Tip: Before proceeding, choose one side of each board that looks best and focus on finishing the side you choose. It doesn't make sense to sand/stain both sides of each fence board as this would be a waste of time and material in my opinion.
I used my planer for the first half of this project to get a smooth surface on each fence board. Then, my planer quit working for the remainder of this project. Ultimately, I ended up buying another planer a few months after this reclaimed fence board project.
First, I used my orbital sander with 80 grit sandpaper to remove the rough surface. Next, I used 120 grit sandpaper and then 220 grit sandpaper on both sides of the surface.
Fill Holes
Most reclaimed fence board wood projects have a rustic style; therefore, minor holes and cracks add character. However, some folks may not want these imperfections. If you are one of these people, now is the time to fix these with wood putty.
Remember, do not fill the holes with wood putty until the initial round of sanding with 80 grit, 120 grit, and 220 grit is complete.
First, fill the holes with wood putty and allow to dry. Then, sand the wood putty flush with the board using 220 grit sandpaper.
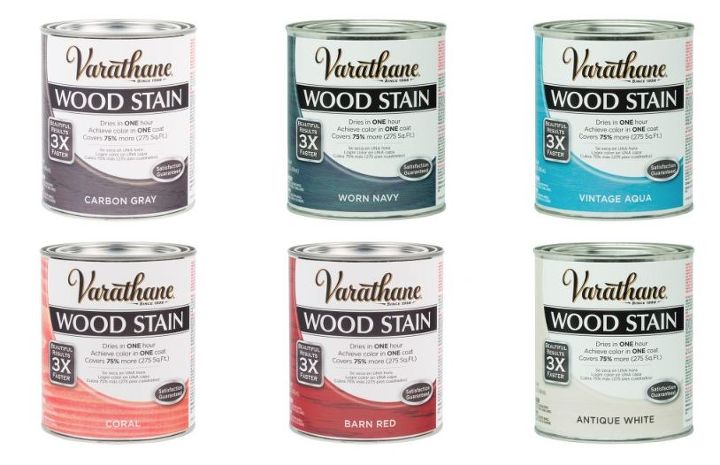
Step 5: Stain Fence Boards for a Wall & Seal
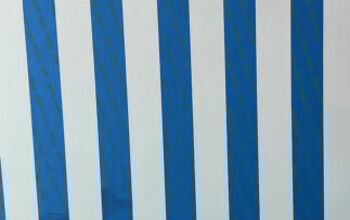
I used multiple colors of the same Varathane fast-drying wood stain to create a unique wall. There was no specific reason I made this wall look this way as it goes against my coastal rustic style. Honestly, I just chose the 5 colors listed below and just went with it.
First, I separated the boards into 5 groups to make certain I had an equal number of fence boards for each color wood stain.
Next, I used a chip brush to apply the wood stain to 10 fence boards at once. By the time I finished the tenth fence board, it was time to wipe off the stain on the first board. Ultimately, I determined the correct number of fence boards to stain at once according to the drying time.
Then, the stain dried overnight. I didn't put on 2 coats because I didn't want the wood to appear as though it was painted.
Seal Fence Boards
After the stain was completely dry, I sealed the fence boards with shellac spray finish.
I use shellac on many of my projects because it is inexpensive, dries quickly, non-toxic, and it is a great protective sealer. Also, I chose the spray can instead of the brush on shellac in order to finish this step faster.
First, I lined the boards up on the ground outside to make the staining process more efficient.
Next, I sprayed the boards with a steady sweeping motion from side to side. Additionally, I overlapped each spray by 1".
After I finished the last board, I put on another coat of sealer. However, I sprayed the fence boards vertically instead of horizontally (side to side) to get rid of any spray lines from the previous seal coat.
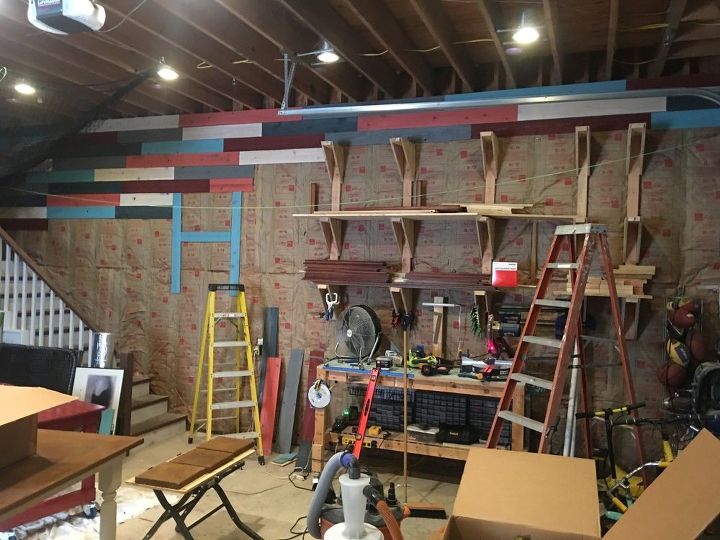
Step 6: How to Install Old Fence Boards on a Wall
To install the old fence boards on a wall, I used a brad nailer with 1.25" brad nails and a leveler.
If you don't have visibility to your studs like I did, use a stud finder to mark your studs at the top, middle, and bottom of the wall. Studs are not always perfectly straight so it's important to mark them in multiple locations.
First, I installed the first board at the top left corner of the wall. Why? I prefer the top to have full boards b/c it is more visible than the bottom. I checked to make sure it was level with my leveler and drove in 2 brad nails (top and bottom) near the middle of the board. Ultimately, I just chose a stud that was near the middle of the board.
Next, I drove in 2 nails for each stud the board went over. One nail near the top and the other nail directly below near the bottom.
Then, I installed additional boards while working my way from left to right to the other side of the wall.
I used my miter saw to cut the boards to size when needed. To avoid splintering during the cut, I used a piece of painters tape across where I planned to cut the fence board.
It is important to note to make sure each board is long enough to cross at least 2 studs in order to be properly secured. Studs are 16" apart, so each board will need to be at least this length.
Additionally, I didn't worry about leaving a space between the boards on either side or at either end. These old fence boards are not going to shrink or expand significantly like new wood and I didn't want my wall insulation to show.
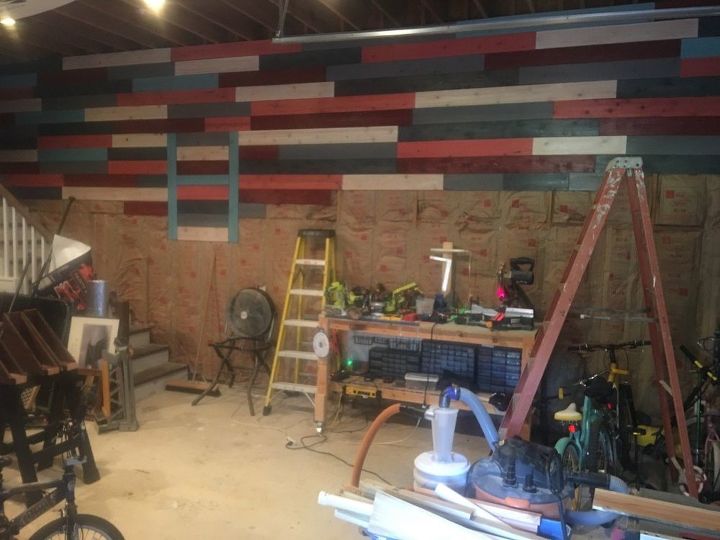
Step 7: Add Decorative Letter
I had about 10 feet of fence boards that were more narrow than the other fence boards because they were the end pieces of the fence.
Instead of wasting these fence boards, I decided to make an 'H' in the middle of my wall. My last name starts with the letter 'H'.
While this was a great idea and worked out well, it was a HUGE pain to work around. Ultimately, it caused more time to measure/cut boards around the letter than it was worth.
If you plan to do something like this, I recommend installing the letter on top of the completed wall instead of the method I chose.
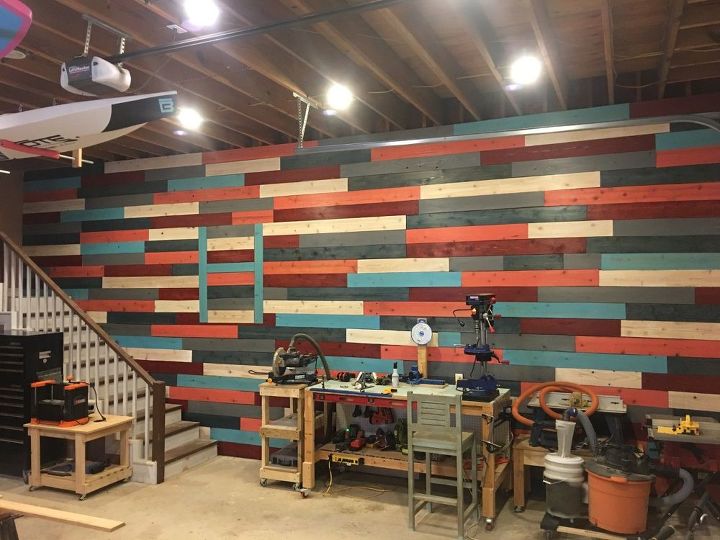
In summary, this project took time; however, it was very satisfying to use old fence pickets on my workshop wall. It is rewarding to reclaim material most consider to be garbage and turn it into something useful and visually appealing.
Most importantly, I hope you learned how to use old fence boards on a wall.
Checkout my online store and download a copy of digital plans for most of my projects.
Feel free to contact me anytime if you have any questions. I'm happy to help!
Resources for this project:
See all materials


Comments
Join the conversation
-
Lol, I thought the pool and deck looked nice but obviously when the pool got destroyed, it was time to go. Your project instructions were wonderful, so thorough with explanations given as to why you did what you did. Awesome job!
-
I don't have a workshop or available wall but I have these exact boards. I think the same project could be done on a smaller scale. I love the colors. When I figure out my take on your project, I will send a picture.


Frequently asked questions
Have a question about this project?
This is fantastic. I'm assuming that if I do this to an exterior wall on the garage I can skip most of the clean up steps. : )
Why did you remove the deck? I think I would have put another pool in...My opinion..Did the person who removed the deck keep the boards..Hope you didn't pay him to tear down and haul off..
Wouldn’t it have been quicker, easier, and more practical to have done the power washing and etc. before taking it all apart?