


How to Make a Reclaimed Wood Dining Table
In this tutorial, I show you how to build a Reclaimed Dining Table with epoxy resin and pecky sinker cypress wood. Learn many resin tips and woodworking techniques that make this a DIY project for everyone.
Christmas was only a few months away & the adults in our family pick names to exchange gifts. My mother in law needed a new table, so I made sure to pick her name for this year. She mentioned in the past how much she loves Louisiana Cypress wood, so I planned to make her a special cypress table with unique wood that is 100s of years old.
I searched for cypress table ideas for about a day. The unique look of pecky cypress quickly grabbed my attention. This wood is fairly common in my part of the country (South Louisiana) & I thought it would be a great choice of wood for this epoxy resin dining table. The wood is not only beautiful and unique, but it also has a lot of historical/geographical significance. My Mother-in-law would appreciate the historical value.
I called a friend of mine who knows the best places to purchase reclaimed wood in the New Orleans area and he referred me to a company that has been owned by the same family since the early 1800s.
I visited the lumber company the following day and noticed they not only had sinker cypress, but they also had pecky sinker cypress.
Step 1: Why is Sinker Cypress so special?
Please consider subscribing to my YouTube channel to be notified when I release a videos.
South Louisiana has many cypress trees; however, many of the logs were cut down in neighboring northern states b/c they were easier to access. I couldn't imagine cutting a large cypress tree down in the Louisiana marsh/swamp. The cypress logs were sent down the Mississippi river and many other rivers to float to the city. Occasionally, the butt log would be bacterially infected and would not float down the river to their destination. Often times, these valuable butt logs were treated carefully so that they did not sink to the bottom of the lake or river. (Sinker logs were the largest log from the tree and contained highly valuable lumber; if they sank to the lake or river bottom, it was a lost profit.) Today, we are recovering the cypress wood which has been submerged in cool water absorbing the tannins from the water for a century or more; the lumber they produce is called “sinker cypress.” Some experts estimate nearly 20% of the logs sent downstream sank.
The TV show "Swamp Loggers" follows many professional loggers who retrieve this wood from rivers and lakes all along the gulf coast.
“Pecky” refers to a fungus that causes hollow tubes to run vertically throughout the tree. The fungus grows while the tree is alive and only germinates when the tree is around 125 years old. The fungus dies when the tree dies.
Step 2: Prepare the Wood
Next step was to remove the soft/damaged wood from the pockets on the pecky cypress table.
I accomplished this by scraping as much of the wood out as possible with my wood carving tools.
This was quite a time-consuming process b/c many of the soft pockets caused by the fungus were much deeper and longer than I anticipated.
I scraped each pocket on both sides of each board and used my shop vac to remove the debris. It may have been easier to use an air compressor and blow-out each pocket after scraping.
Once all the debris was removed, it was time to break out the belt sander and orbital sander to get both sides of each pecky cypress board as smooth as possible. I started with 150 grit sandpaper on the belt sander and finished with 220 grit sandpaper on the orbital sander.
Step 3: Flat Surface and Straight Sides (Planing and Joining)
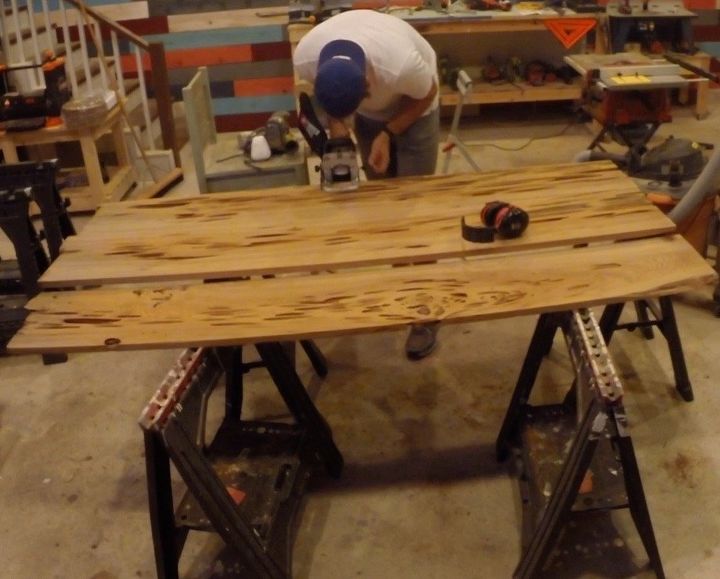
After the pecky cypress boards were sanded and cleaned, it was time to square the sides of the boards in preparation for them to be joined together. I need to upgrade my table saw soon with a larger table saw to make ripping long pieces of material easier.
I don’t have a jointer, so I used my table saw to rip an equal amount off of each board to make the table 36” wide (each board would be 12” long). This worked out really well b/c 2 boards were 14” wide and 1 board was 15” wide.
Next, I ripped 2” off 1 side of the first board, 1” on each side of the second board & 3” on one side of the last board.
I saved the 3” board I ripped off of the last board to use on the table legs (more on this later). I didn’t care if the outer edges of the table were perfectly straight b/c it is a reclaimed resin dining table. Perfectly straight outside edges on the pecky sinker cypress table were not important considering the irregularities of the wood.
Biscuit Joiner
The 3 slabs lined-up nicely, but I was concerned about which joinery method would be best to use on the pecky sinker cypress table.
Some of the ‘pecky pockets’ in the wood tunneled the length of the board and close to the edge. I figured the strength of the table would be at risk if I used pocket holes or mortoise/tenon methods to join the pieces near one of these tunnels.
I decided to use biscuits to join the 3 slabs b/c I can place the biscuits in solid parts of each board & the width of the provided extra stability.
Most importantly, I had an excuse to go buy a new tool b/c I did not own a biscuit joiner.
It took me a while to figure out where to put the biscuits and how many to use. I decided to use 6 biscuits per join (12 total). There were a few biscuits that were visible on the underside of the table, but that was the best I could do.
Once I got over the pure awesomeness of my new biscuit joiner & how easy it was to use, I clamped the pieces and let the glue dry overnight.
Repair Joints
There were very minor creases between boards where I joined them together. I lightly sanded the surface of the pecky sinker cypress table one more time.
However, I elected to use the dust bag attachment that came with the sander instead of connecting my sander to my dust collection system.
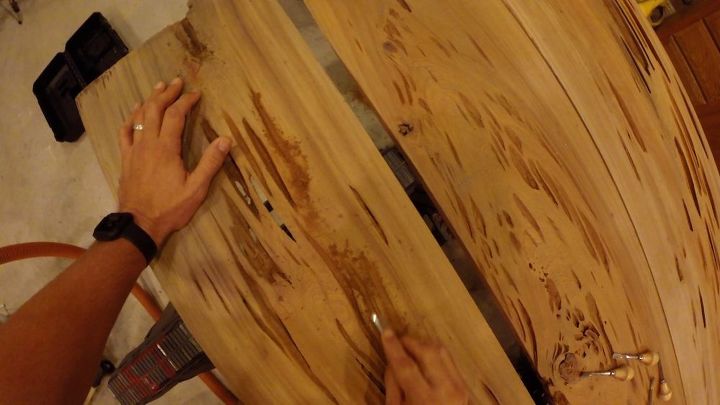
I mixed the sawdust in the bag with glue in a clear plastic cup to a putty-like consistency – this was so easy that I was able to talk to my wife on the phone and mix at the same time (view pic below).
I’m a man, which means I’m not very good at doing 2 things at the same time. Next, I liberally spread the mixture over the creases and gently wiped off the excess with a popsicle stick because it was the closest thing within arm’s reach.
Remove Excess Glue
I lightly sanded the resin dining table surface of the pecky cypress table one more time to remove the excess glue/dust mixture and the creases disappeared – gotta love when little tricks like this work out. Next, squared off the each end of the table with my circular saw to make it an even 76” long.
I used a damp towel to wipe the surface in order to raise the grain of the wood a small amount and lightly sanded again with 220 grit sandpaper.
Next, I vacuumed the pecky sinker cypress table surface again and used a tack cloth to make sure I get all the loose debris.
I used 2 tack cloths to wipe down this table while making sure to use a clean side of the cloth for each wipe.
Step 4: Prepare Table for Resin
Sealing the Resin Dining Table
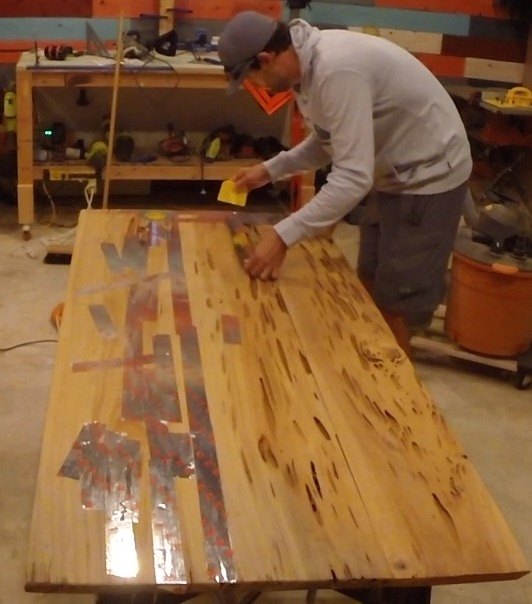
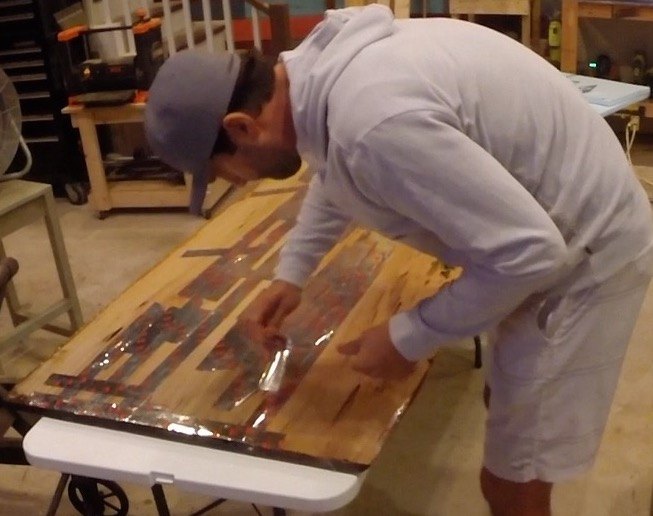
Now to the tedious part. I flipped the pecky sinker cypress table top over and began taping the indentations and pockets with HVAC foil tape. The idea was to pool the epoxy resin at the bottom to fill the cavities and prevent the epoxy resin from dripping through when poured on the top.
Reasons for HVAC Tape
I chose this tape for 3 reasons:
- I had an extra roll laying around my shop.
- It sticks really well to any surface & it is really strong.
- I didn’t know any better.
Instead of tape, a plastic sheet secured tightly to the bottom of this table should work as I’ve read epoxy doesn’t adhere to plastic.
However, I didn’t feel like running around the house or the big box stores searching for plastic and figuring out a way to secure it to the bottom to prevent sagging.
This process took me roughly 2 hours, which isn’t too long. It just seemed like this took FOREVER probably b/c I was excited to start using the epoxy.
I made sure each pocket in the wood was covered completely even if the cavity seemed contained.
As I mentioned previously, many of the pockets formed channels in the middle of the wood that ran from one side to the other. I also used a flexible plastic spreader to flatten the tape on the wood.
Prevent Sagging
Before I move on to the next step, it is worth mentioning a subtle mistake I made that could have easily been prevented and saved me a ton of time.
I poured the epoxy resin on the table while it was resting on saw horses. I did this b/c I wanted to make sure there were no major leaks through the bottom.
Ultimately, I should have trusted my taping skills (if there is such a thing) and placed the table on a flat surface (work table) covered in a plastic sheet. This would have saved a lot of sagging and less material to fill the pockets.
Step 5: Epoxy Resin Seal Coat
3 Coats of Resin
I decided it would be best to apply the epoxy resin mixture in 3 stages (instead of 2 stages as recommended in the epoxy manufacturers instructions), which I listed below. I will refer back to these 3 stages often – here is a brief explanation of each.
1.) Seal coat = this coat would basically ‘wet’ the entire surface of the table top and seal any potential air pockets in the wood. The mixture is poured onto the surface and then worked into the surface with a rubber squeegee. There should not be any material build-up with this coat. If the seal coat goes on too thick, air bubbles can get trapped in the cured epoxy.
2.) Fill coat = this coat will fill the cavities/pockets in order to achieve a level surface. This stage is specific to this type of wood. If this was a flat surface, this would be accomplished in stage 1.
3.) Flood coat = this is the final coat and should be poured in the middle of the table and settle outwards (towards the ends). This coat self-levels (no squeegee wiping) up to 1/8” thick. If you desire more than 1/8” thick, multiple coats need to be applied at least 4 hours apart. A squeegee or foam brush may be used to ‘guide’ the material around the surface, but no wiping.
Best Epoxy Resin
After building many epoxy resin tables with different types of resin, my favorite is Pro Marine (link in material list at bottom of post) which is sold on Amazon and very affordable. I used 3 gallons total.
Epoxy Resin Tips
The best advice I can give regarding using resin/hardener is follow the manufacturers instructions. Most men tend to glance over instructions and sort of figure it out as you go (I definitely fall into this category), but you WILL have problems if you do don’t follow the instructions with any resin/hardener.
I’m not going to fully explain how to use this stuff in great detail in this post as this information is covered in the product’s instructions, which vary from product to product.
Mixing
I started by mixing 1:1 ratio of resin/hardener that totaled 8 ounces. I knew this was a very small amount, but I wanted to make sure I got the hang of it before jumping to 10oz, 12oz or even 20oz mixtures. This step is VERY important as most underestimate the amount of mixing this stuff needs. I mixed (no whipping as this will create bubbles, which creates more work later) until the material was clear.
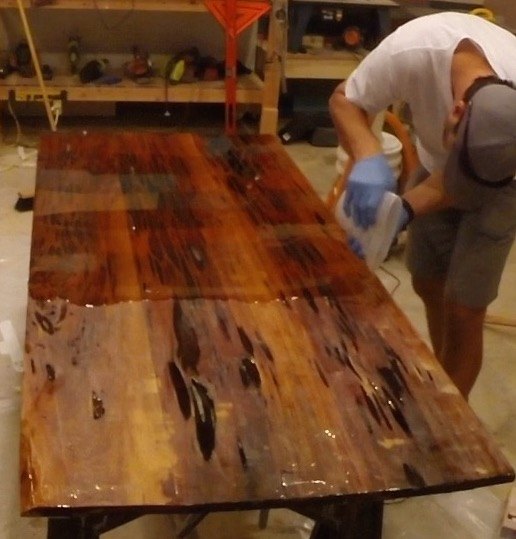
Seal the Table
I used 24 ounces to seal the table. Some of the material in the seal coat dripped into the cavities, so I used more than I needed. I used a blow torch 6 to 10 inches away from the surface.
After I finished the epoxy resin seal coat, I used a brush to ‘seal’ the edges of the resin dining table. This can also be done in stage 3 (flood coat), but either way works.
Step 6: Fill Coat
Now on to stage 2 (fill coat). I did the first fill coat immediately after I applied the seal coat and I increased the mixture from 8oz to 16oz.
I used a squeegee during this stage as well to guide the material into the cavities and fill them.
This took some time b/c I did experience minor sagging with the tape in some spots. I had to do the fill coat twice to get the pockets level before I applied the flood coat. I let this coat dry for 24 hours.
Since I let this coat dry for more than 4 hours & I wanted to achieve a flat, uniform surface, it was time to sand.
I started by sanding with a 120 grit belt sander to knock down buildups. Next, I used an orbital sander with 220 grit sandpaper to smooth out the surface.
Finally, I carefully wiped down the surface with acetone (don’t use paint thinner!).
After wiping with Acetone, I wiped the surface down with a tac cloth. Note: I was worried after I sanded the epoxy b/c it turns to a hazy white color and imperfections are more visible, but this goes away once the flood coat is applied.
Step 7: Flood Coat
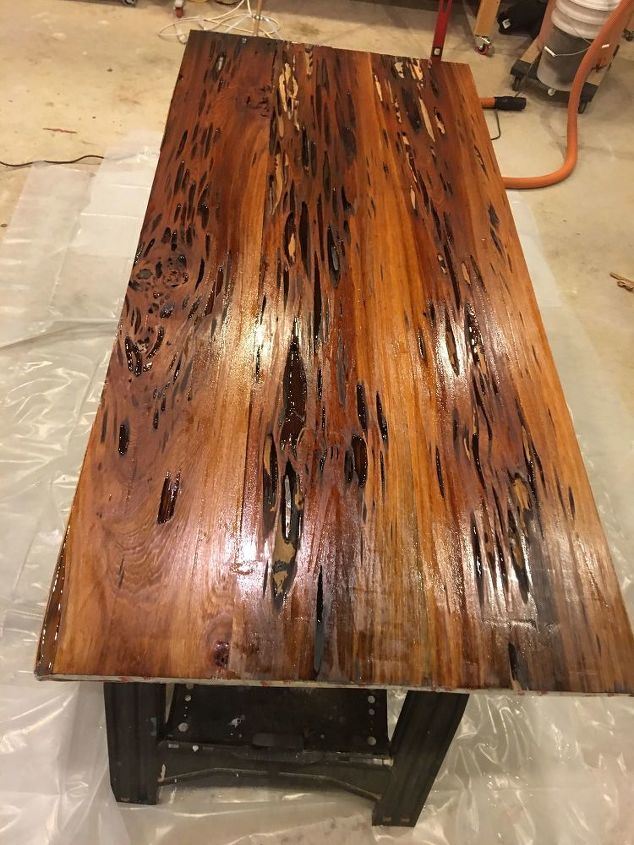
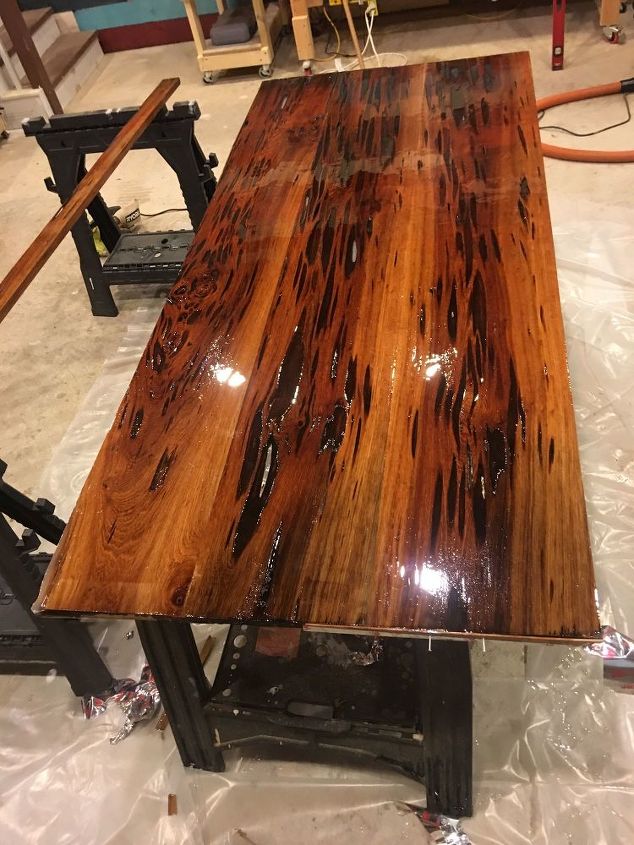
It was time for the flood coat (stage 3) & I was really excited to see how this was going to turn out.
I was also a bit nervous since this was my first time working with epoxy. The flood coat was mixed in 2 batches. This made sure I could adequately stir the mixture.
I poured the flood coat slowly to make sure it covered the half of the table top. The material is rather thick so it merges nicely together. It also runs over the sides (as planned) so be sure to put down plastic to protect the floors.
As soon as I poured the first batch for half of the pecky sinker cypress table, I began mixing the second batch. I wanted it to blend/merge well together. I took a brush and gently wiped each of the 4 sides of the table to spread the material and prevent any drips from hardening.
I only put on one flood coat as I really didn’t see a reason to add more thickness.
Please note: It may be wise to find a way to protect the table from dust/debris when the epoxy is drying.
Step 8: Remove Tape from Underside of Table
After allowing the pecky sinker cypress table to dry for 48 hours, it was time to remove the tape from the underside of the pecky sinker cypress table, sand, and stain.
I picked the table up and flipped it over onto the white picnic table.
I recommend to get help before attempting to flip the table over by yourself. I’m 6’7” and I have long arms so I was able to grip the table fairly well. This is the only reason I attempted this step without help.
The removing tape process was not as bad as I originally thought it would be. It took me about 1 hour to completely remove the tape.
A few small pieces stuck to the epoxy on the underside, but the belt sander removed the pieces easily.
Overall, I’m happy with the way this tape performed during this project considering I chose to use it b/c it was laying around my shop.
I used the belt sander to smooth the underside of the pecky sinker cypress table and used a brush to wipe off the dust. Yeah, I know – I forgot to wear my dust mask.

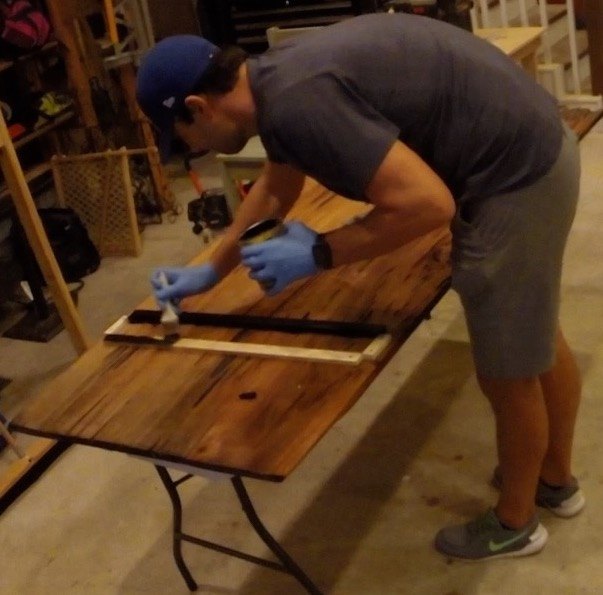
Step 9: Seal Underside of Table
In order to give my mother in law options, I decided to finish the underside of the table with an oil and urethane based clear coat. This finish would be more of a natural look. If my mother in law prefers the natural look, use that side. If she prefers the glossy resin look, flip it over and use that side.
Again, it is important to follow the manufacturer’s instructions when using stain or sealers.
On the first coat, I made sure to get inside the pockets in the wood as they had a few on the underside of the table that did not protrude through the top.
I had to use a q-tip in some of the pecky cypress cavities to make sure everything was covered.
I lightly sanded the table with 220 grit by hand and applied the 2nd coat.
Step 10: Table Bottom
Be sure to visit my blog post for FREE downloadable plans for this project.
On to the table supports. I actually found a few table support designs that caught my eye online.
However, the plans called for holes to be drilled in the table top which I did not want to do. I decided to use no plans and rely on my imagination..
My mother-in-law likes farmhouse & country style furniture, so that is the style I hoped to make.
It is very difficult to find untreated pine 4x4s near my home, but I ran across some at the blue big box store. I decided to purchase 4 8’ pieces, which was more than I needed for this project. It was exciting to learn I can now buy untreated pine 4x4s where I live! In the past, I used 2-2x4s glued together to make a 4×4, which was a bit of a pain.
Mill wood
Most wood from the big box stores needs to be lightly sanded in order for the stain to properly penetrate the surface.
I ran each side through my planer as the wood was sort of in rough shape anyway. This also helped form a 4 straight edges on the wood instead of random rounded edges.
I wasn’t concerned about getting the wood perfectly flat/straight b/c the character of the Farmhouse table would hide many imperfections.
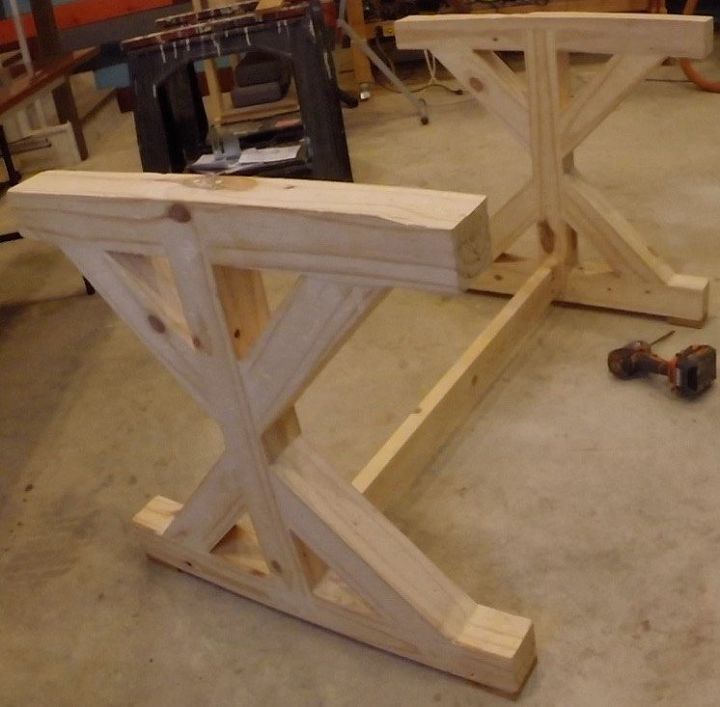
Design
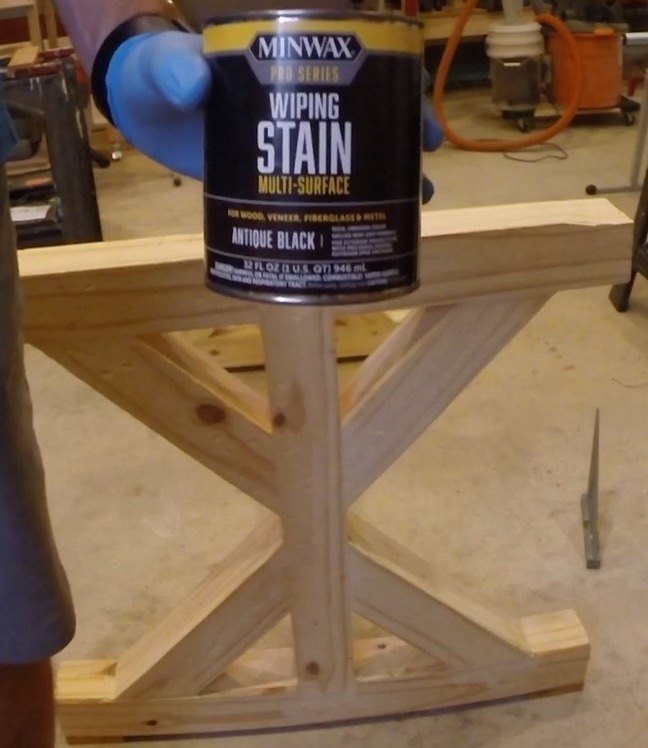
I notched each leg for a cross-support brace on both support legs. The ‘H’ design looked a bit plain and boring, so I measured to cut 4-45degree support arms for each support bracket. 8 support arms total.
I glued each piece in place and used my nail gun to secure them in place. Next, I pre-drilled 4 pilot holes in each brace and used screws to secure the 45 degree braces in place. I filled all holes with wood filler.
Once the wood filler dried, I sanded down the excess with both my orbital sander and belt sander.
Cross Support
I decided to use an upright 2×4 to tie the 2 support braces together b/c I had an idea of how I wanted the bottom to look. My electric hand planer made quick work of the rough 2×4’s on both sides. I used my Kreg Jig to drill 2 pocket holes per side of the 2×4.
Next, I attached the 2×4 to the bottom of each support brace & filled the pocket holes with paint grade pocket plugs and glue. Once the glue dried, I used my Japanese finish saw to remove the protruding plugs and sanded down to a smooth finish.
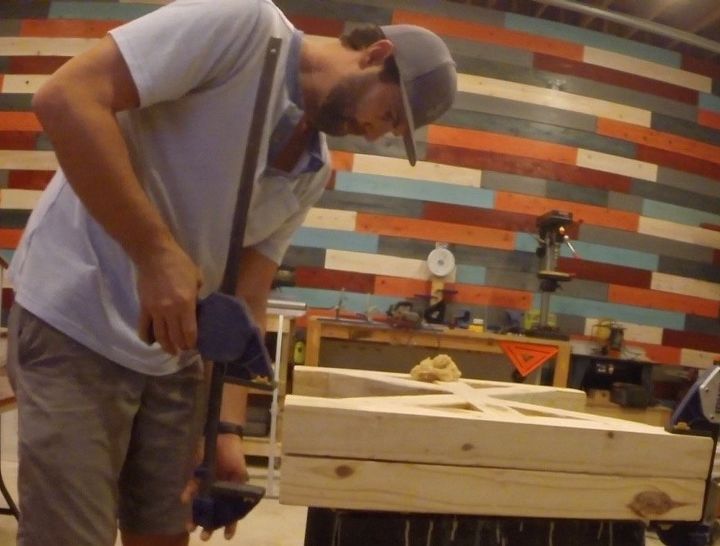
Step 11: Distress Wood and Stain
Once everything was sanded down, I decided to distress the wood a bit before staining. I used various tools to distress the wood as there is no one method that is best. I scraped the wood with the grain using a flat head screw driver. Next, I dented the wood using a hammer, a hammer with a screw, and a hammer with a roofing tail. I also used a very small drill bit to put holes in the wood.
After I gave the 4x4 pine wood a fairly good beating, I clamped each support brace together to find any uneven spots. This would cause me heartache later on when it's time for the table top be put on. Luckily, I didn’t have that many noticeable uneven spots.
I used my Japanese finish saw my wife gave me last Valentine’s Day (I think it was V-day) to trim off some of the uneven spots. Next, I lightly sanded both support braces again with 220 grit sandpaper before attaching the foot pads.
Step 12: Stain the Bottom
I put a lot of thought into what color stain to use on the pecky sinker cypress table braces.
I really had no idea b/c the wood on the table is medium & very dark brown in the cavities, so the table braces need to be one of those colors. My wife is really good at picking out colors and she recommended I use an ebony or antique black.
The Pro Series wiping stain by Minwax was my stain of choice. Since I didn’t stain the pieces prior to assembly, I needed a stain that would be ‘thicker’ in order to prevent dripping.
Additionally, it provided me with more control over the staining process. I used staining cloth & a chip brush to reach the crevices.
Next, I applied the stain to approximately half of 1 support brace and wiped it down. I repeated this process 3 more times. This stuff goes on really well and it only needed 1 coat.
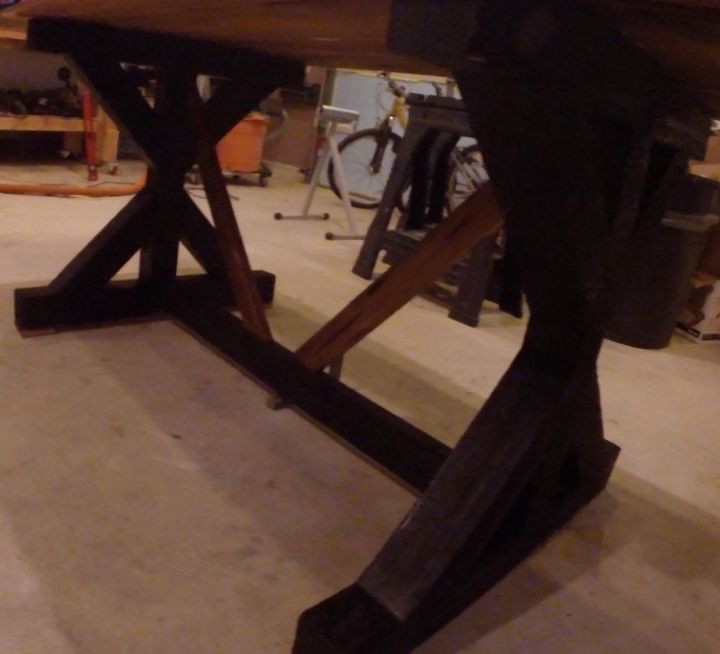
Step 13: A little Extra Flare
I used the wood I ripped from the original pieces of pecky cypress for the table braces. Earlier in the project, I wiped these scraps with a paint brush from some excess epoxy. They are about the size of a standard 1×3. I used glue and my brad nailer to secure the piece.
Step 14: Make the Table Reversible
I chose to make an outline of the upper 4×4 out of 1x2s and glue them in place.
CORRECTION: After putting the wood glue down, I immediately removed the wood glue and replaced it with hot glue to make the support rails easier to remove.
Next, I placed the table on top of the braces and measured all 4 sides to ensure there was equal distance between the front/back and left/right.
Once positioned correctly, I traced the outline of the braces on the underside of the table.
Then, I cut the 1x2s to size, used hot glue to fasten them in position, and stained them to blend in with the support braces. I was actually very surprised how securely this fit and how well it worked out.
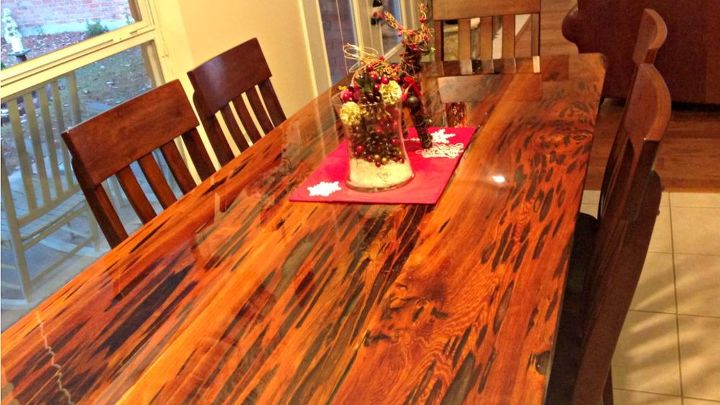
Step 15: Conclusion
I hope you learned something from this project and you have an additional resource should you attempt to build a table on your own. If you ever do, come on back to Hometalk and find this post. :)
I have free DIY plans for this project (and many others) available for download on my website - click HERE to download the free plans.
Resources for this project:
See all materials


Comments
Join the conversation
-
Outstanding!
-
You did a beautiful job!


Frequently asked questions
Have a question about this project?
I am confused about step 14. I do not understand how the tabletop is reversible. It seems that you glued 1 by 2s to the underside of the table. You then couldn’t flip the tabletop and use the underside as the tabletop. What am I misunderstanding?
In the "seal table top" step, why did you keep the blow torch 6-10" away?
Also, in regards to your conclusion, where did you apply the spray in bed liner?
Additionally, in the "distress" step you refer to beating the pecky sinker cypress before staining, although the pecky sinker cypress has already been epoxy coated and stain sealed and it is the pine 4x4 base that you have seemingly distressed and not pecky sinker cypress.
Lastly, You provided a glossy finish to one surface and a natural stain/sealer surface to the opposite table top surface in order for your MIL to have the option of flipping or reversing the top, yet it appears you glued 1x2 furring strips to one side thus making it impossible to use either side. If this is the case, why not just permanently anchor the table top to the leg base?