


Directional Arrow Sign
Hi Liz here from the DIY & decorating blog Simple Decorating Tips.
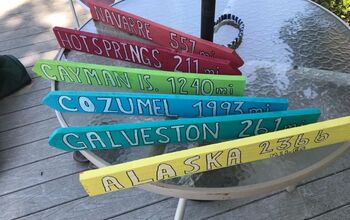
Don't you just have an affinity for those colorful directional arrows signs you see around cabins and cottages?
You know the ones pointing the way and how far to get to an inn, or the ice cream store (the "dairy" as they call them in Maine) or marina or some fun little store, in the colors and fonts known for that particular place? Taking inspiration from the ones in Kennebunkport, ME, (KPT) I came up with a little bit different message on one for the Maine cottage. Here's what I did and what it looks like...First, here's a couple of pictures of only a few of the many inspiring directional arrows signs found around KPT.
Depending on what kind of corner, some of them have directional arrows pointing all four ways on every side, so fun!
As I made my DIY directional arrows sign while I was staying in Maine, at the cottage, with very limited tools, I had limitations... like, no saw. If I really needed to, I'm sure I could have found a local carpenter to help me out with some cuts, but there was no need once I spied these simple arrows.This is just a fun little decor for the cottage, so doing it 'on the cheap' is the ruling thought. :)
( The ones I found are now discontinued... But here is a shopping link for some very similar.)
Mine are two connecting pieces of some sort of thin hardboard. The black faux chalkboard smaller center part is glued to the back and there was a twine hanger across the top, (you can still see the two holes in each arrow)
When I first bought them, the back boards you see in the blues and green and colors I painted them, started off in a brownish tan color, which for a different treatment could look fine, but for this project, I wanted to emphasize the different colors like in the KPT town signs.I have actually been wanting to do this project for a while... but instead of listing local places, I wanted to write towns and the distance to them, that bare a special significance to our family.
I've read from so many of you different techniques to transfer script from the computer, however, I don't have a printer handy, and I actually prefer to do it by hand. I find it so much more satisfying and enjoyable to do. It's actually like drawing, not writing.So here's my technique to print these scripts by hand.
First, working on Microsoft Power Point, I wrote out the town and mileage, then played around with the font selection until I liked the chosen font for the specific place. I then added 2 reference lines through the center of the script, both vertically and horizontally. These reference lines are super important, they tell you what part of the letter is above or below, and if you refer to that, instead of allowing your own handwriting to take over, you will approach it like drawing a picture, instead of writing a word. It really works!
Though it's not visible in the computer screen shot I showed you above, I winded up moving the horizontal reference line up to go across the top of the lower case letters. You can see this change in the lettering below:
This picture doesn't look like much, but it's actually showing you the light pencil lines I drew on the arrow. I've added a bottom line besides the two center vertical and horizontal lines.
Now you can see the arrow with the penciled in script. I started in the center of the arrow, with the MN and then worked out to the right and left from the center.
For this sign, I wanted a more permanent treatment than chalk, so once the penciled letters were done, I used a white paint marker. ( here is a shopping link for this marker) Here is a black one on top and a white one on the bottom. They work really great, although a little practice is helpful. You need to shake them well and often, (with the lids on! I have the paint splatters around the kitchen to show what happens if you don't have the lid on!!) And then you lightly press the tip on some paper towel to get the paint to flow into the felt tip.
Then it's just a matter of simply painting the penciled letters.
After I got the 6 arrows done, I needed to find a piece of wood to use for the 'post' to hold them. I really wanted an old weathered looking piece of wood, exactly 36" long, (remember, no saw here, and I'm cheap... er... this is an 'on the cheap' project) so I started to visually search around construction dumpsters as I drove around the countryside and towns, all I could find was new wood scraps though... But then I lucked out, I drove by a cute little house in Arundel that had some miscellaneous 'free' items at the end of the road, a window blind, a part of a bay window roof, a chair cushion and this 36" piece of weathered wooden board.
Even though the board had a slight crack in the middle of it, for my use, it didn't matter. (So funny they put it at the end of the road for free... I really don't think anyone in their right mind would want this junky piece of wood... besides the rare chance of me looking for this exact piece!) I hot glued the arrows on the old board, pointing in the appropriate direction to where the places are from where the sign will hang in the cottage. And then just screwed the 'post' to the wall.
And there you have it! Fun, colorful decor with a meaning. The directional arrows sign all finished. Everything is west from the cottage, except the beach. ;)
I hope this was encouraging to you to feel confident to do some script even if you, like I, don't have all the new-fangled equipment, printers and vinyl cut outs. You can do it by hand, with a few reference lines and just draw what you see.


Comments
Join the conversation
-
Finished mine but waiting for rains to stop. Started this last year and came on this inspired me to finish. Going on my pool deck.
-
Sweet! Love the different fonts and thanks for the warning about shaking the paint pens!


Frequently asked questions
Have a question about this project?