


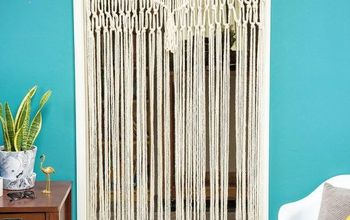
Boho Chic DIY Yarn Wall Hanging

You may have seen some of these beautiful yarn wall hangings before, but have you finally went and made one for yourself? It's a lot easier than you may think! You'll need a few simple supplies to make this beautiful decoration for your home.
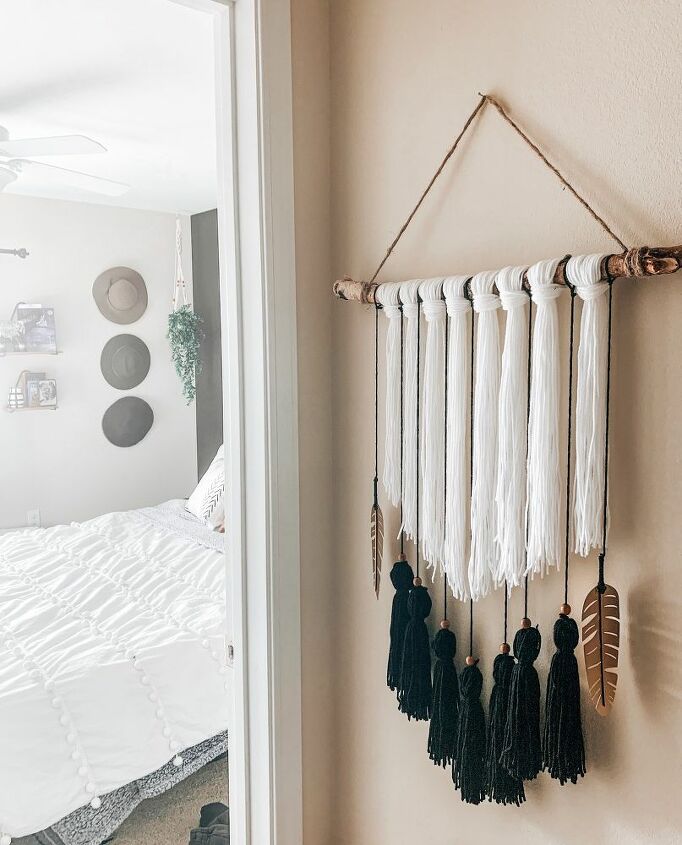
I love this in my apartment! It's the perfect piece of décor for outside my bedroom and it was so easy and fun to put together. If you want to learn how to make this DIY, keep on reading!
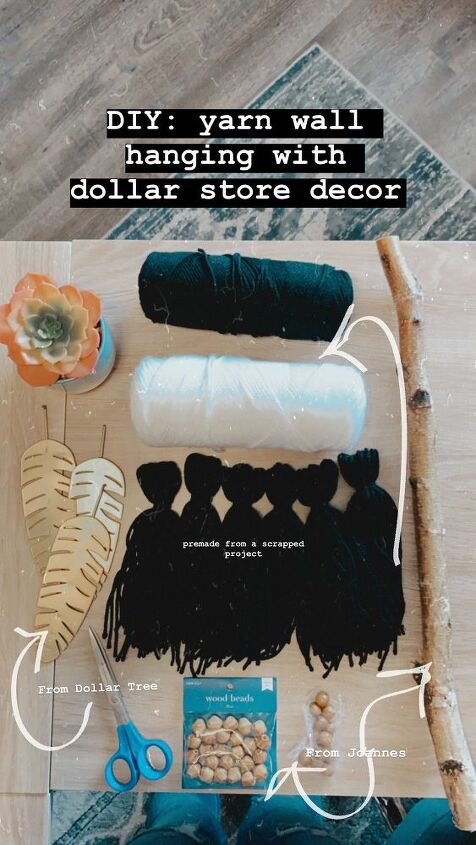
First things first, you'll need to gather up your materials. You'll need:
Yarn - you can definitely personalize your project with your own choice of color/size/type of yarn. I went with black and white for a neutral look against my walls.
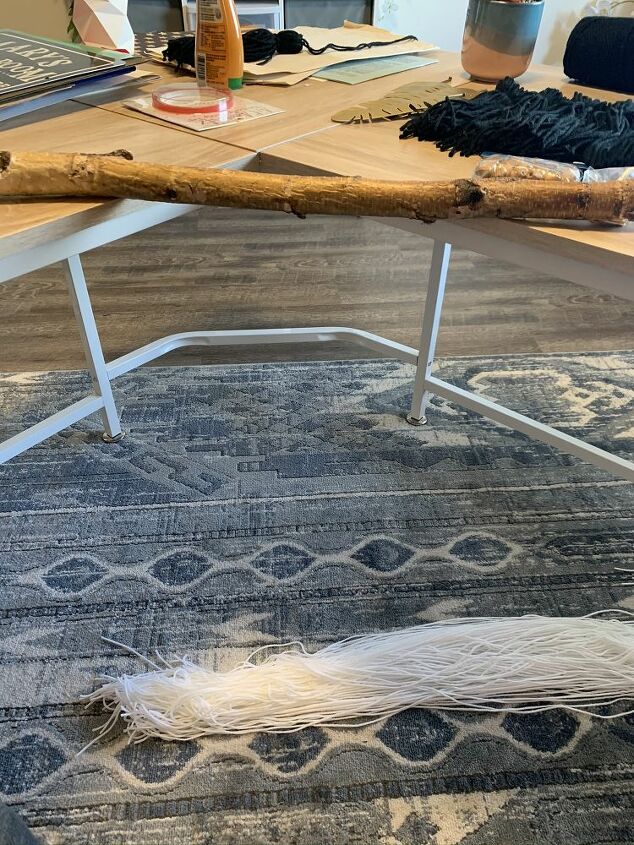
Wooden branch or dowel - I got this branch from Target during the post-Christmas sales for $1, but you can either find a natural branch out there in your neighborhood, OR you can buy a wooden dowel from any craft store.
Scissors - you'll be doing lots of snipping and "hair cuts" in this project
Measuring tape - not required but also pretty helpful for one of these steps in the process.
(optional) Your choice of décor item - I got these metal feathers from the dollar tree and just popped them off their plastic stand they came with to use for this project. You could also use metal rings, real feathers, faux flowers, or maybe you have some beautiful jewelry you can showcase in your décor piece. The possibilities are endless. You don't even have to use an extra item, it can be beautiful and simple with just yarn, if that's what you prefer.
(optional) Wooden beads - to accent your tassels
Yarn needle - for attaching the beads to your tassels and to the yarn strings
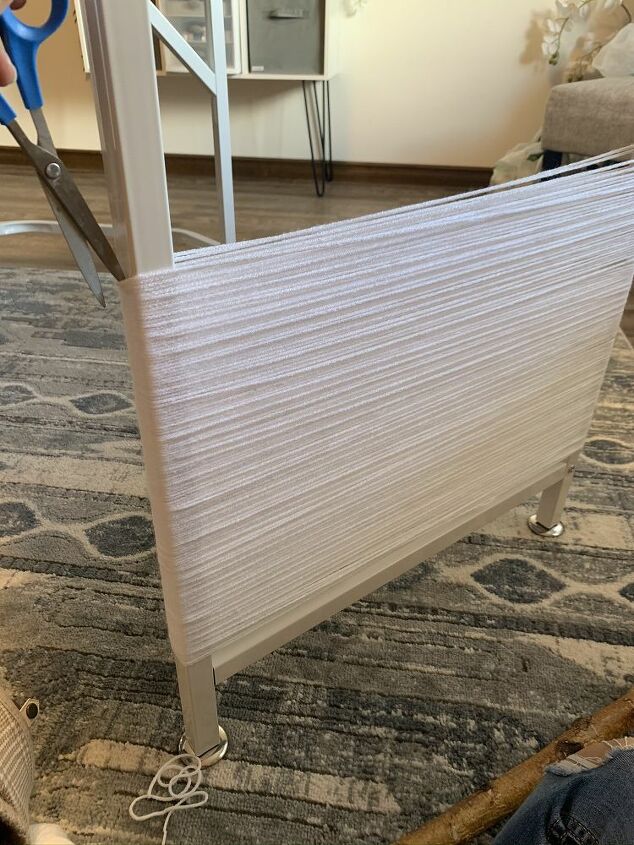
For learning how to make tassels, the next thing you'll need to do is cut your yarn in the length you desire for your project. My craft table legs were actually the perfect length that I wanted, so I used that to skein my yarn around that. I had my loose end on the right hand side and held that in place with a small piece of tape as I wrapped it around and around the table legs.
You can use a piece of cardboard, a book, your arms, or something around the house to use for this, it doesn't need to be table legs.
I didn't necessarily count how many times I wrapped it around the table, I just estimated how much yarn I would need to fill up my branch.
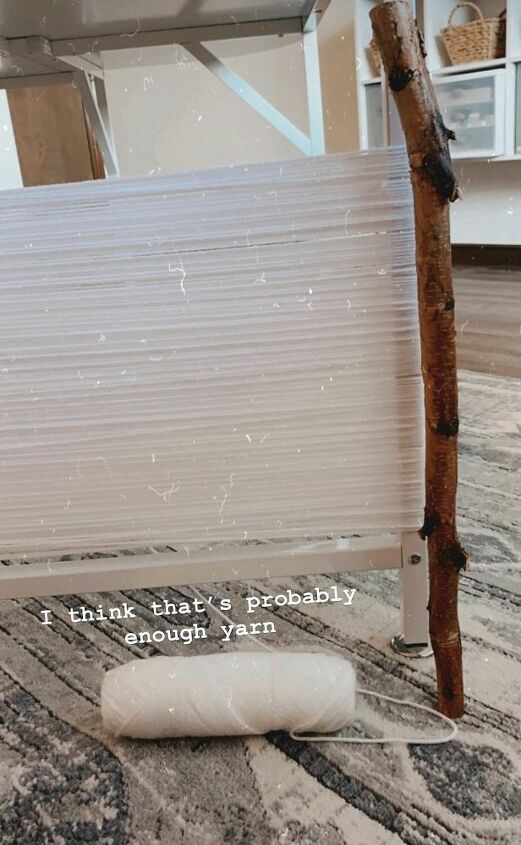
In this picture you can see I used the wood to gauge how much yarn I would need. Once I thought it was enough, I started to cut the yarn on the side where my loose end was (the right hand side) and laid my pieces out on the floor nicely.
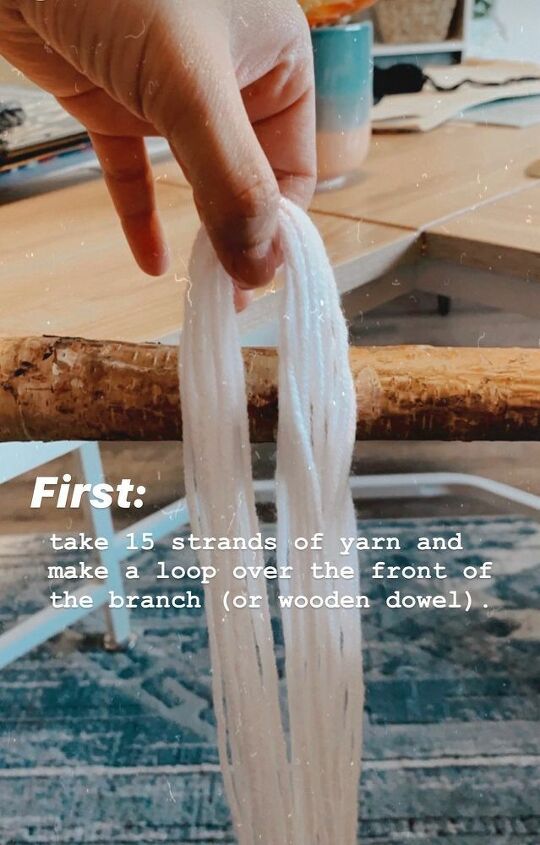
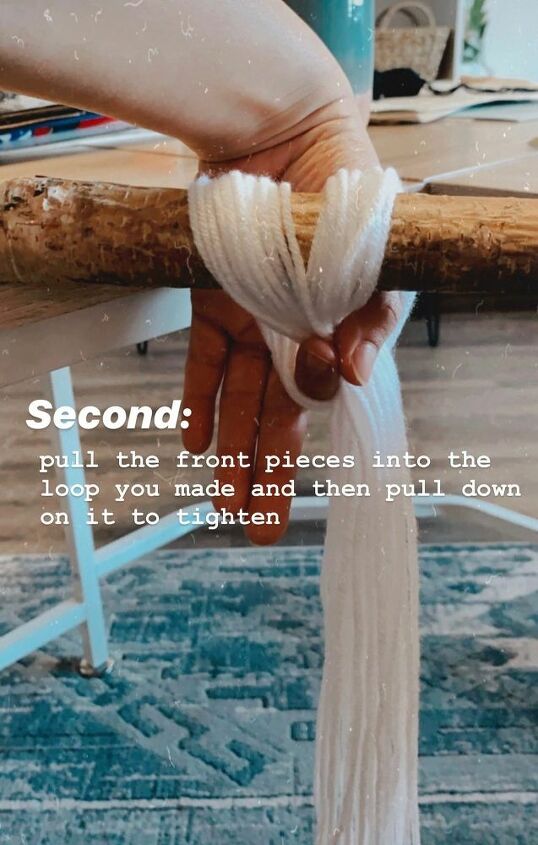
Next, you are going to start your loops to attach the yarn to your wooden dowel/branch. Make sure your branch is elevated in between chairs or hung on the wall, somewhere to make the next step easier for you than doing it on the floor.
I grabbed 15 strands of yarn for each of my chunks to place on the branch.
Making the knot on the branch is easy, but hard to write in text. You're going to set your yarn on top of the dowel/branch and make a loop, then pull the yarn ends from the bottom up through the top loop, and pull down tight to create a knot. The following pictures should help display this process.
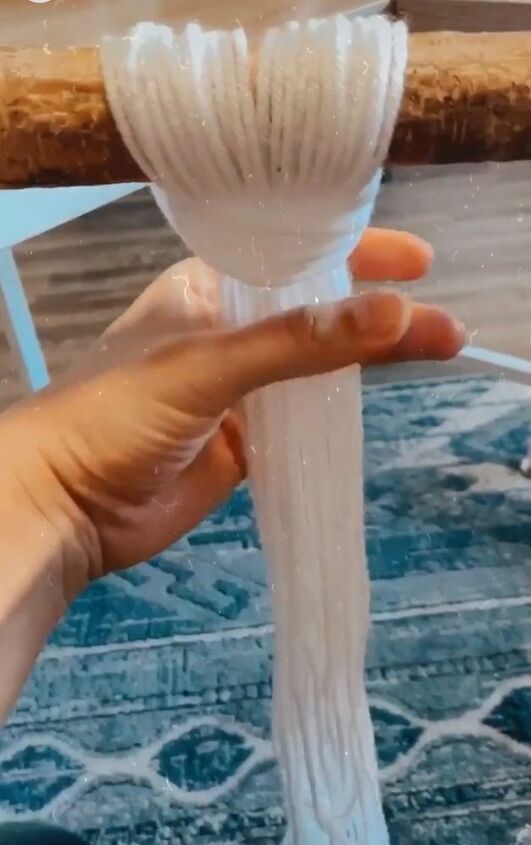
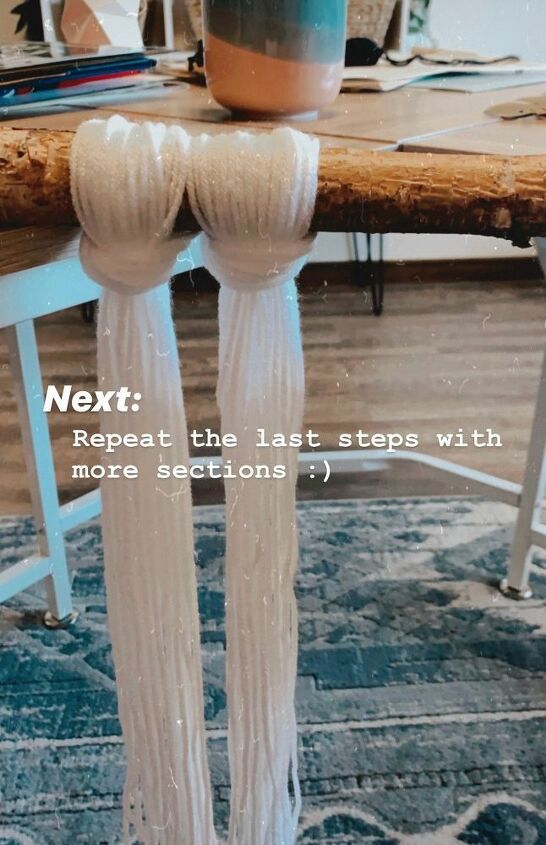
Once you get your knots made, repeat the same steps until you fill your branch/dowel up with more sections. I ended up with 6 total chunks once I was done.

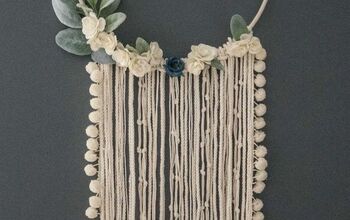
Next, we're going to hang the tassels. Now, I had made these black tassels outside of this project that I had scrapped, so I don't have the pictures to show how I made them. They are very basic to make though, and I know there are Youtube videos to show exactly how to put them together.
I laid my wooden branch on the ground and straightened everything out. Then I took long pieces of my black yarn, tied it to the branch and double knotted it. I didn't cut the strands prior to tying them because I wanted to make sure they were all even after the fact.
I took out my measuring tape and cut the black yarn strands in a V-shape. The outer pieces were 16", then 17", then 18" and then 20" for the middle piece. I had intended to have 2 inch difference between each piece, but I accidentally cut a piece to 17" so I just went with it and continued on.
After you're done cutting, it's time to attach the tassels to the strands.
So, attaching them to the cord is simple, but again, MUCH harder to explain through text! I've included this video here to show my hands in the process.
Basically, I used a yarn needle and threaded the long black yarn strand through, then added the bead to that strand. Then, I took my tassel and tied a short string of yarn to the very top of the tassel and tied it tight. I used the yarn needle (holding the long strand) to loop through the top of the tassel and attach it to the strand with the bead. Then, I tied all the strings together and knotted it several times. I cut off the long hanging strings once it was all secured. (I hope this makes sense, hopefully the video helps!)
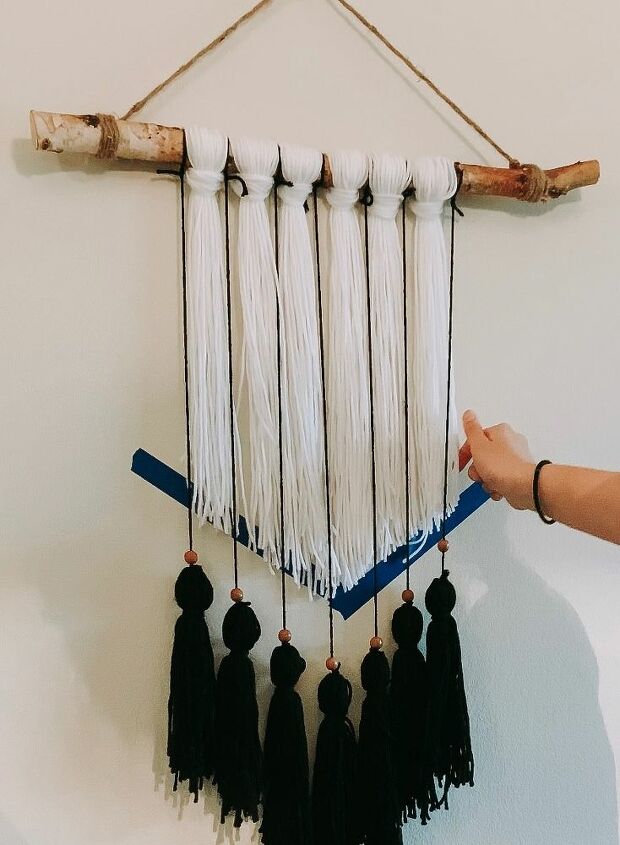
Once everything is attached, it's time for the hair cut! I put some painters tape on the wall in a V shape and gave the white yarn a good trim. I also trimmed the black tassels to be straight across.

Once I finished cutting, I felt like something was missing. I decided to add two more sections of white on each side (I had left over white yarn) so I went and added those, and trimmed again.
If you are content with your project here, call it done! I wanted to add a little bit more personalization to mine, so I decided to add my dollar store metal feathers.

Here, I took two long strands and used my hot glue gun to wrap the black yarn around the "stems" or whatever of the feathers and tied the other end of the strand to the wooden branch on each side.
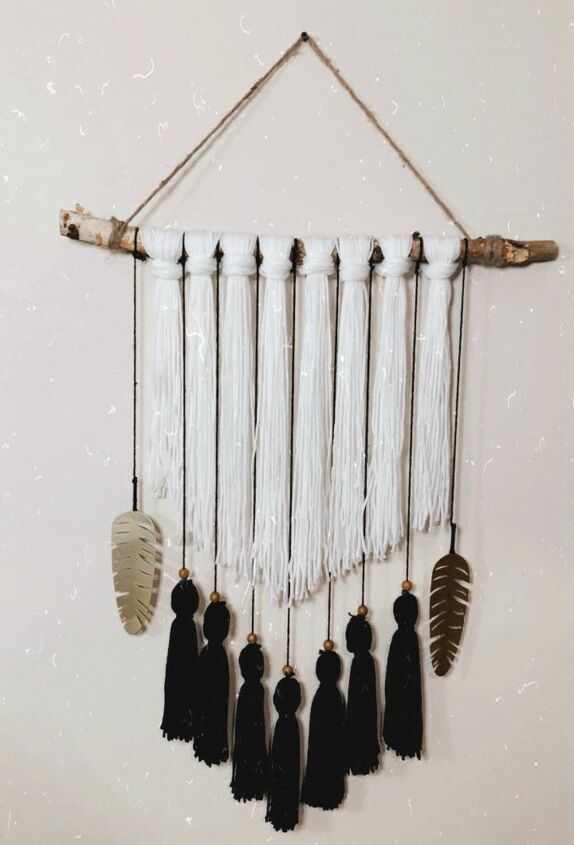
And here it is, in all it's glory! While this project does have many steps, it was fun to put together and be creative with the personalization. I find that taking a few hours to craft can be therapeutic, just putting on some good music or a good TV show, being creative, and seeing your craft come together. I hope you guys enjoyed this project and are inspired to create your own!
Resources for this project:
See all materials


Comments
Join the conversation
-
Thanks for taking all the math out of this project!!! They are easy to make, but I haven't taken time to figure out the numbers. So, thanks a bunch! Looks great, good job!!
-
Pretty 😍 I like your style!


Frequently asked questions
Have a question about this project?