


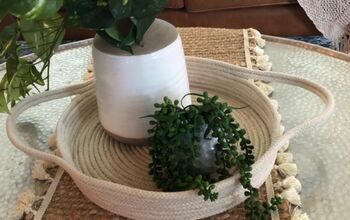
Create an Eye-Catching Home for Your Trinkets With a DIY Vanity Tray

A vanity tray is a tiny bit of modern magic. It's a way to turn a prized collection of household stuff into a centerpiece for your living room or whichever corners of your home need a little sprucing up. My latest video tutorial features one of my favorite DIY projects, requiring only a few minutes and a handful of easy-to-find materials to put together. It's also infinitely customizable, with easy variations for a bathroom vanity tray or a mirrored vanity tray, and a bit of a recycler's dream if you happen to have a shed full of once-loved frames and hardware. A step-by-step guide is outlined below, along with a list of everything that you'll need to begin building a vanity tray of your own.
Tools and Materials
- A picture frame (size 8x10'' is ideal)
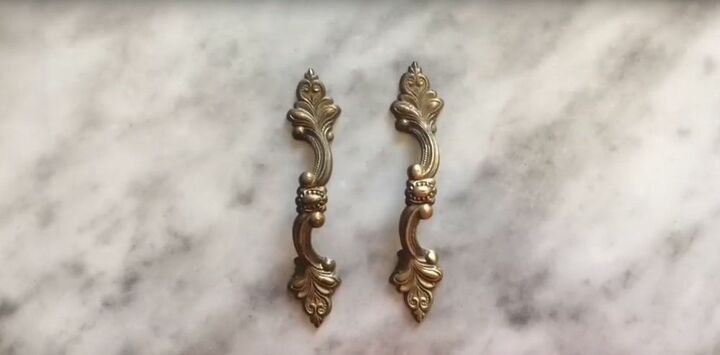
- Antique finish brass handles
- Antique finish brass decorative feet
- Pattern paper, card stock, or photo
- Clear E6000 glue
- Glue gun and glue sticks
- Pen, ruler, scissors
- Glass cleaner
- Toothpicks
Gather Your Materials
In my opinion, the best part of this DIY vanity tray project is that all the pieces can be swapped out so that you can create something truly unique to yourself and your house. It's a step that we'll cover in greater detail towards the end of this tutorial but, before we get too crafty, let's go over the list of tools and materials that you'll need before you can get started. Make sure you have a clean, airy space to work in, as we will be fixing details to our vanity tray with glue.
You'll need a hot glue gun and glue sticks, as well as a tube of clear E6000 glue. This is an industrial jewelry and craft adhesive but it's available at most hobby stores for a few dollars. Then, you'll need to source the body of the vanity tray. I used a standard 8x10'' picture frame. A pair of antique finish brass handles and four brass decorative feet add a bit of rustic charm (and support) to our vanity tray. Complete the piece with a photo, glass, or pattern paper interior or even opt for a mirrored vanity tray for a simple bathroom tidy.
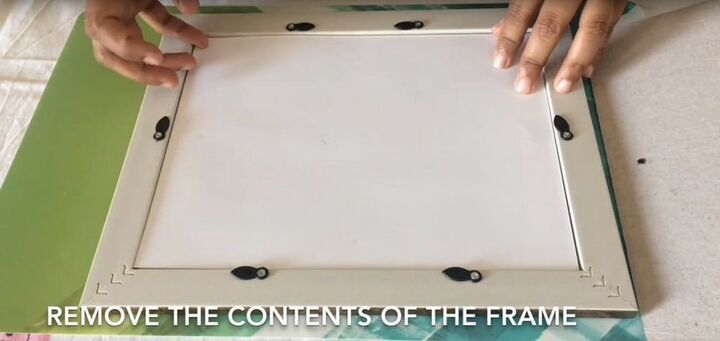
Remove the Contents of the Frame
It's time for a little therapeutic destruction now. Remove all the packaging from your picture frame (if it's new) or wipe off the many years of dust it has accumulated (if it's old), and place it on a sturdy surface with the glass facing away from you. At all times during this tutorial, you'll need to be careful not to scratch or smash the glass pane. Keep a wet cloth handy to remove lumps of stray glue too, as glue guns, in particular, tend to leave 'strings' of excess glue during use.
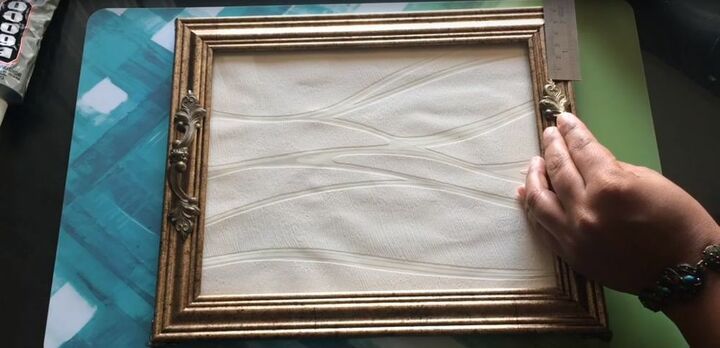
You'll then need to remove the rear card backing of the frame by turning the grips holding it in place towards the outer edges of the wood. Then, the placeholder image inside should fall out easily (don't throw it away just yet though; we'll need it in the next step). Finally, gently pull all the hardware and the support stand from the card backing. Don't worry too much if you remove the surface of the card during disassembly. It won't be visible once the vanity tray is complete. Your picture frame should now be empty. This will form the outside of our glass vanity tray and support the decorative feet and handles.
Measure and Cut the Patterned Paper
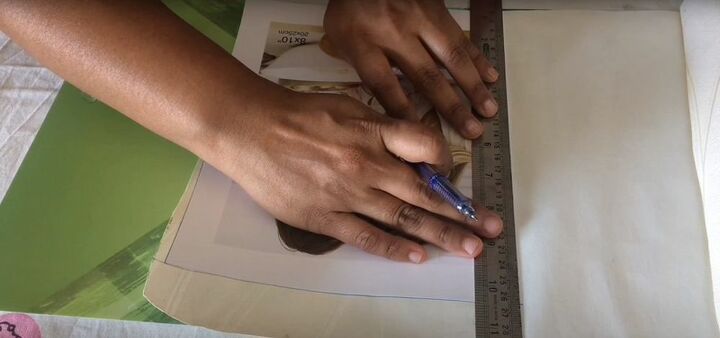
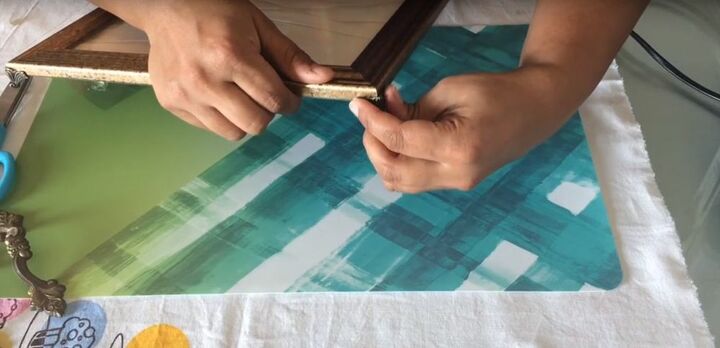
In my video, you can see that I've used patterned card to add texture to the frame's interior. You can happily use spare wallpaper for this step if it will save you a trip to the hardware store. In fact, you can use whatever you like. We've already mentioned the possibility of creating a mirrored vanity tray but this fun DIY project can also feature a photo, book pages, concert tickets, baseball cards - anything at all!
Now, remember the placeholder image that I mentioned in the previous step? Place it in a corner of your card, find your pen and ruler, and simply draw around it. Easy! You should now have a perfectly-sized outline of card for the interior of your vanity tray. Using scissors or a craft knife, cut it to shape - and, please, be careful! At this stage, you should also clean the glass of your picture frame with your preferred solution.
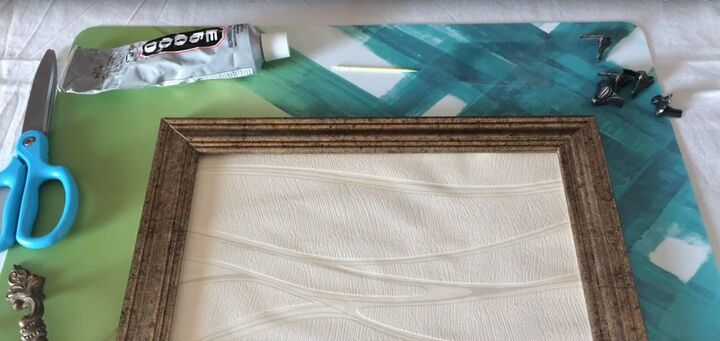
Assemble
It can be a bit fiddly but this should be the easiest step of all. You'll want to insert your freshly-cut patterned card into the picture frame, followed by any extra supporting pieces of card that came with it (you can safely throw away the placeholder image at this stage though). Finally, re-add the tough card back and re-seal it in the frame. Ensure that all the grips on the rear are turned back into place to avoid anything falling out while we continue to work on our glass vanity tray.
You now have the heart of your new vanity tray, pending a few minor additions yet to come in the following steps. Now is a good time to clear your workspace of anything that you don't need in preparation for the gluing of the brass feet and handles.
Attach Feet
This step turned out to be a lot easier than I first expected. But, as you're going to be using two different kinds of glue at the same time, it definitely has the greatest potential for mess and mistakes. A toothpick or needle is an essential bit of kit here too.
Apply E6000 thinly to the inside of each brass foot with a toothpick (I recommend leaving some gaps), followed by the glue gun. It's helpful at this stage to work from a blob of E6000 on a piece of plastic film, rather than directly from the bottle - but be careful where you're putting the sleeves of your overalls! When you're ready, stick all four feet to the corners of your vanity tray and allow it time to set. E6000 should be solid within two minutes but 24hrs is the recommended curing time. Each foot should be able to sit on any right-angle surface, but you can test this without glue beforehand if you'd like to avoid any unfortunate mistakes.
Attach Handles
Just a quick note on my chosen glue here. Though it might seem a little counter-intuitive, using E6000 adhesive and the glue gun together provides our attachments with extra strength. You can get away with using either, though a debate rages among craft communities regarding which option is the more effective glue. One thing you should take note of is that E6000 is permanent and toxic so please make sure your workspace is well-ventilated (or work on your glass vanity tray outside). You may also prefer to work with a facemask and gloves during this step. With that out of the way, it's more of the same process for this next step.
Whether you achieve it via rulers and math (or both) you'll need to work out a way of ensuring that the handle placement on your vanity tray is central. For example, you could subtract the length of the handles from the length of the frame and halve the remainder (e.g. a ten-inch frame minus a four-inch handle leaves six inches - or three inches either side of the handles). Or you could go just by sight if you're confident! In any case, mark the top and bottom edges of your handles with a non-permanent marker or a pencil. Apply the same combination of E6000 and glue gun as in the previous step and stick your handles into place. Note that your handles may have left and right-hand orientations!
Enjoy!
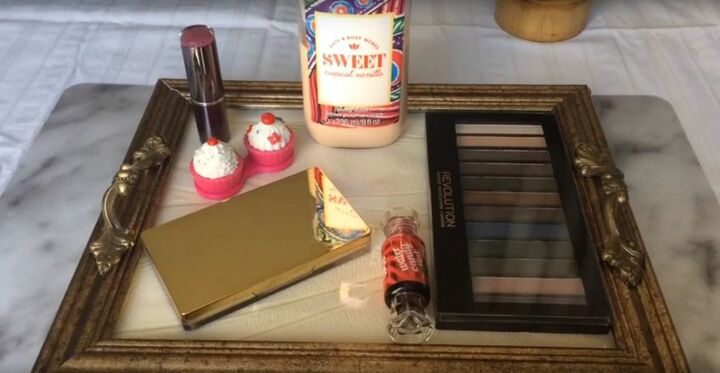
Congratulations, your glass vanity tray is complete! Now, let's take a moment to talk about all the things you can do with your creation. In my video, I utilized the vanity tray as a practical place to hold TV remotes, cosmetic items, and every-day essentials like phones and keys. It can also serve as a more permanent holding for houseplants and ornaments. Try getting creative with the lighting around objects on a mirrored vanity tray. It's a great way to pull focus to a centerpiece - or just to make the day's loose change look like a museum exhibit. In the bathroom, use it to hold washes and shampoos. Watch for mold though, and clean off any residue left behind after bathing.
I believe the best way to look at a tutorial like this is as a guide or jumping-off point for lots of different types of projects. Why not try replacing the handles with seashells or searching thrift stores for different types of frames to use in future vanity tray designs? Whatever you choose to make, I hope my DIY vanity tray video has inspired you!
DIY home decor using old picture frames
Resources for this project:
See all materials


Comments
Join the conversation
-
Very clever idea!! I have tons of old picture frames collecting dust. I just might try to do this💞
-
So cute!


Frequently asked questions
Have a question about this project?