


Make Your Own Drum Shade Chandelier – DIY Tutorial
Hi friends, hope you all had a great week! I want to show you a project I did a while back that turned out surprisingly beautiful. Have you ever thought of making a drum shade chandelier? Did you think that making your own chandelier was complicated and out of reach? Well, I did too, until I was put to the task to make one for my room during a challenge. Just to find out it was so easy and fun to make using simple supplies.

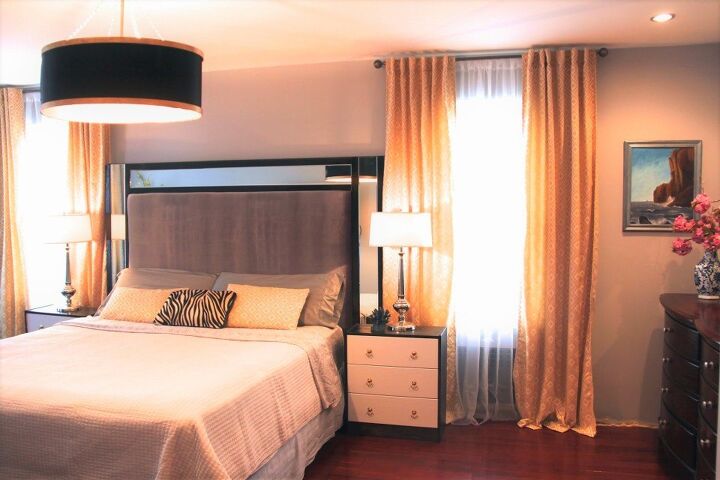
When we moved into our house, our bedroom was a bland looking space in need of serious style. I had a difficult time figuring out a look and the feeling I wanted to evoke in this room.
The choices for this bedroom were dark and moody, light and airy, contemporary or transitional. So many styles, so many options stifled me and I couldn’t make up my mind for an end design style. So, I decided to do a “temporary makeover,” invest very little time and money till I figured a permanent look. Six years later… the “temporary makeover” is still going strong.

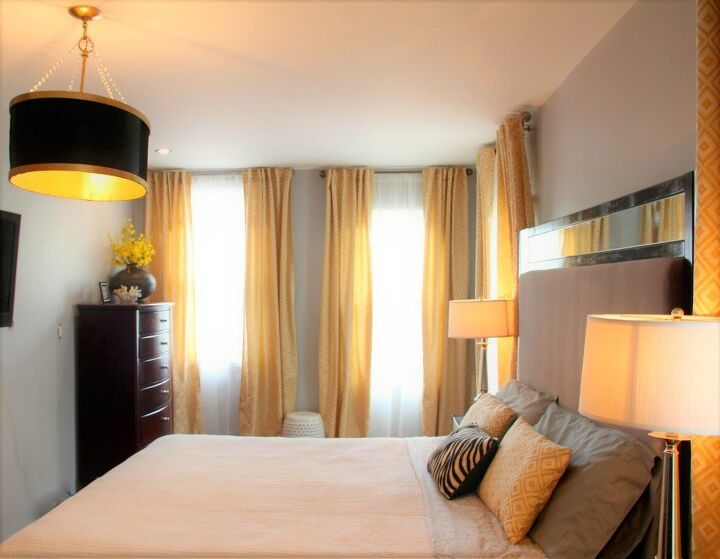
I had decided to DIY everything possible in this room. From curtains, side tables, headboard and even Chandelier. I will be sharing posts on our DIY headboard and curtains soon. You can see the Ikea Rast side table here. Today I am sharing how I made this drum shade chandelier for our bedroom.
More DIY Embroidery Hoop Ideas
This project was so much fun and easy to do, even my friends followed my progress and couldn’t wait to see the finished chandelier.
let’s get started with making your own drum shade chandelier… First, gather all your supplies.
Supplies needed
- 2 very large oval quilt hoops, you can get the size according to dimensions you need for your space. I bought this at a local fabric store, Save-a-thon. But, you can purchase them at Michael’s, Joanne fabric or here.
- 4 strings of crystals or glass, I used crystal strings from another chandelier I had.
- 2 large poster boards
- I used Black silk fabric, you can use your choice of fabric to coordinate with your design.
- Gold spray paint
- Light cord set from Ikea or you can get from Home Depo t or here. I used one with a rod from a fixture I had.
- 4 eyelet hooks
- Spray adhesive
- Glue gun
- Small S hooks
Let’s get started making your own drum shade chandelier
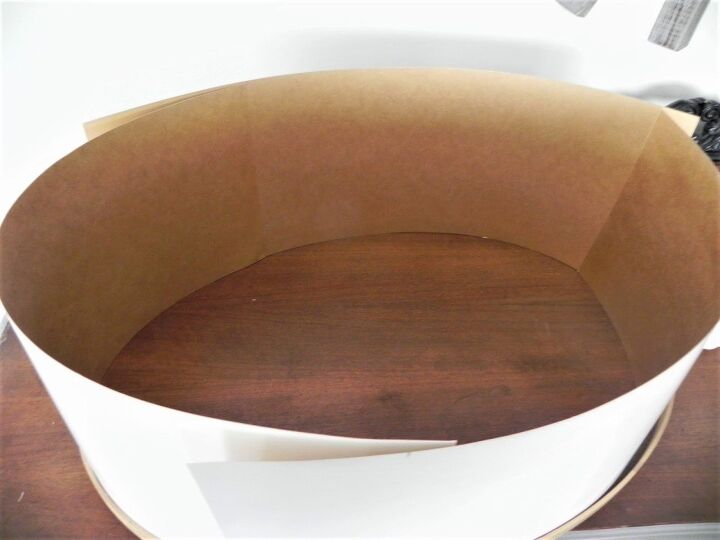
The embroidery hoops comes with two hoops in the set. First, I started by separating the hoops. I used the inside hoop that is intact for the rims. You can keep hoop with the do-hickey for a future project.
Next, cut the poster board to the desired height of the chandelier.
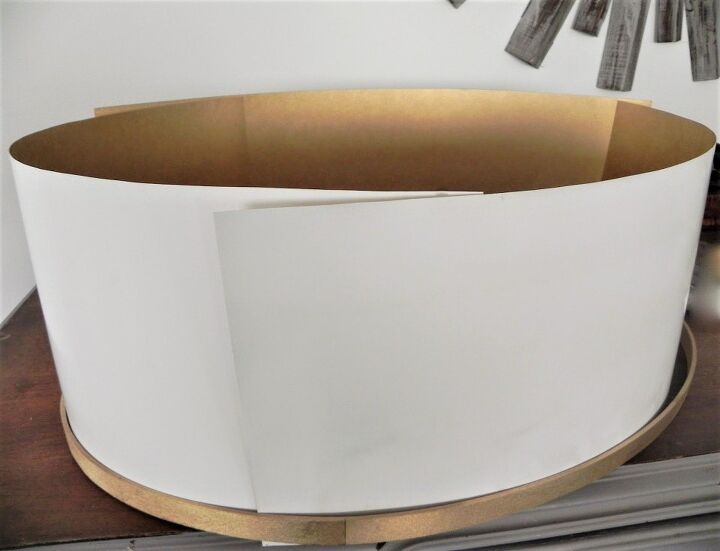
Spray the inside of the poster board, hoops and the light cord with the gold spray or the color you have chosen for your space.
Once completely dry, fit the poster board inside the hoop, cut to fit overlapping one inch. Glue the ends to make the oval shape with the boards.
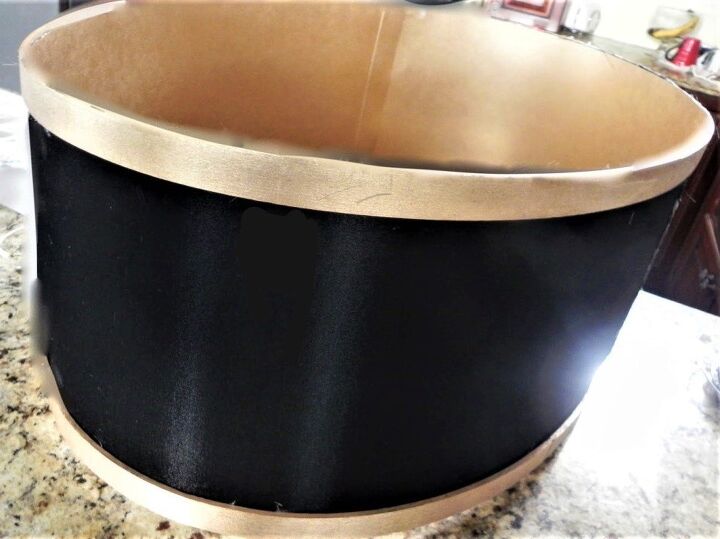
Next, cut the fabric to the size of the oval form leaving and inch on the top and bottom. Spray the poster board and carefully attach the fabric, making sure to remove any wrinkles and bubbles as you attach.
I screwed the eyelet hooks inside top rim of the shade, evenly distributing to keep shade level. Make sure not to puncture through to the outer side and attached the crystal strings.
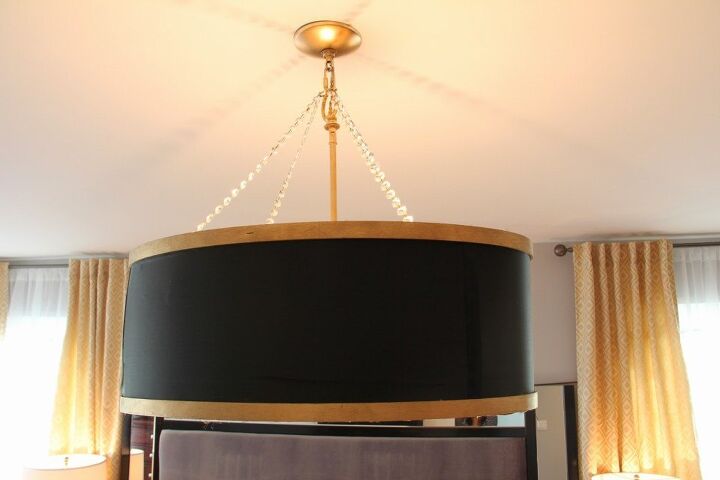
Lastly, use the S links to connect the crystal strings to the light cord and hang the light.
Making your own shade chandelier is pretty simple to put together. You can give the chandelier any shape, size, color you want to create a one of a kind piece.
Hope you enjoyed this tutorial…
Check out some of my other projects here and here.
Thanks for stopping by…
Resources for this project:
See all materials


Comments
Join the conversation
-
I love this, and want to do it. My problem is that I need a light socket with a pull chain. Do they still make those?
-
great idea!
I had been mentally designing an octagon shade with metal and glass to hide the five light fixture in my octagon shaped breakfast nook.
The great irony was we threw out the 70's vintage drum shade that was in the corner of the dining room when we moved in 20 years ago.


Frequently asked questions
Have a question about this project?
I love this idea!! Two of the bedrooms in my house are kind of small, so I hang the lights for space saving reasons, not to mention I just like the hanging lights. I always struggle with finding shades or covers that I like, so this is perfect for me!! My only question is the strength of the bulb you are using?? I would imagine too low would not allow enough light, but I am the daughter of a firefighter so I would be concerned with too much heat coming from a strong bulb as far as the watts....any suggestions that will help me not be a paranoid fireman's daughter but will give at least some of the necessary light for a bedroom would be very much appreciated!! ;-)
I love this idea!! Two of the bedrooms in my house are kind of small, so I hang the lights for space saving reasons, not to mention I just like the hanging lights. I always struggle with finding shades or covers that I like, so this is perfect for me!! My only question is the strength of the bulb you are using?? I would imagine too low would not allow enough light, but I am the daughter of a firefighter so I would be concerned with too much heat coming from a strong bulb as far as the watts....any suggestions that will help me not be a paranoid fireman's daughter but will give at least some of the necessary light for a bedroom would be very much appreciated!! ;-)