


How to Plant Lily Bulbs In Your Perennial Flower Garden
Lilies are among the most dramatically beautiful perennial flowers in the garden. Fortunately for us beginner gardeners, they’re also very easy to plant and to care for! Here’s all the details about planting lily bulbs in your flower garden.
Step 1: Choosing Lily Bulbs to Plant
Lily bulbs, or “corms”, come in many different varieties. The plants come in different heights, with different types of foliage, and different colors of flowers. They come in soft pink, white, bright yellow, orange, red, and even hot pink. There’s a world of lilies to choose from!
Types, Bulk Bulb Bags, Single-Packed Specialty Bulbs
(I love the gorgeous pink lily types)
Step 2: Preparing Lily Bulbs for Planting
Soak the bulbs for an hour or two before planting if they are at all dry or soft. While this step is optional, it can help your lily bulbs root into the ground. Lily bulbs are corms, and don’t have a true bulb protective coating. This allows them to dry out more easily than other bulbs like tulips and daffodils.
Inspect, Soak
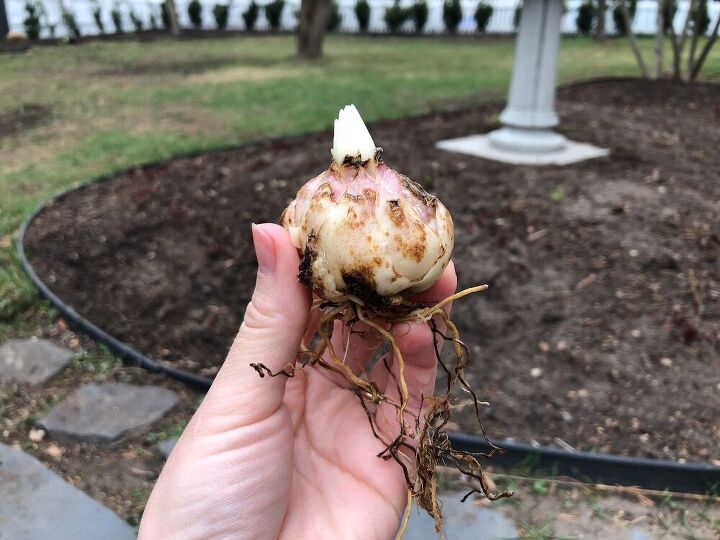
Photo: Close up of lily bulb fresh out of the packaging
Step 3: Select a Planting Location for your Lilies
Lilies flower best when grown in full sun, but they’re also tolerant of partial sun/partial shade (particularly in hot climates). They like well-drained loamy-sand soil that drains well. Avoid planting them in heavy clay where water pools easily.
Planting lilies among other perennials lets the roots and bulb stay cool while the leaves can bask in the energizing sunshine. Lilies and other tall perennial flowers also grow best in an area sheltered from high winds.
Full Sun, Sheltered From The Wind, Well-Drained Loamy Soil
Step 4: Planting Lily Bulbs in the Ground
- Dig a hole that is 3 times as deep as the lily bulb is tall.
- Place the lily bulb in the hole with the pointy side up. The top should be about 4″-5″ below the surface of the soil around the hole.
- Gently backfill with the soil that came out of the hole. Try not to leave to many air pockets (but be gentle!).
- Water the planted lily bulb
- Other lily bulbs can be planted in the area, as close as 8″-12″ apart or as far apart as required to fill the space. Lilies do grow quite quickly and may eventually bump into on another when planted closely.
- Apply mulch around the plant to keep the roots cool and moist.
Dig hole 3x as deep as bulb is tall, Roots Down, Stem Up
Step 5: Caring For Newly Planted Lily Bulbs (Corms/Roots)
Once the area has been watered and mulched with homemade compost (or another organic mulch), the lilies are pretty much set to grow!
Keep them well-watered for the first year or two to help them get established. Watering can be decreased dramatically once the roots of the plants have grown deep. Lilies can be fed with organic flower food or bulb fertilizer as they start to sprout out of the ground
Mulch, Water, Fertilizer tips for newly-planted lily bulbs
Here is a long-version overview video (above) showing the whole process of planting lily bulbs, including shopping tips, planting tips, and care tips.  Happy flower gardening everyone! 🙌
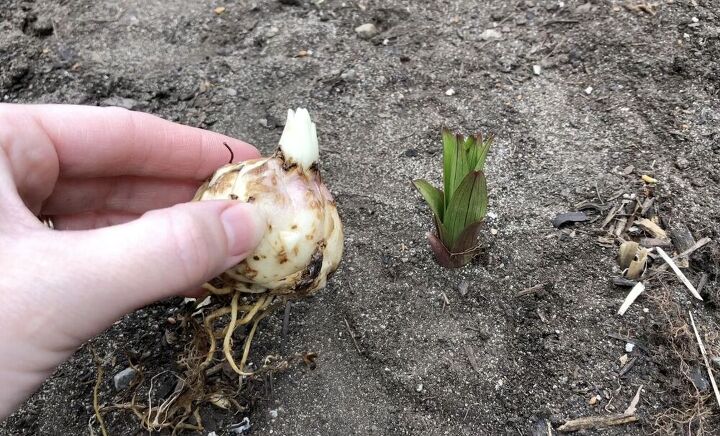
AFTER: Lily Bulb Sprouting
Here is a photo showing a lily bulb on the left, beside a lily sprouting out of the ground. The lily bulbs should look like the green sprout on the right side about 2-3 weeks after planting in most conditions.
Resources for this project:
See all materials


Comments
Join the conversation
-
Thank you so much for this tutorial. I am new to planting bulbs and learned a lot.


Frequently asked questions
Have a question about this project?