


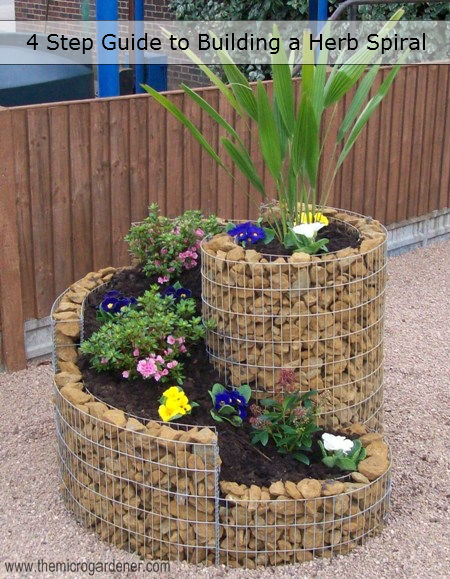
How to Build a Herb Spiral Garden
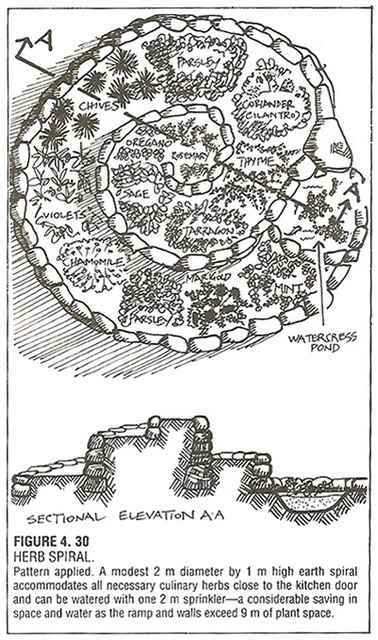
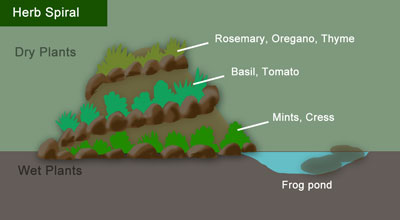
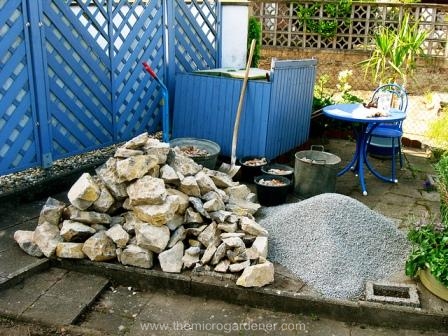
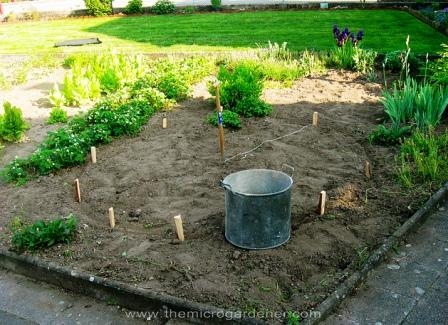
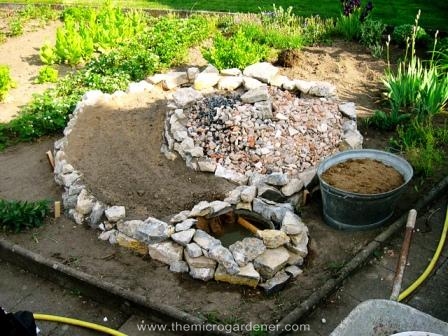
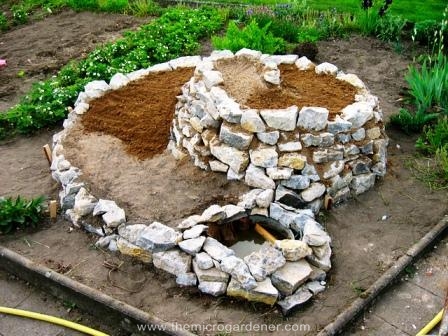
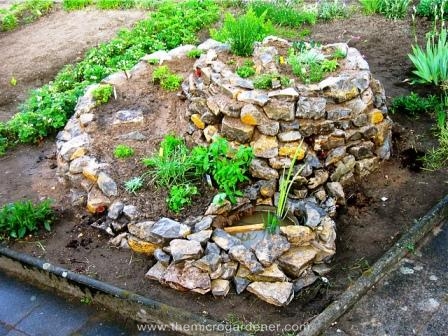
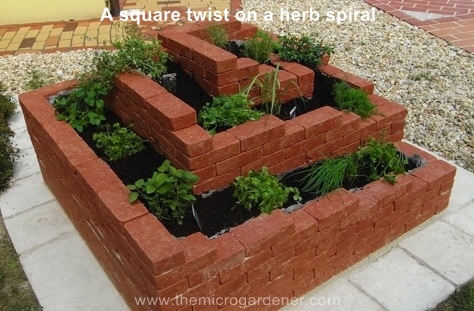
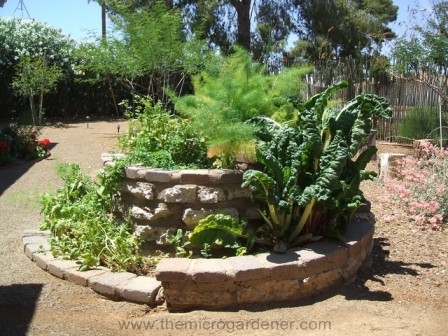
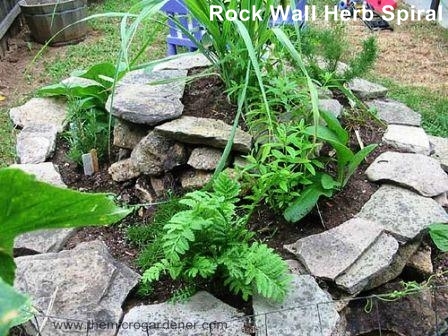
As a urban gardener, I love ideas that help create more growing space, are visually appealing, low maintenance, very do-able and are easily accessible. The Herb Spiral is a nature-inspired vertical garden design that is highly productive and energy efficient. It allows you to stack plants in a pyramid to maximise space - a practical and attractive solution. It is typically 6.5ft wide in diameter at the base, ascending to 3.2- 4.2ft, with the center of the spiral at the highest point. The spiral ramp provides a planting area large enough to accommodate all your common culinary herbs but is certainly not limited to just growing herbs! If you are interested in how the design works and all the benefits, you can read more about them at https://themicrogardener.com/15-benefits-of-a-herb-spiral-in-your-garden/. I thought I'd share a tutorial on this DIY project which can be as cheap and cheerful or elaborate as your budget allows - the materials vary widely so you can choose something that meets your taste, time and skill level. There are plenty of videos, specs and tips in the full online tutorial that will help you get the feel for the various options you have and stages of the project. I've helped build them from scratch in just a few hours - it's about organizing your materials and having the site ready - bribing a couple of friends with some yummy food to help give you a hand doesn't hurt either! Here are the basics you need to know: Choose a site ideally located close to your kitchen door for quick access to fresh herbs. Orientate the bottom of your spiral on the northern side in the Northern hemisphere or southern side in the Southern hemisphere. This creates micro climates that allow you to plant a wide variety of herbs that enjoy different positions - sun, shade, dry or moist. Materials: (these are just typical 'ingredients' you can use and the basic 'recipe'). · Cardboard (without ink or tape), weed mat or gravel – optional but useful to kill weeds if building your spiral straight on top of lawn. (I avoid carpet because it's likely been treated with chemicals that will leach into the soil as it breaks down). Alternatively, you may need a drill for drainage holes if building on concrete. · Long stake. Secure a 1m length of string to the stake and tie at the other end with a lightweight stake, bamboo cane or chalk. Use this to draw a line on the ground to measure out the circle. · Organic matter such as mushroom compost, worm castings, lucerne, mulch, straw and garden soil to build fertility to feed your garden long term (quantity depends on diameter of your spiral). · Compost (for planting your herbs into – preferably home made so it will be full of living microorganisms or alternately, a certified organic compost). · Rock minerals and organic fertiliser (to add nutrients to your soil). · Mulch (whatever you have available) e.g. lucerne, sugarcane, baled grassy mulch hay, pea straw, grass clippings,leaves, etc. · Herb seedlings; bay tree and vegetable seedlings if planting. · (Optional) pond materials and irrigation fittings if including. STEP 1: Measuring up – Have someone hold or bang the stake into the central point of the ground where you want to position your herb spiral. To determine the perimeter, stretch out the string attached to the center stake to mark out your circle, drawing a line in the soil with the other stake or bamboo cane tied on the end of it (or use chalk if you are marking out a hard surface). The diameter averages between 5 –6.5 ft or 2.5 – 3.25 ft from the center. STEP 2: Your base – if starting on lawn you will need to stop weeds from growing. Cardboard can be used for this purpose to sheet mulch and build the spiral on top. No light = no weeds! Lay your weed mat or wet cardboard (soak with a hose or in a wheelbarrow) to cover the circle you have marked out. STEP 3: Construct the wall structure – Using your edging material of choice, start laying your bricks/rocks on the outer edge and working inwards to create a spiral shape, allowing about 1.6 ft width to plant into or adjust if making a smaller spiral. Once you have your basic shape laid out around the circumference, add a second tier of bricks, remembering the outside 'wall' of your spiral is lowest (e.g. 2 bricks high or perhaps 1-2 rocks depending on size – enough to retain your soil). The middle will usually end up about 1m (2.5 ft) high with a central planting area, gradually tapering down in height on a light slope to the bottom. You can block it off or add your bog/pond at the base if using. STEP 4: Add your organic materials & nutrition – for each of us this will be different, depending on what you have easy access to. Some people only add mulch or straw to their herb spiral and plant into pockets of compost. If you're on a tight budget or this is all you have access to, then this system of 'growing soil' will work fine but 'dead dirt' is unlikely to bring you a successful outcome! There are plenty of tips on ways to make your own soil in the online tutorial. For which herbs to plant where, you can find more info @ https://themicrogardener.com/how-to-plant-out-a-herb-garden/ I'd love to see pics if you've built one and if you haven't, I hope this inspires your next project!


Comments
Join the conversation
-
I like ALL of these spiraling, squaring rock gardens. A few conversation pieces. Very pretty!!

-
I am so in love with these spital gardens. I hope that I can get some made for next year. Thank you for sharing.😃👍👏


Frequently asked questions
Have a question about this project?