How to create a Cinderella shabby girl looking dresser

+22
How do I create this look?

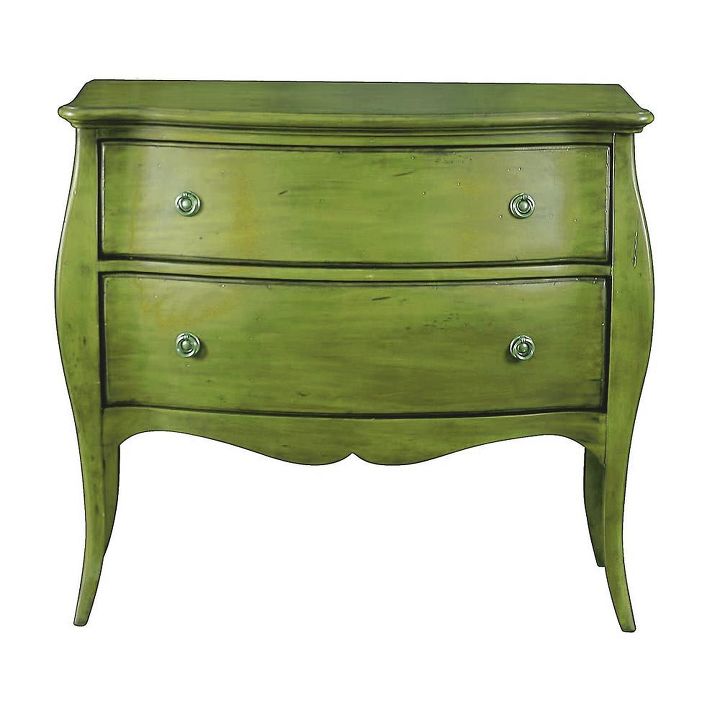
This is the look I want

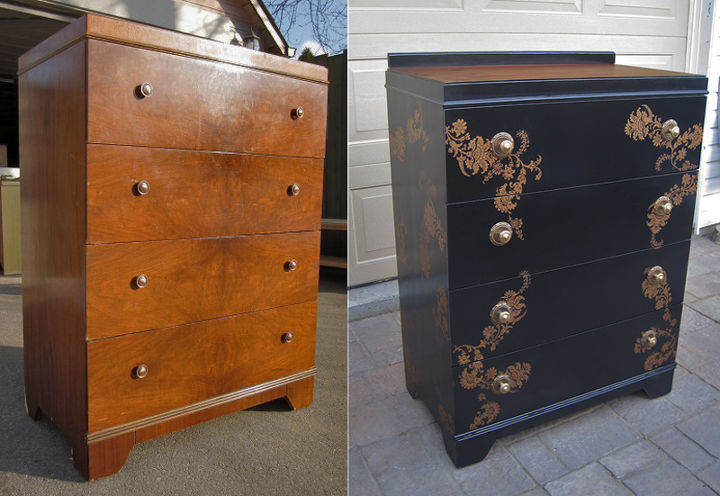
This is what I have to work with
12 answers
-
First Remove all the Drawer Pulls... then on Paper Draw outline of the Dresser and Drawers. Make a several copies. then using colored pencils add colors to each of the drawers or every other drawer to see what color combinations you like. you could use paint chip samples from Paint dept at most builders supply stores like Lowes, Home Depot etc.. ( Wall paper samples too ) like the pinterest photo... add some designs similar to them to the other drawers or use stencils or decoupage ideas until you get what you want.. If you don't like the the drawer pulls then you can fill in the holes with wood putty, sand lightly after it dries. Then you might have to sand the whole dresser lightly , wipe it off totally, then you are ready to paint, decoupage etc.. if you decide to use the same pulls that are on it now you can spray paint them another color or Colors.. Can't wait to see your end project finished...
 Jean Thompson
on Dec 25, 2015
Jean Thompson
on Dec 25, 2015
-
Hi Jessica. I've done this before using 3 different materials. Fabric, wrapping paper and designer paper. I've always used the decoupage method for the initial sticking of material. Then I sand lightly and finish with a matte polycrylic. I'll attach some pics for you to see.
 Hope Williams
on Dec 25, 2015
Hope Williams
on Dec 25, 2015
-
Designer paper.
Hope Williams
on Dec 25, 2015


-
Each one is about 5 bucks.
Hope Williams
on Dec 25, 2015


-
A custom dresser I did with a Paris themed material.
Hope Williams
on Dec 25, 2015

- See 2 previous
-
You can use scrapbooking materials with Mod Podge and different chaulk paint colores for each drawer.
 Janet Pizaro
on Dec 25, 2015
Janet Pizaro
on Dec 25, 2015
-
I'd buy some fancy molding @ Home Depot, the width & length you need, to wood glue to the front side panels, next to the drawers. Then do the decoupage method Hope Williams offers. I'm working on one myself right now & found it helpful.. You can make it happen girlfriend! After pics please.
 Mickey Baron
on Dec 25, 2015
Mickey Baron
on Dec 25, 2015
- See 7 previous
-
The inspiration piece looks like it was done with chalk paint and stencils. If you don't want to decoupage, you can find stencils at most arts and crafts stores.
 Reggie
on Dec 25, 2015
Reggie
on Dec 25, 2015
-
This piece doesn't look 'decoupaged' - to me it has been painted and stencilled possibly using chalk paint - I would say that the side that is visible and no doubt the other side and the bottom drawer is stencilled and no doubt the dots would have been painted 'free-hand'. And the brown parts i.e. one drawer, the top and the brown down the sides have obviously been left as is, with perhaps using 'minwax'? On yours - perhaps you could do similar, but I would possibly leave the bottom base and the legs and the top in its original condition apart from cleaning and applying some minwax and... you could perhaps leave a couple of drawers as is and apply the minwax on them and then using the chalk paint for the rest of the unit with the colour/s of your choice and stencil both sides and say, a couple of drawers and perhaps leave a couple of drawers plain? Hope this helps - Good luck and post the completed project - it would be nice to see what you managed to achieve :)
 Denise Hardy
on Dec 25, 2015
Denise Hardy
on Dec 25, 2015
-
I used fabric instead of paper to decoupage the drawer fronts. Glued it down with Mod Podge then a thin coat of clear acrylic over the fabric. I've been using it for two years now and nothing has come loose or discolored. I used a light upholstery fabric, something suitable for throw pillows. It was my first effort at decoupage so I had to guess at some of the techniques. When I put the fabric on, there were some thread ends showing so I gently sanded the edges of the drawer fronts and that got rid of the thread ends. If you opt for paper, don't use anything too thin. Using foam brushes helps keep from tearing the paper. I love this style! If you mess it up, it isn't too much trouble to start over.
 Liz
on Dec 25, 2015
Liz
on Dec 25, 2015
-
Here is a link to a search on YouTube for Cinderella Shabby Chic. https://m.youtube.com/?#/results?q=Cinderella%20shabby%20chic%20dresser&sm=12
 LD
on Dec 25, 2015
LD
on Dec 25, 2015
-
Treat each drawer as a "sample" of different finishing techniques - bare wood stained, paint, decoupage, stencil, photocopy transfer, etc.. Choose the technique based on what materials you have and what you'd like to try, so it will be fun. You can choose 2 or 3 'main colours' and 2 or 3 "supporting colours", or just go wild as you see fit. When you finish all your drawers, refinish the cupboard and top in a way that showcases all the drawers together - either plain or fancy, it won't make a difference if the drawer fronts steal the show! Now you've done lots of different treatments; you'll have a good idea of what you like to work with and what you'd like to try in the future. Enjoy!
 Duv310660
on Dec 25, 2015
Duv310660
on Dec 25, 2015
Sign Up to Answer