


LAMiNATE Counter Tops Turned to POLiSHED STONE

Do you have outdated laminate counter tops that you wish could be polished stone like granite but don't want the HUGE price tag? Well, here's an easy and beautiful technique that will turn your laminate counter tops into Faux Polished Stone!
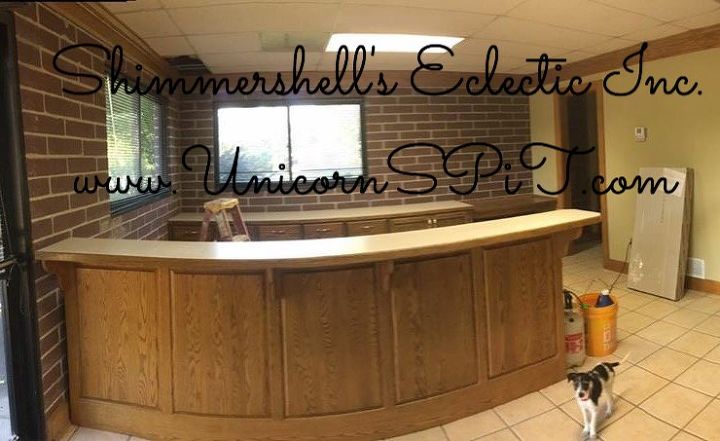
Here is our check out counter at our retail center before. It was that orangish yellow oak with light tan laminate on top. First we slicked up the base. We will save that for another Hometalk post 😉
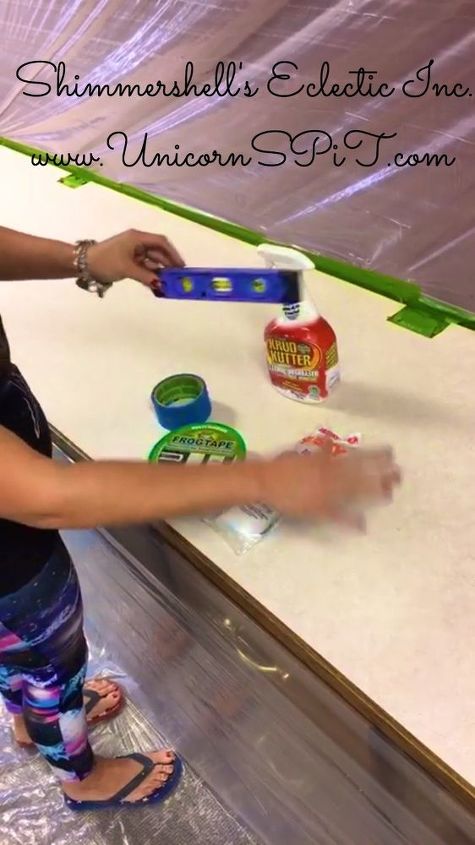
Heres what you will need: 7 ml Plastic Drop Cloth Frog Tape or Blue Painters Tape Krud Kutter 220 sand paper Level Famowood Glaze Coat Plastic Adheisive Spreader Plastic or Rubber gloves You will want to start by protecting all surfaces by hanging your plastic drop cloth with Frog Tape or Blue Painters Tape. Any areas you do not want over spray on like walls, floor, cabinets... etc you better mask off well. You will also want to make sure your surface is level for the process. You will want it level when you seal it at the end. Sometimes you need to put in a couple shims to level it. Grab your Level and make sure before you get started. You will also want to clean your surface. I use Krud Kutter and 220 sand paper to make sure every thing is clean.
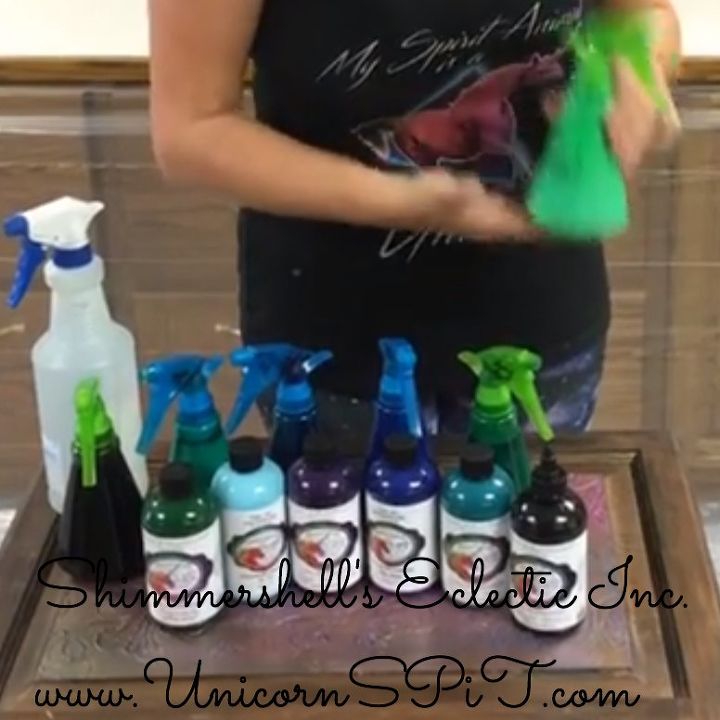
Unicorn SPiT Gel Stain- Your choice of colors Spray Bottle of Water Small Spray bottles-1 for each color For this Peacock Granite look we used Zia, Dragon's Belly, Purple Hill Majesty, Blue Thunder, Navajo Jewel and Midnight's Blackness Unicirn SPiT Gel Stain. We diluted each color one part Unicorn SPiT to 3-4 parts water so they would spray easily.
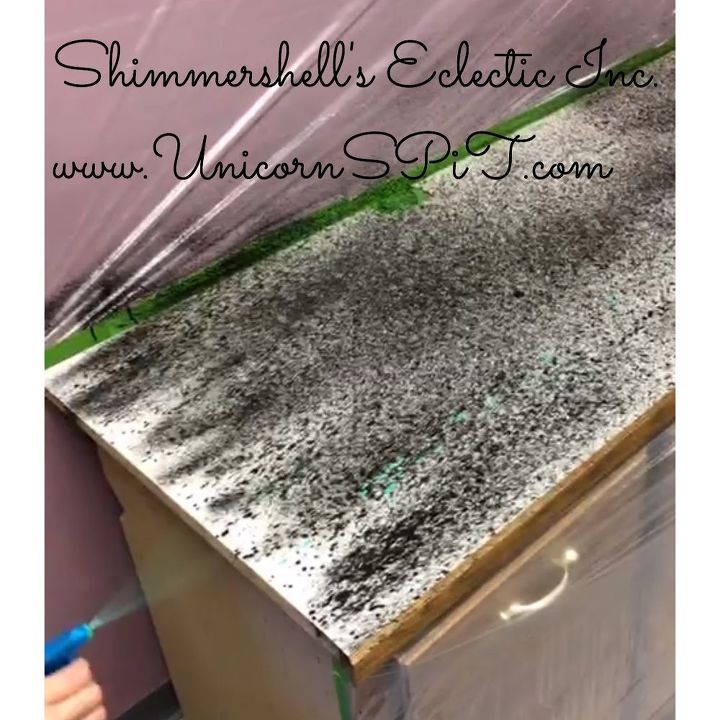
Now let's get started!! You will want to grab your Black Diluted Unicorn SPiT and start by misting the counter top going in one direction. Keep your spray bottle at an angle. You want to keep thinking about how the flow of natural stone will form.
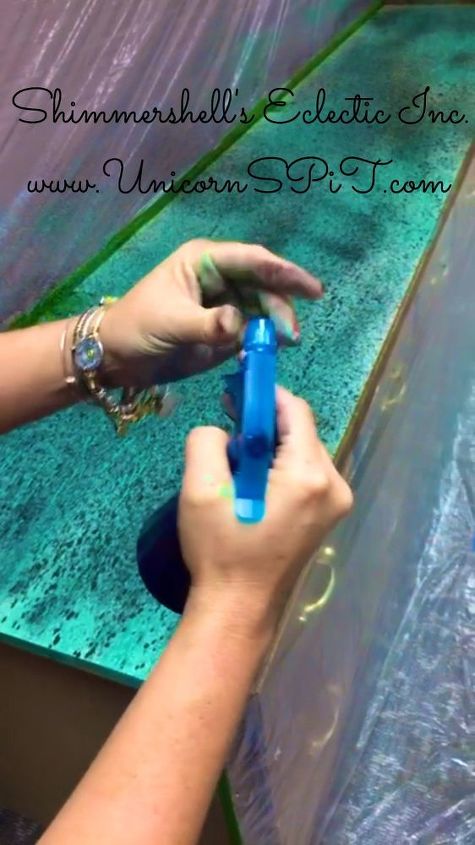
These spray bottles we got at Dollar Tree are perfect for this project. You can twist the tip to get different effect from a mist to a spray.
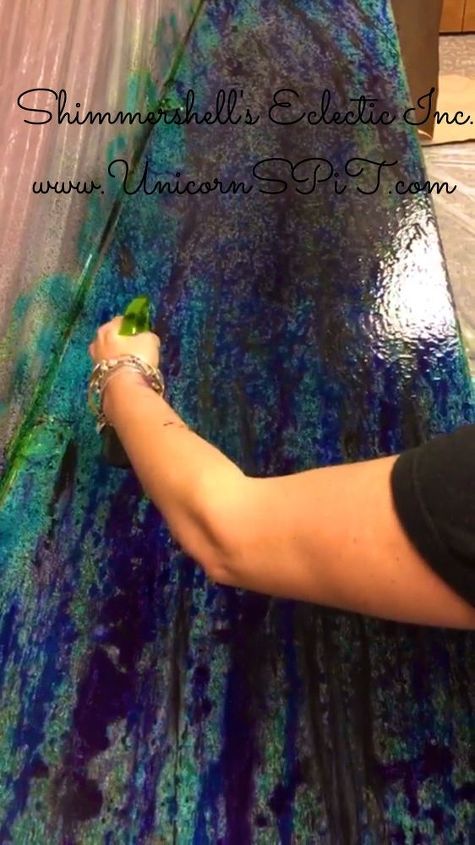
For this out come you will want to layer the UnicornSPiT in this order to achieve this look. Start with Midnight Blackness, then Zia Teal, Patina(1 part Dragonsbelly to 3 parts Zia) Purple Hill Majesty, Blue Thunder, Navajo Jewel then a mist of Midnight's Blackness one last time. You will continue each color going in the same direction. You can use any colors you would like. Just look on line for your favorite shades of Organic Stone. Again going in the same direction you will want to go all the way to your edges. I just want to note that I love purple. Purple Hill Majesty was sprayed on in strong bolts and Blue Thunder. On the Zia and Patina I like to make the spray wider to give a fine mist. Then last but not least I used Midnight's Blackness and change my sprayer so it will shoot long streaks of black to give it that natural stone look. Then a mist at the end. Remember to always spray in the same direction.
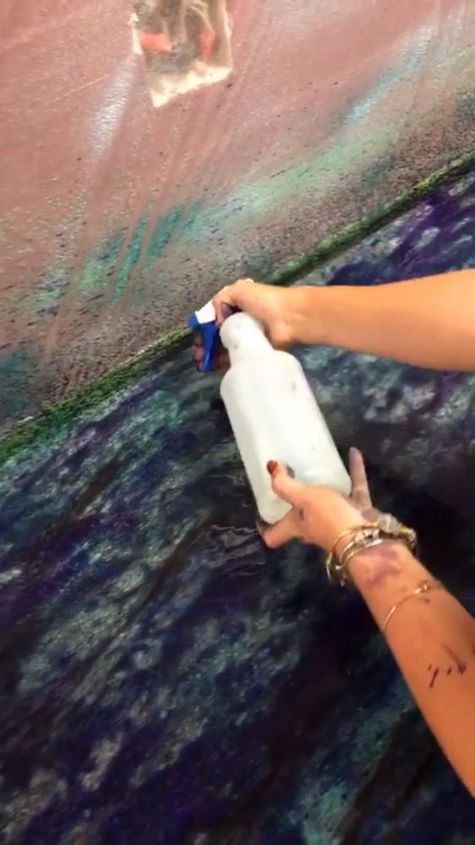
Ok your very last step in making your Stone Counter Top and this is where all the MAGiC HAPPENS! Grab your spray bottle of water, hold it up high above the Unicorn SPiT and mist it until it's completely wet. You want to keep it straight up and down to avoid the SPiT to flow in any sort of angle.
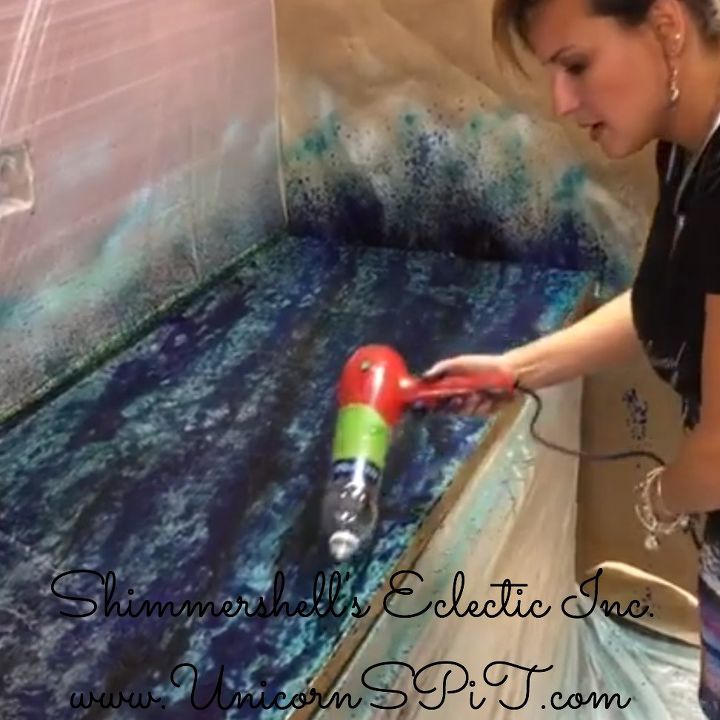
Once it's wet, grab your blow dryer and in this case my Fiancé Don added a Water Bottle that he cut the bottom out of and taped it to the blow dryer with the mouth piece being used as a direct source of air. You will want to move the water around along with the Unicorn SPiT and get a flow going giving it an organic look to it. More water the better the flow. Just not too much water. You will want to start with blowing it one direction the length of the counter and then blow back the other direction. If the edge and corners are not covered in Unicorn SPiT, grab your water bottle and spray. It will start blending together.
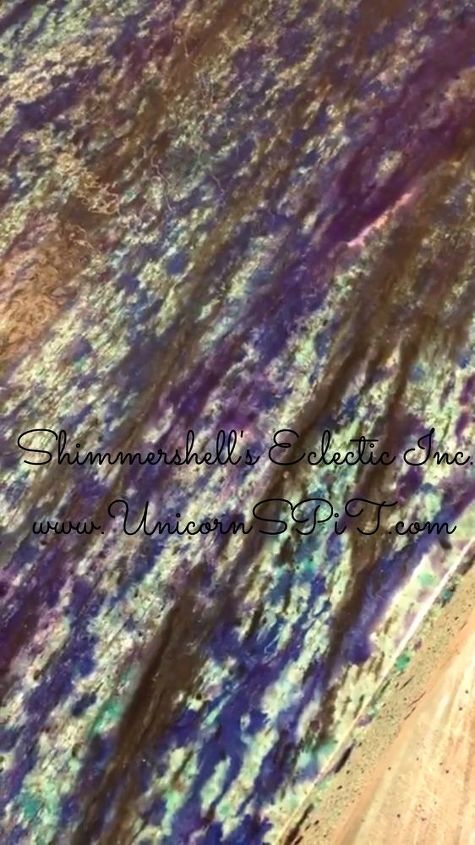
Now it looks like stone!! Time to let it dry. You will know your design is dry when it goes from the vibrant colors to a chalky finish. This can taker over night depending on the humidity in the room.
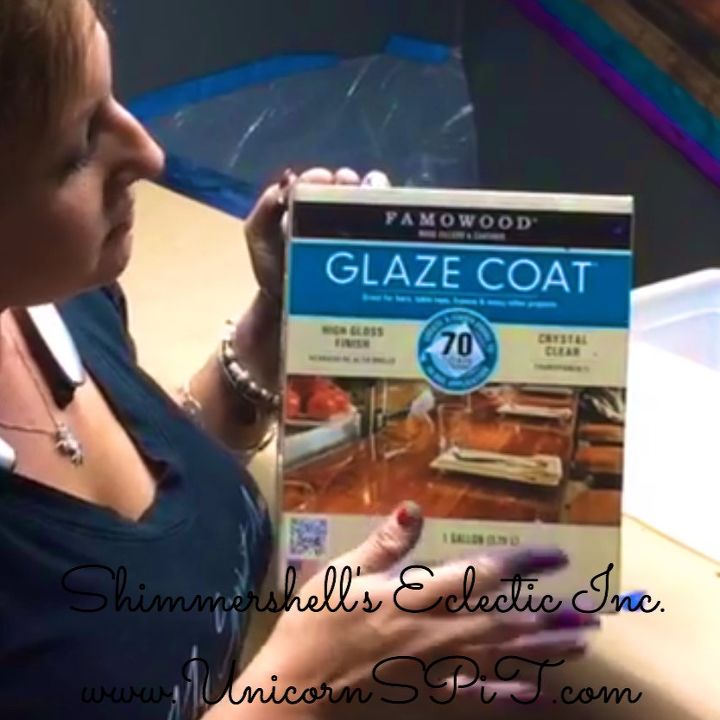
Once it's completely dry you are going to want to paint the edges black or a coordinating color before you seal it. I use Famowood Glaze Coat 2 Part Epoxy as my sealer for the real polished look. Just follow the directions on mixing. It will take you a total of 12 minutes of stirring and this counter top took a full gallon of Epoxy. It's best to make too much than too little to avoid dimples, separation and bubbles. One coat of Famowood is equal to 70 coats of Varnish. Water resistant and heat resistant up to 120 degrees Fahrenheit.
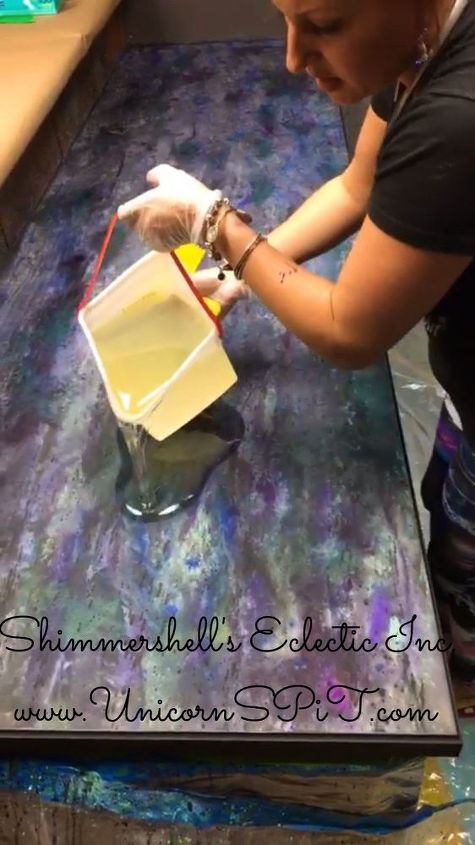
Pour the Famowood on allowing it to self level itself for about 2 minutes. DO NOT let the Famowood sit in the container after mixing for more than 10 minutes. It will get hot and harden up on you.
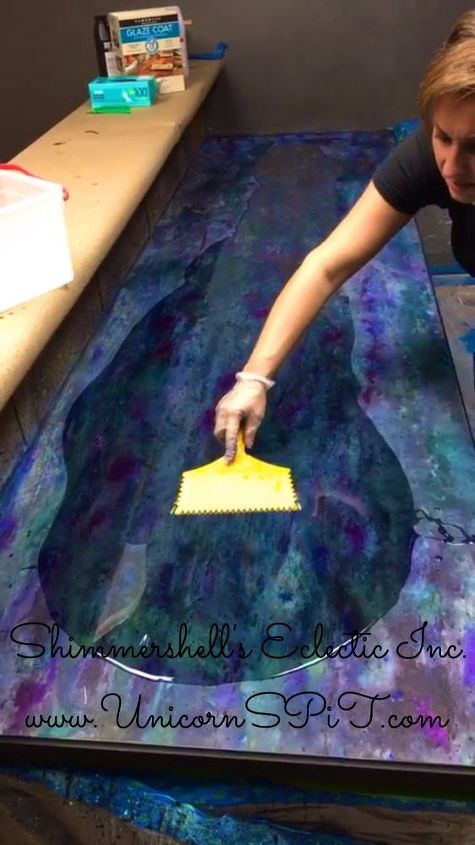
Using a Plastic Adhesive Spreader start smoothing it out from the center to the edges. Think of it like frosting a cake. Do Not go over the same area more than 4-5 times to avoid separation and dimpling. Allow it to flow over the edges a little. Once spread out evenly, use your gloved hand to smooth and seal the edges.
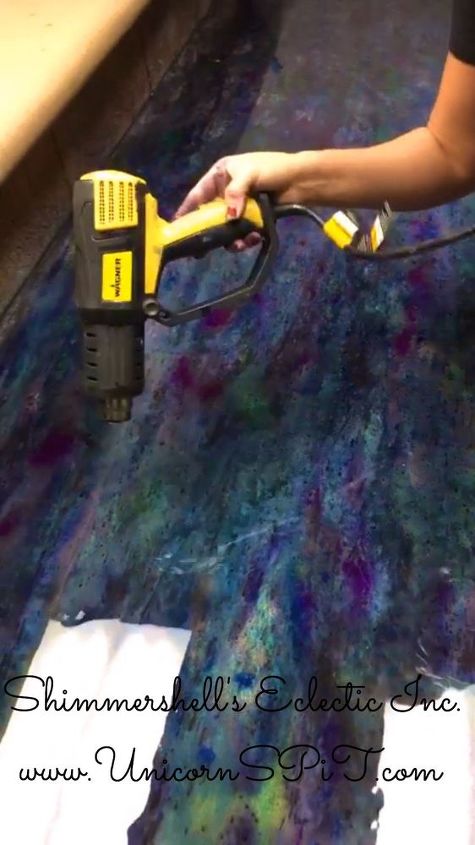
You will notice bubbles. NO FEAR! Using a heat gun set at 980 degrees ferinhiet, a torch, flame or long handled lighter, fan the Famowood from a few inches away and watch the bubbles pop! After it is all clear allow your counter top to dry overnight. Be sure to turn off anything in the room that can cause air movement. Dust is your enemy here, lol!
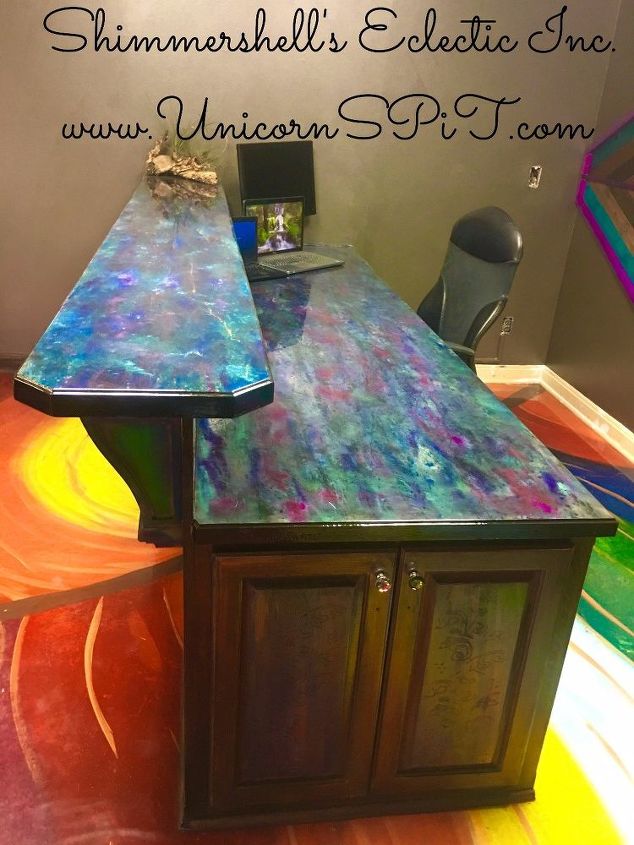
Once Dry, you are good to go!! Sit back and feel proud that you saved yourself thousands of dollars!! You can do any color combination you desire. I just happen to love unique stones that you can only dream of affording like Amethyst and Turquise and Fancy Dancy Stones they use in jewelry. Its so easy and affordable, you can even do your work bench like i did mine!! Thank you so much for reading my Hometalk Post. I hope it inspires you to reuse, reduce, and recycle buy simply updating your existing counter tops with this beautiful technique. Its so easy, affordable and fun that anyone can do it. For more unique ideas, inspiration, and tutorials on the many uses of Unicorn SPiT, feel free to join our Questions & Answers Facebook Group at www.facebook.com/groups/unicornspitgelstains/
order at : www.MichelleNicoles.com
Comments
Join the conversation
-
LOVE all things Unicorn Spit lol Great job! Beautiful

-
WOWZA....I live by anything Unicorn...😉


Frequently asked questions
Have a question about this project?
This is an excellent technique to do old sink counter tops (rehab) was wondering if you could just do a gray, black & white marble technique? thx.