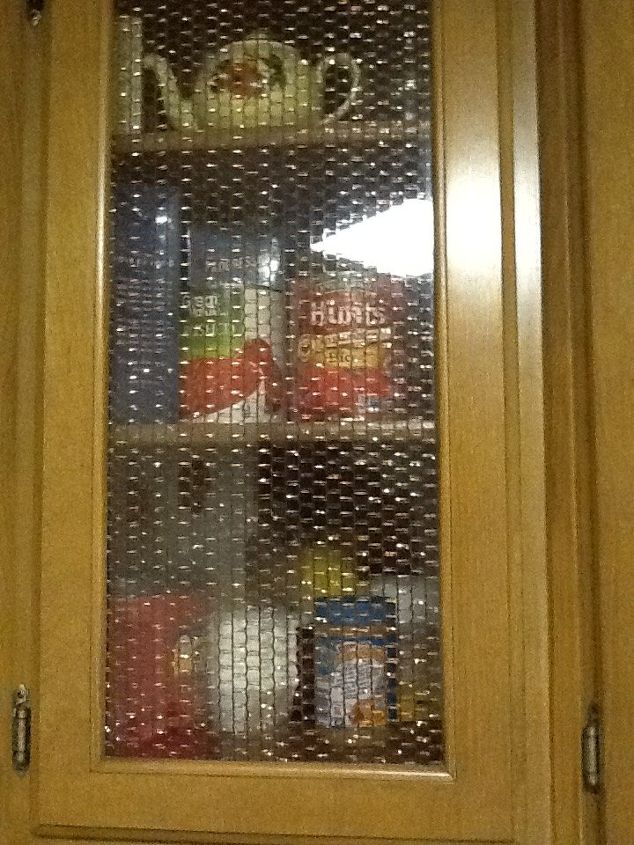
What can I do with this boring kitchen cabinet?

+30
I can't figure out what to do to make this cabinet look cute. I need help and some idea! Please help


You could use a tension rod at the top and some material to match your decor and make a curtain to fit. Or...get some cute baskets and chalkboard labels for each shelf.
some pretty self adhesive contact/shelf paper applied to the back wall then lightly sand the shelves and paint a contrasting color the organize with more wire or wicker baskets, Hope this idea helps..also add the contact paper under the microwave with maybe a piece of thin plexiglass for easy cleaning
it looks blah... pick a theme and beef it up. baskets are great and will organize and keep things neat. try trays to put your coffee pot on . the cup rack idea is ok but yours is just there, it needs to be more solid looking . pick a theme.
Put "stubby" legs on it to look more like a piece of furniture. If the microwave fits on the top shelf, I'd put it there so it doesn't look so top heavy. Then get creative with accent color, using a contrast on the back.
Get it up off the floor... bun feet, or other screw on legs ... Paint it another color. Remove the microwave, relocate the fly swatter and relocate or replace the trash can. Enclose the lower area with cupboard doors... louvered doors (accordian or shutters) in same or contrasting colors. Clear off the top and tile the top, ceramic 4x4s , or laminate/metal strip ( not too heavy ). Paint the wall, floor to ceiling behind the cabinet. Keep the cup rack, spray paint it, get some mugs you like ... Put the coffeemaker near the inner corner, and spoons/ sugar/etc. on a small fun tray.
In no particular order......
Use what you already have whenever possible, save $$ !
Dollar store, thrift store, Goodwill
Lowe's and Home Depot, neighborhood hardware
Have fun and please post photos !
You could also use cardboard boxes if you don't want the expense of buying baskets. Buy a roll of wallpaper and spray glue. It will tidy/cheer up the shelves. I would also remove the unnecessary pieces like flyswatter ect. It won't take much money, time or imagination to bring a look you are happy with. I do know that sometimes some small thing can leave you stumped for ideas, but this little shelf is just waiting for you to happifiy it. Good luck with your choice and enjoy trying different suggestions.👍👏📌📝🎨
Wood bun feet. Wooden accents in a different color from the base color you choose. Or you can stencil design or flourish. Baskets, lazy susan... could add a drop down top extender that will add to your useable top surface and draw the eye away from the waste receptacle. Need color scheme & theme. Could do the tension rod/fabric for the bottom portion and leave the top shelf open for easier access to supplies.
Move the microwave to inner shelf , put a tray next to coffee maker with your coffee making supplies. Then put colorful baskets or containers on bottom shelf. Put the fly swatted somewhere else. Also move the garbage receptacle.
Keep your eyes open for an interesting piece of furniture that will fit in the space..A good place to find furniture like that is Goodwill...Once you find your replacement piece.....TRASH the one that is there...It is beyond help.
There is nothing really wrong with this piece except it is a box! At HomeDepot or other building stores you can usually find packages of tongue and grove style wainscoting , normally there are 6 lengths per package. If you have access to a chop saw or speak very nicely to the lumber clerk they will cut the lengths to fit the sides of your stand (measure from under the table top to the floor). Purchase a length of 1/2" by 2" trim wood and cut it to the same length (2x) and attach it to the front edges and with the remainder cut pieces to fit the bottom and the top underside of the table top to frame it in and make it look more like furniture. Make sure what ever trim wood you use is deeper than that bottom shelf that sticks out so if you decide to put doors on the new 'cabinet' that shelf doesn't hinder the doors from closing. You could look for off cuts of counter tops at the lumber store as well or even a re-store may have pieces that contractors have donated to beef up the table top, try to stick to real wood instead of a laminate covered surface, that way if you choose to you can paint it to match or accent any room it is in, in the future. With a piece like this the bottom is likely hollow where the kick plate is, so there is nothing to screw feet into...that being said, if you want to put feet on it, you need to fill that space in with wood to put feet on it. Look for off cuts of 2x4" wood at the lumber store that measure the depth of the cabinet to screw into the unit before you do any of the other ideas so you can cover the screws up with the wainscoting. Wainscoting is normally real wood that can be stained or painted, have fun with it, you are making a $30 shelf into a $100 piece of furniture!
Put it in the garage,next to the washer for laundry supplies. when all else fells give it away.
go to a habitat store get a gently used lower kitchen cabinet put it on top like a hutch paint them to match. put your microwave on the bottom of your now hutch and it will decorate a lot nicer and your are getting added storage . Habitat for humanity might become your favorite shopping place. You don't have to keep the top that comes with it it if does. Place a nice 3/4 plywood on top to support your new hutch.
This spot needs a new taller cabinet. You can likely find one for less than the cost of the fancy paints, bun feet, etc., to fix this one up- and it is wrong for the space. Or get shelving like "Elfa" brand. Leow's has a less expensive store brand that comes in different colors and finishes. Very sturdy.
I don't get the people telling this woman to get rid of the cabinet when she specifically asked how to make it look cute?
If it was my project, I would try to find another cabinet-deep bookcase (3 shelf) to go on top the existing one and attach it securely to the cabinet -possibly the wall.
craigslist, goodwill, thrift stores, moving sales are all good places where you could pick one up for $10-20
-get nice wicker baskets to go on the lower shelves for storage on lower shelves. (Ross stores has great prices on these or maybe a thrift store,....measure 1st)
Nice bowl for fruit in metallic or natural wood at thrift store or Ross.(Ross is better since you can exchange it if it doesn't look right)
It looks too cluttered with the cups, stuff on the microwave, if they all had their place it would look nice.
If there is enough in funds to do more.... follow this tutorial to make it look "built in".
http://www.hometalk.com/diy/living-room/furniture/diy-library-wall-billy-built-in-bookcases-26121232?se=fol_new-20161226-1&date=20161226&slg=8d4fb43cad42af5394ae27be10dded1b-4253755
Have the microwave, coffee pot (if it couldn't be put anywhere else) on the 1st shelf new shelf
then do a display....maybe cups on a black lazy susan ,
1-2 knickknacks,
or maybe cook books on the subsequent shelves.
Don't like the BLACK microwave with the white CABINET,
- I'd spray paint it following this tutorial
http://www.thehipsoiree.com/2014/05/13/tutorial-tuesday-microwave-makeover/
perhaps white to be consistent so it doesn't stick out so much, or perhaps get a white cover for it.
OR if it was my choice I'd paint cabinets glossy black so the garbage can, microwave, coffee pot tie in with it?
do a grass cloth pattern wallpaper on the back inside of the 2nd shelf (to match wicker baskets) Possibly lower one too...ebay is a good place for this or there are some discount online wallpaper stores you would be able to pick some up
put flyswatter on a hook on the side of the cabinet by the wall, out of sight but handy when you need it
Paint just the back panels to match other stuff in your kitchen or cover the back with wallpaper.
Here my updated photo, I still have some more decorations coming in the mail but this is a start. I read all the comments and thank you for your help. I didn't want to get rid of or change the look of the cabinet because I built it with my grandpa. I thought about putting legs on buy it wouldn't make sense with my two dogs that she'd and my my 8 month daughter. I will be adding knows to the top of the glass containers and labels.
Oooh nice, I like that it's special and that you built it with your grandfather, you could use some pretty baskets on the bottom for storage to hide things from view. It's a nice cabinet, I wish I had one like this to store some of my things in my kitchen, so I will be on the lookout for a similar one, good luck in finishing this fun project, I think you are off to a great start, and there were plenty of suggestions.
Yesssssssss!!!!!!!!!!!
I like the idea of large baskets on the bottom shelf. Or you could cover a couple of boxes with fabric - nothing too dark. If it were me, I would put a runner across the top to protect the surface. I would also add a picture of your Grandfather and another family photo in the area above your coffee cups and below the shelf on the pretty metal rack. The nice thing about a piece of furniture like this is that it is useful and you can easily change up the look with little effort or money. Enjoy the shelves and especially your memories!
Have you considered adding a curtain rod to this? If you don't want to attach it permanently, you could use 3M removeable hooks. You could cover the front with fabric of your choice and change as your mood/other decor changes. It would also add hidden storage.
I like it. If you want to add some pop to it, you could cover poster board (cut to the dimensions of the interior back panel.)with fabric, wallpaper or even gift wrap in a fun pattern and add it to the back. You don't even need to glue it in. Easy to change up any time you want. Add baskets and boxes for more storage if you like in front of the new decor backboard. Hobby Lobby even has new decor poster board. I was crushing on a gold dot version. This might be too lively for your kitchen but this is what I had in mind for your shelf but you use a pattern you love. https://www.pinterest.com/pin/143974519316801373/
Here is a link to Hobby Lobby's patterned poster board. If you click color on the right, you will see they have 18 different options. There is a huge variety from wood, stripes, dots and even floral. Can you tell I am dying to try some of these out? http://www.hobbylobby.com/Scrapbook-Paper-Crafts/Mixed-Media/Blank-Surfaces/22-x-28-Patterned-Poster-Board/p/PP30031
Good job. Looks nice.
Good job. Might add some baskets on the bottom shelf for your eight-month-old's toys or old spoons /pans for toys.
It sounds like to me, your trying to keep little problems from becoming big ones and that's a great idea. I have read all previous reviews and I feel you are doing the right thing. I know you don't want to move your cabinet up on legs and I respect that thought.
If you want a different point of view, move everything away from the wall and stand back, take a look at the bare wall, then move your cabinet up, off the floor (to sweep under the cabinet) as a (temporary idea), maybe (with legs or bricks), then you will cover more space, move your items away from little hands and noses. Also, you can set the cabinet on a small coffee table that is wider and longer than the cabinet to keep it from topping over, or mount the cabinet on the wall and arrange the items better. Hope this stimulates you toward better ideas, Good luck!
You can shop your local thrift store for some old shutters that you could attach to the front for doors.
Updated photo looks better. Where is the metal basket in first photo, use that as well. very popular now. Could you try the metal pitcher and other items on shelf above switched ? Also, please move the tray closer to maker. What is the item by shelf, i can't tell. keep up the good work👌🏻
You could add a butcher board top, maybe doors with chicken wire and tin buckets with blackboard squares painted on the fronts of each to label contents. I too would add small square silver feet.
Put Printed contact paper on back and rim the front of the case. Can even do the front edges of the shelf if you want. If you can't find a pattern you like you can use wall paper. Cheap, easy and looks custom.
If you have to use that cabinet I would put doors on it. If you don't have to use it I would remove it and build shelves on both walls. Paint them and use baskets. I found an easy way to build shelves from YouTube . You wouldn't have to use 2x4's but 2x2's would work. This would give you a lot more storage and I believe it would look proportionate.
The ideas given are all good. I like the idea of using shelves, as Renata mentioned, since you could use the whole vertical space, as well as the width. You could always use the cabinet as toy/book storage for your little girl's room.