


How to Prepare Seed Potatoes for Planting
When I sat down this fall to plan out my spring garden, I realized that I really wanted to try my hand at growing potatoes, so just a couple weeks back I bought a few bags of seed potatoes. However, I quickly realized that I needed a refresher on how to prepare seed potatoes for planting. I did it once before on a farm that I worked on but I wasn’t sure about cutting them and placing them and prepping them, etc. etc. and so on.
So, I took to the internet and my few favorite gardening books and this is what I ended up doing.
When you decide to plant potatoes it is best to start with potatoes that are specifically made for planting and growing potato plants. They should also be organic (in my opinion). Sure the ones that you get in the grocery store may sprout and may actually grow, but there is no way to know that they will grow “true to form” or that they haven’t been treated with some yucky chemical.
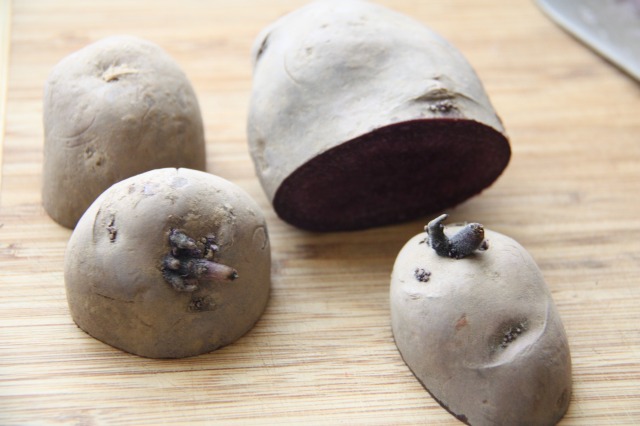
A lot of seasoned farmers will recommend “chitting” your potatoes. Mine came “pre-chitted” (I think I just made that term up) because they were already sprouted when I took them out of the bag. Seed potatoes stored at 40 degrees will not sprout but will remain dormant. By moving the seed potatoes to an area of 60 degrees and slightly humid, you’ll find that the eyes start to sprout. This will help speed up the growing process.
Some seed potatoes you will want to cut into smaller pieces. I planted mostly red potatoes and most of the seed potatoes were relatively small. However, if your potato is more than an inch and a half in diameter or so, you’ll want to cut it. When you cut it, make sure that you leave at least one eye per piece of potato. Each piece should be about 1-1 1/2 inches across. After you cut the potato, you’ll want to be sure to let it sit to “crust over” on the parts that you cut. I’ve read varying advice about this. Some say to leave it for 24-48 hours, some say 10-14 days. I suppose it depends on how humid your conditions are. The reason you are doing this is to prevent the potato from rotting in the ground before it has a chance to grow.
So, I took to the internet and my few favorite gardening books and this is what I ended up doing.
When you decide to plant potatoes it is best to start with potatoes that are specifically made for planting and growing potato plants. They should also be organic (in my opinion). Sure the ones that you get in the grocery store may sprout and may actually grow, but there is no way to know that they will grow “true to form” or that they haven’t been treated with some yucky chemical.
A lot of seasoned farmers will recommend “chitting” your potatoes. Mine came “pre-chitted” (I think I just made that term up) because they were already sprouted when I took them out of the bag. Seed potatoes stored at 40 degrees will not sprout but will remain dormant. By moving the seed potatoes to an area of 60 degrees and slightly humid, you’ll find that the eyes start to sprout. This will help speed up the growing process.
Some seed potatoes you will want to cut into smaller pieces. I planted mostly red potatoes and most of the seed potatoes were relatively small. However, if your potato is more than an inch and a half in diameter or so, you’ll want to cut it. When you cut it, make sure that you leave at least one eye per piece of potato. Each piece should be about 1-1 1/2 inches across. After you cut the potato, you’ll want to be sure to let it sit to “crust over” on the parts that you cut. I’ve read varying advice about this. Some say to leave it for 24-48 hours, some say 10-14 days. I suppose it depends on how humid your conditions are. The reason you are doing this is to prevent the potato from rotting in the ground before it has a chance to grow.

Cutting the Seed Potatoes

Want more details about this and other DIY projects? Check out my blog post!
Comments
Join the conversation
4 of 9 comments
-
I have a question. I have grown Yukon Gold potatoes for several years very successfully. This year our Texas weather was really bizarre this spring and my yield was small. I am considering trying a fall garden with potatoes but, of course, no one carries seed potatoes in the fall. I am considering using some of my spring crop as seed for the fall. I realize the usual arguments about only using certified seed potatoes but since they are not available....Any comments?
- See 1 previous
-
This was my first year growing a garden and I went in blind. I was given some potatoes, no idea what kind, but I cut them to get more plants. I never let them sit to crust over...threw them in the ground, water and waited. I live in Denmark so usually it is humid here but this summer was really dry. I tell ya, I got some amazing potatoes. To each plant, there was between 18 to 25 potatoes. And they are wonderful eating too. Guess I got lucky!


Frequently asked questions
Have a question about this project?