Repurposed Mid century dresser for TV Dresser. Here is the final look

LB
by LB
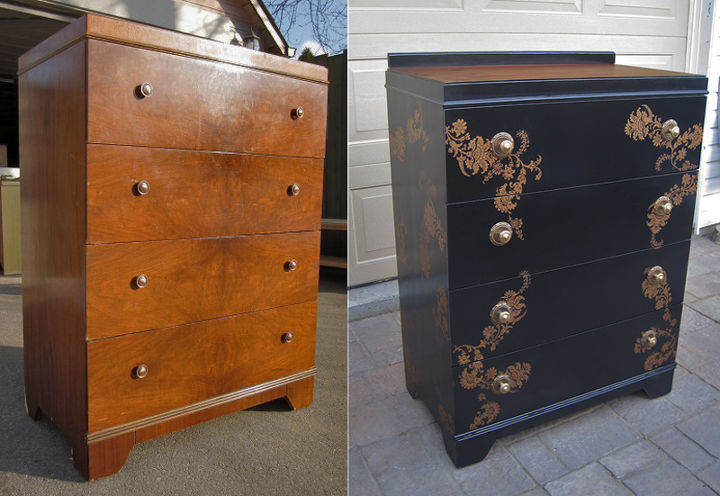
I think I can remove the bad veneer and/or wood glue it. But I need a visual as to what I should do. Because of the damage I was thinking ASCP or a high gloss finish but afraid it show the bad spots. Any suggestions would be great. THANKS!
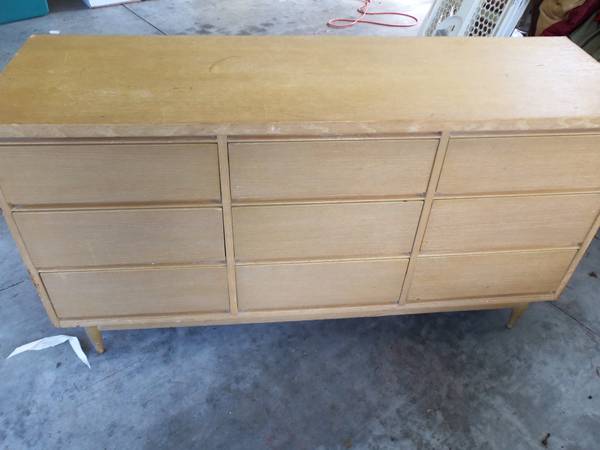
Craiglist 9 drawer dresser for TV stand. Before..
Needs some wood glue and sanding.
Will maybe take out some of the drawers for the electronics of the TV. DVD and HD box.
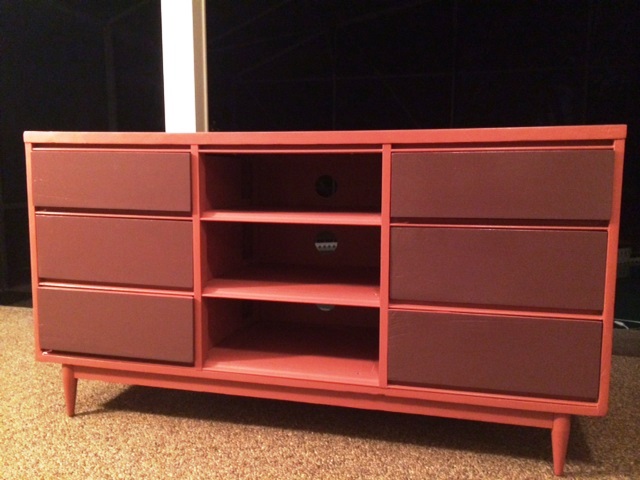
This is the Craigslist find for $20. Did DIY chalk paint on outside cabinet and High gloss on the drawer fronts for pop. Thank you all for you help. Also did shelves in the center as they were higher that across the top.
  27 answers
  • Chris Chris on Mar 17, 2014
    I can't give you a visual, but would only recommend high gloss if the rest of your house has a modern flair to it. I painted some bookshelves high gloss and they're not offensive. That said, judging by the size of your unit, I'd make sure it's sanded down properly, the chips or nicks in the veneer are filled in with wood putty (that's paintable/stainable); and I'd put a base coat primer (such as Kilz) on it before painting. It also depends on if this is a wooden surface that could be stained or "whitewashed" for an antique feel. Distressing - scuffing, denting, etc. could also be an option. I have a large kitchen island that I first painted a satin-finish enamel in dark rust red; then covered over wiith a glaze of dark walnut. The result was stunning. Hopefully others will be able to provide you with different ideas and/or pics.
    • LB LB on Mar 18, 2014
      Hi @Chris, yes, I am I going to sand for sure. Thanks for the comment.
  • Hi @LB! I thought I'd share a visual with ya! I used a chalk style paint and a high gloss top coat to achieve the look. The best of both worlds ;) Hope it helps! Oh, if you follow the link over to my blog, you'll find some useful info about repairing with bondo too! All the best, Angela http://www.hometalk.com/diy/bedroom/dressers/bold-blue-dresser-makeover-3013744
  • Tracey Tracey on Mar 19, 2014
    You should check out http://www.livelovediy.com. She gives instruction on how to paint different types of furniture.
  • LB LB on Mar 19, 2014
    Awesome, I will do that, thanks for the tip!
  • Beth Mitchell Beth Mitchell on Mar 19, 2014
    woodfiller and satin paint
  • Somewhat Quirky Somewhat Quirky on Mar 19, 2014
    I love the look of a waxed finish. When I want a finer look for my chalk paint pieces, I wax twice then sand. You can get a really hard, fine finish but it wouldn't be high gloss, just a warm gloss finish. There is an old legend for sanding that I have used on some pieces and I LOVE the finish - wax every day for a week. Wax once a week for a month. Wax once a month for a year. After that wax once a year. I haven't gotten to a yearly wax yet :) but I have been amazed at the richness the extra waxing adds. Also - the flat front on that piece is a perfect canvas for a beautiful decoupage or stencil finish.
  • Jeanie Randall Jeanie Randall on Mar 19, 2014
    I had one similar and I painted the frame and stained the drawers (if they are in decent condition). If you don't like it, then you could paint the drawers too.
  • Kelli Kelli on Mar 19, 2014
    I have a 12 drawer similar to this as well. I painted it with Anni Sloan. Although, I am not quite done with it. I need to straighten the lines, wax, and put the knobs back on.
  • Sherrie Sherrie on Mar 19, 2014
    I think everyone has a idea of what's right and what they would use. I am a lover of chalk paint, but I wouldn't use it on the piece. I also think high gloss. Chalk paint leaves brush marks and there is a lot of blank space, it isn't something you want to distress, but it is sleek and beautiful and modern. You could use chalk paint then a high gloss poly. But why do all that work when you can get the same results a whole lot cheaper using good quality paint?
  • LB LB on Mar 19, 2014
    Hummm.... food for thought... I think your right... Love the exchange of ideas.
  • Theresa Theresa on Mar 19, 2014
    I would stain the top and paint the rest of the dresser. I think ASCP or paint would work.
  • Country Design Home Country Design Home on Mar 20, 2014
    That piece says mid-century-modern all day long. Would not go with chalk paint, but would definitely stick to the style of the era. Perhaps a shiny pop of color if you have a place in your home for that? Aqua or orange, or even black or shiny white.
  • LB LB on Mar 20, 2014
    I am going to use chalk paint but I will make my own, The veneer on this piece is literally coming off on the corners and very thin and rough after sanding. I will be using Angela Davis's (see above) suggestion and do the bondo, sand and paint, maybe a funky color, with a high gloss top coat. CHECK out Angela's awesome tutorials on repairing veneer on her website http://www.hometalk.com/atozcustomcreations. I hope that is right Angela! I looked it up and this is a Danish mid century piece,,, one just sold on Etsy for $395. Stay tuned...
  • Vickie Cooney Vickie Cooney on Mar 20, 2014
    Hi I did a dresser similar to this one, what I did was fill in all the imperfections lightly sanded pun a primer and then painted it a bright teal/ turqouise in a semi gloss it came out beautiful
  • LB LB on Mar 20, 2014
    Sounds beautiful, I love teal. I will use a high gloss top coat too.
  • Letitia Letitia on Mar 21, 2014
    Great Piece. Mid Century though I agree. A light coat of orange with a maple stain over would be nice. If you don't feel comfortable with high gloss use a low lustre or satin. Much easier to get a nice finish. Try differennt color ideas out on the drawer fronts. They would be easy enough to resand if you don't like the result. Good luck!
  • LB LB on Mar 21, 2014
    I am testing my paint colors now. I had a piece of 8' molding cut into 5 inch pieces and I painted 3 colors, red sienna in satin, a high gloss red brown (one of those rejects on the clearance counter) and the I mixed the above two and I think I like the mixed color. The problem is that I had to take a lot of the veneer off the drawers due to peeling after I sanded. This one is going to be tough. I hope that I can get it smooth enough. Thanks for your thoughts.
  • Heather Heather on Mar 21, 2014
    I just painted a desk ( http://blissfullychicdiy.blogspot.com/2014/03/my-new-desk.html ) that was a hot mess! It had all kinds of issues. I sanded and peeled off all of the veneer and though the top wasnt perfect when I finished the paint still turned out great. I think you would be fine with normal paint.
  • LB LB on Mar 21, 2014
    Yeah this dresser is turning into a hot mess! I tried to patch with bondo and that is going to be a learning curve but hey Im up for it.
  • Cyndi Cyndi on Mar 24, 2014
    I recycled a dresser with the same number of drawers for a tv stand. I removed the center drawers and the drawer runners, and used 1/4 plywood to level up the drawer shelves. It was a free junk pick and in really bad shape, but the bones were strong and sturdy (it is just a temporary fix for the large flat screen my hubby had to have, till I find a tv stand I really like because its sort of French Provincial which really isn't my style). I bought several rolls of neutral wrapping paper, in monotone beige and mod podged it onto the drawer fronts and shelves and base. The top is painted a matching beige with the details antiqued with gold and black. The drawers are perfect for dvds, phone books, note pads and pens, (the phone books, note pads and pens used to take up a drawer in my kitchen). Have fun with it, nothing is written in stone when it comes to a project like this, you can always do it over. One suggestion, cut the holes at the back of shelves at least 5 inches long and 2 inches high, and save yourself much aggravation when trying to feed all the cords and cables through.
    • LB LB on Mar 24, 2014
      @Cyndi Well, let me say that bondo is very tricky and dries really fast but I got it done. Next time I am going to tape around the area so I don't get bondo on the good part of the drawer, thus less sanding. You said you removed the center drawers and not the top drawers? Hadn't thought of that. Thank you for the tips tho I will use them..as this is my first project.
  • Cyndi Cyndi on Mar 24, 2014
    the reason I removed the center drawers instead of the top drawers was because the center drawers are about 3 inches wider than the drawers down each side... the electronics would have fit, but it would have been a tight squeeze on the ends. The wrapping paper and mod podge was a quick, cheap fix for something that I don't plan on keeping for a long time, if it were a craftsman style dresser, or something with a little more modern lines I would have taken more time to refinish it to suit me, I had even bought fabric that I liked to cover the drawers but it was just too busy when I draped it over to get a feel for how it would look.
  • LB LB on Mar 24, 2014
    Okay, I will have see how my equipment will fit. Thanks,
  • LB LB on Apr 09, 2014
    Thank you all again for all your help!
  • Cyndi Cyndi on Apr 11, 2014
    I love the colors you chose, it looks fantastic!
  • LB LB on Apr 11, 2014
    Thank you Cyndi for making me rethink the drawers. You were right, I had to go with the center drawer shelving because they were higher and my equipment would not have fit it I did the shelving across the top drawers. I would love to see I picture of your dresser? You have one similar? Do you have it on your boards?
  • Janet koons Janet koons on Jul 03, 2014
    Lovely. Love that era of furniture. Good job!
  • Bernice H Bernice H on Jan 08, 2015
    This is so beautiful, and way more lovely than my 350 cabinet I bought. Next time I will know. the color is gorgeous!