


Quick & Easy Bulletin Board

by
Leslie D
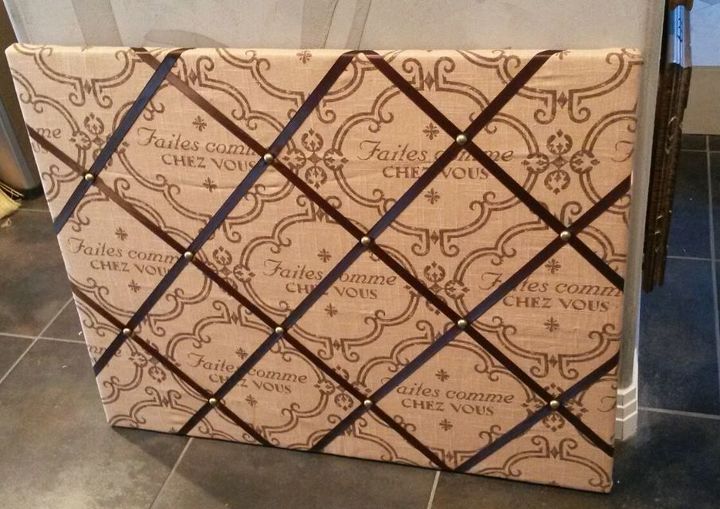
I needed a bulletin board for my office and hate the look of cork boards and everything else I was finding. I purchased a few supplies, and in about an hour's time, and a little of my husband's help, we made this bulletin board, where I can slide notes, lists, etc., behind the ribbon for a much more stylish look in my office.
Materials: Painters Canvas in desired size, measuring tape, ribbon, batting, material of choice, scrapbooking toggle studs, exacto knife, staple gun, scissors, painters tape.
Take a painters canvas in your desired size (I used a 30" x 36"), which took one yard of fabric, 2 rolls of 18' ribbon, and 12 toggle studs.
(1) Wrap the canvas in batting...I used the thin sheet type with a stiffer backing, wrapping the edges and stapling to to the wood on the back edges of the canvas.
(2) Repeat with your desired material, assuring any pattern you have is aligned straight.
(3) Measure the canvas from corner to corner and align your ribbon so that you get equal distance between ribbons, cutting each to length, leaving enough ribbon to wrap to the back for attachment. You don't have to be a math major to figure it out. Just cut the ribbons and slide them, measuring as you go to get a consistent measurement.
(4) staple the ribbons to the back, pulling fairly tight (I used painters tape to hold the ribbons in place once I had them in place).
(5) Use the sharp point of an exacto knife and make a small slit in the center of each ribbon intersection, going all the way through to the back of the canvas. Do this slowly. You don't want the knife to plunge too quickly and cut the ribbon in half. I tried using a nail, but it wanted to "push" the canvas and I was afraid of stretching it.
(6) Insert a toggle-type scrapbooking stud (the kind with the two bars that spread out to hold them in place) through the slit and spread the bars on the stud tight against the back of the canvas. If you end up with an intersection against the wood edge of the canvas, you can just hot glue the stud into place after removing the toggle posts.
(7) Trim extra ribbon and material/batting from the back.
(8) Ready to hang without any hardware, just two nails and it hangs like a normal painting on canvas!
Not the cheapest board to make because of the cost of (the very expensive) fabric I chose, and the canvas, but I think the results are well worth it!


Frequently asked questions
Have a question about this project?