


Shabby Happy Hutch
$25
5 Hours
Medium
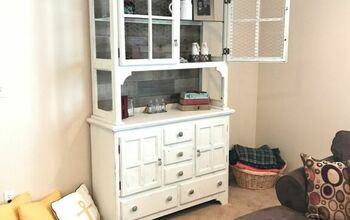
Love the shabby-chic look and what better color than white to transform this old hutch into a pretty garden hutch that can be used inside or outdoors. I’m planning to place it in my future screened-in porch that I am building in my new home.

Start off by sanding the entire hutch lightly with a hand- sander or by hand with individual sand paper.. Obviously the hand- sander is easier and if you love re-doing furniture, then the sander is a great investment.

Let dry for a few hours.. With your hand slightly sand paper the hutch to remove any residue . Start the process of painting over again but using white semi-gloss paint. I actually like the feeling I get when I paint by brush…… it’s relaxing and it feels like a work of art. One little tip! Spray paint the areas I have missed with either a white semi gloss spray paint. Hold the can at least 6 inches away to avoid dripping.

Apply a second coat of paint and repeat the process. Once its dried sand the corners to expose the wood. Yeah it’s time-consuming but it’s a great feeling of accomplishment. Add lots of colorful plants and planters. I have added all my thrift store finds as planters.

Want more details about this and other DIY projects? Check out my blog post!


Frequently asked questions
Have a question about this project?