« View Post
Photos

Oops! Leave without saving?

If you leave this page, the information you have entered will not be saved!
Are you sure you want to leave this page?

Leave this page Stay on this page

Hometalk.com

  • Sign Up
  • or
  • Log In
  • Professionals
  • Community
    • All Members
    • Professionals
    • Bloggers
  • About
    • About Hometalk
    • Blog
    • FAQ
    • Guidelines
    • Resources
    • Support
    • Press
    • Contact
    • Terms of Use
    • Privacy Policy
  • Following
  • All Topics
    • Cleaning & Organization
    • Crafts
    • Design & Décor
    • DIY Projects
    • Gardening
    • Home Maintenance & Repairs
    • Outdoor Living
    • Painting
    • Remodeling
    • Repurposing & Upcycling
    See More Topics »
  • Questions
    • All Questions
    • Open Questions
    • Unanswered Questions
  • Clips
Post & Ask
Join Now Log In

Hometalk is where people share and help with everything home & garden

Paige R

Woodstock, GA
4Likes 1 Share
  • Overview
  • Posts10
  • Comments2
  • Following8
  • Send a Message

Featured Photos

About Me:

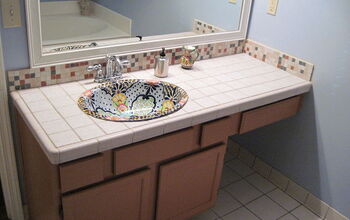
My husband and I bought a fixer-upper home six years ago, and we have been doing DIY Projects whenever we can. We love taking family outings to home improvement stores. While there, spend hours looking, dreaming, and planning.

Favorite area of home improvement:

Last November, we welcomed our first child, a son, into the world. His room has been our best DIY, so far!


Recent Activity


Becky Sharon @ mrs. hines class Eclectically Vintage - Kelly FunkyJunk Interiors - Donna Leah Donna Dixson Karen - The Graphics Fairy + 1 more
  • Paige R
    Followed 8 people on Feb 13, 2013
  • See 1 more photo

Play "Tree Trivia" and win one of three $100 Amazon gift cards!

We all had so much fun with the first contest, Hometalk has agreed to host another one! I took a walk through a local nursery today and enjoyed the fragrance of newly arrived Christmas ...»
trees. While I was there, I took pictures of some of the branch ends. Can you name all four below?

It's trickier than it looks! The contest ends Sunday at midnight and Hometalk will randomly choose the three winners from all correct answers. Happy holidays!

Walter Reeves
Walter Reeves Decatur, GA
239 Comments | Post Comment | 4230 Views
  • Paige R
    Commented on Nov 20, 2011
    cypress, fake,rosemary, fake
  • Share 0
  • Like 10
  • Clip 1
Liked by:
Vicki Michelle L Betty R Megan H
  • Blue is better
  • Another View
  • Third View

Bathroom Paint job

My husband and I bought a house, and quickly realized we were not fond of any of the previous owners' color choices. Our Master bath color was a mixture of brown and yellow...very bad! ...»

Advice:

Remember the drop cloth.

Remember to tape between the ceiling and the top of the wall.

Take a break if you feel yourself losing your patience. Your project is not going anywhere, but you may have to!

The color had to be covered with a layer of Kilz, and the paiting could begin. I did not realize how labor intensive paiting was, until I did it on my own. The Kilz takes about a day to dry, and then you can begin with the color of your choice. The color coat took about two to three hours to paint by myself. It would have been a smoother process, had I had help from friend or two.

Materials:

paint kit, Kilz, Behr Paint - $0.00

Paige R
Paige R Woodstock, GA on Sep 06, 2010
1 Comment | Post Comment | 65 Views
  • Yamini LEED AP at Urbanmotifs
    Yamini LEED AP at Urbanmo... on Oct 13, 2010
    Nice! Do you have any "Before"
  • Share 0
  • Like 0
  • Clip 1
  • The view from above
  • Up Close

Tile Countertop

We had to make a new counter top for our master bath. We installed a new sink, and had to destroy the previous counter top. ...»

Advice:

Buy some extra peices of tile to allot for cutting mistakes. Do not be frustrated if this project takes up your entire weekend. You will have a great looking counter for many, many years!

This was a little bigger prject that we had anticipated. When we cut the opening for the new sink, we realized how bad the old counter top actually looked. My husband then created a new counter top. We had noticed tile counter tops on a recent HGTV episode. The rough look of the tile would really make the smooth, artsy sink "pop". My husband really had to configure the entire plan via 10th grade geometry. he did make a few mistakes in his cutting of a few tiles, but all in all, we were very pleased with the end result. We did have to use the bathroom across the hall for a bit, while my husband was sawing and placing the tile. the tile did have to set for 24 hours, and the backsplash tile had to be taped to the wall during the drying process.

Materials:

tile 4X4, chair rail tile, corner tile, cement backerboard, sink, thinset, grout - $0.00

Paige R
Paige R Woodstock, GA on Sep 06, 2010
3 Comments | Post Comment | 135 Views
  • Steve G
    Steve G on Oct 16, 2010
    The tile looks great. Has it been hard to keep clean?
  • Share 0
  • Like 0
  • Clip 3
  • New Faucet
  • Closer View

Faucet

We had to replace the faucet in the master bath, due to installation of new sink and counter.

Advice: ...»

Remember to turn off the water. When faucet is installed, run the water for a bit to check for any leaks.

This was a very easy project for my husband to complete. He changed faucet fixtures in other areas. He did have a bit of a challenge trying to decide where to place the faucet. It did not fit into the hole of another faucet, but instead had to have a new hole created for it altogether. He did have to turn off the water for an hour or two, in order to make sure that his install was accident free. When finally he had the faucet in place, he turned on the water in ordr to check for any leakage in the faucet, sink, or pipes. When he realized nothing leaked, we were satisfied.

Materials:

faucet assembly, plumber's tape, putty and wrench. - $0.00

Paige R
Paige R Woodstock, GA on Sep 06, 2010
1 Comment | Post Comment | 44 Views
  • Yamini LEED AP at Urbanmotifs
    Yamini LEED AP at Urbanmo... on Oct 13, 2010
    That is one unique looking sink you have there! Can you tell me where you bought it? Its ...»
    Amazing!!

  • Share 0
  • Like 0
  • Clip 1
  • Backsplash in bathroom
  • Closer View

Backsplash for Bathroom Sink

It all started with a sink. We found a great sink, and ended up changing almost our whole bathroom in the process. When we pulled up the old countertop, in order to install the new ...»
sink, we realized we neede to cover the wall. Where the sink had been, was a tacky wood backsplash, that took part odf the wall with it. We had to find something the same height, because anything taller would have covered the mirror.

Advice:

Read up on tile installation before you begin, Nothing is as easy as they make it look on HGTV!

This was a learning experince for us. We did not know that some of the wall would be damaged in the removal process. We also did not know that it tool about a day for tile to set. It started out fairly messy, but it ended well.

Materials:

tile, grout - $0.00

Paige R
Paige R Woodstock, GA on Sep 06, 2010
1 Comment | Post Comment | 126 Views
  • Steve G
    Steve G on Oct 16, 2010
    Can you find mixed boxes of tiles like that at Home Depot or did you buy the tiles individually?
  • Share 0
  • Like 0
  • Clip 1
  • New Bathroom Lighting
  • Another view

Bathroom Lighting

We moved into a house where "Gold Fleck" lighting goes to die! Our bathroom had horrible lighting over the bathroom that was singing our ceiling!. This had to go! ...»

Advice:

Ask for help and turn off electricity.

Replacing lighting is one of the easiest things for my husband to do. His biggest concern is to remember to turn of the electricity befor he begins!

Materials:

Light Fixture Kit - $0.00

Paige R
Paige R Woodstock, GA on Sep 06, 2010
Post Comment | 53 Views
  • Share 0
  • Like 0
  • Clip 0
  • Finished Mirror
  • Another View

Framed Mirror

It all started with a sink. We installed a beautiful sink, and realized everything around it needed to be renovated. The mirror above the sink was no exception! It was originally a ...»
mirrored piece of glass, sans personality. With a frame up by some molding, and a little paint, we changed the look of the mirror entirely.

Advice:

In this instance, math was the key. Measure the mirror and remeasure it! Also, consider investing in an extra piece of molding, in the event that you make a mistake.

This was a very easy project to complete. It was shocking to me how much molding we needed to cover the mirror. This is when paying attention in geometry really pays!

Materials:

molding trim - $0.00

Paige R
Paige R Woodstock, GA on Sep 06, 2010
1 Comment | Post Comment | 102 Views
  • Mary A W
    Mary A W on Mar 11, 2013
    Hi Piage I saw your post a while back and liked it so I framed my mirrors in the bathroom and ...»
    it made the bathroom look great. Thanks for your idea

  • Share 0
  • Like 0
  • Clip 0
  • Our painted sink
  • A closer view

Installed Painetd Sink

We moved into a hoe that was completey out-of-date. When we found a painted sink on sale for $50, we(I) knew we had to have it. My husband removed the old sink, but realized that he ...»
would have to make a new countertop in order to install the sink. He did create the new counter top and installed the beautiful sink.

Advice:

Plan. Plan. Pla. That is the one thing that my husband and I have a hard time doing...planning. We bought the sink, but did not think about the old countertop. We did not want to mix fresh with stale, thus we had to buld a new countertop. We did not plan on that!

We thought this would be a fairly easy project. Take out the old, install the new. The new sink did not fit the old cut in the countertop, and to add a great, new sink on a shabby, old countertop would have been a sin! Making a new countertop was a shock, but it was a great process.

Materials:

painted sink - $0.00

Paige R
Paige R Woodstock, GA on Sep 06, 2010
1 Comment | Post Comment | 84 Views
  • KMS Woodworks
    KMS Woodworks on Oct 17, 2010
    good success is in the details...and planning is a good part of the details...with this ...»
    project under your belt you will look at future projects with a more experinced eye...good job!

  • Share 0
  • Like 0
  • Clip 1
  • The Mexican Star Light and can lighting

Lighting in Baby's Room

My husband and I removed the fan/light that was orignially in the room, and replaced it with a Mexican Star Light. We nknew we were having a boy, and we wanted a light that was a little more rustic. We ordered this one form a lighting website in Mexico. My husband also added four can lights to the ceiling for a broader lightening depth. My husband also added the recessed lighting feature in order for us to dim or brighten the lights for the baby. The end result is amazing! We can ...»
have a bright room for playing, or a dim room for sleeping.

Advice:

Do not be afraid to think outside the box. My husband has such a great eye for these projects and knew the starlight would not be enough light for the room. Adding the can lights and the recessed feature was a great input by him. Don't forget to turn off the electricity when installing lights. I cannot communicate this enough!

We had a great time with this project. The end result was great, and we were very pleased. Always remember to turn off the electricity when installing lights. My husband has learned the hard way!:-)

Materials:

IC recessed cans, toggle light dimmers, star fixture and plate, romex wire, Switch Plate (1T), Switc - $0.00

Paige R
Paige R Woodstock, GA on Sep 06, 2010
2 Comments | Post Comment | 83 Views
  • Diana Haynes
    Diana Haynes on Apr 18, 2013
    This is absolutely adorable! Great job!!
  • Share 0
  • Like 0
  • Clip 1
Loading
Back
to top
Feedback