


DIY Glass-Topped Dining Table

by
Brooke Bundy
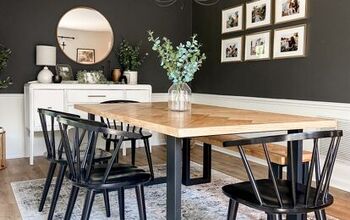
For years I'd been wanting a dining room table that had a glass top and a wooden base. I had a really specific idea in mind for how I wanted it to look, but couldn't find anything to buy that looked like what I was wanting (which was kind of a picture frame look on the top). Besides that, glass dining tables are expensive! Tables in the size we were wanting, which was seating for 8, were way beyond our budget. So instead, we decided to build one ourselves. This wasn't a cheap project (in total for all materials we spent almost $1000) but it was half the cost of buying pre-made what I was wanting and I ended up with my dream dining table!

To begin, we purchased a custom dining legs and base kit from a site called Tablelegs.com. It was our first time using their products and we ended up being so happy with them that we've used them for two more projects since! The base kit and legs come predrilled with all holes needed for putting them together, and include all the screws and other hardware you'll need for assembly. The wood is unfinished so that you can add your own stain.

After assembling the base kit and legs, we ordered the wood we'd need for the top. We got it from a semi-local lumber yard and to keep costs down got the cheapest hardwood that they had, which was poplar. Because none of the major supplies we needed for this project were cheap (table base & legs, wood for top, and glass for top) we ordered them in stages, waiting till one was fully assembled before ordering the next item, that way we were confident about measurements and sizing.

The layout in the photo above is the way that we assembled the pieces of wood for the table top. My husband drilled pocket holes and slots in and near the edges of the wood so that the pieces could be attached to each other using a combination of screws and wood biscuits.

Once the top was assembled it was easy to add it to the table base since that comes predrilled with pocket holes for attaching whatever tabletop that you have. With all the wooden parts of the table assembled, I was able add the stain while we waited for the glass that we'd ordered for the top to be delivered. I went with a dark walnut color for the stain. We don't have a lot of wood in our house, so I wanted this one piece of furniture to be the place where I really embraced wood. {If that makes any sense!:)}

And the final piece that made the table complete was adding the piece of glass to the top.

We got a really thick piece for multiple reasons. One was because I didn't want to have to use those little rubber bumpers under the glass to keep it from sliding. So we got a thick piece of glass that would be heavy enough to not slide around easily. And it worked- it's so heavy my husband and I can't even move it on our own, we have to have help! So I have no fears of it falling. The second reason we wanted thick glass for the top was because we have 3 year old twins and I didn't want to worry about them being able to break it easily, or heaven forbid, crawling on top of the table and then falling through. It wasn't cheap to get such thick glass (somewhere between $200-$300) but for us it was worth it.

This was one of our more extensive projects, and most definitely the most expensive. But it was so so worth it! I love this table, and it's awesome to now have the table of my dreams sitting in my dining room!

There are tons more photos and details for exactly how we did all of this and why we made certain decisions with the table design, plus helpful tips for planning the right table size based on desired seating, at this post on my blog:
Want more details about this and other DIY projects? Check out my blog post!
Comments
Join the conversation
4 comments
-
Wow...just WOW!
-
Amazing post! The table and dining room turned out gorgeous!


Frequently asked questions
Have a question about this project?