


Using Cedar siding for a pictorial mural

by
Richard N
I'm a handyman carpenter and over the years I have done a lot of restoration work on houses and occasionally furniture. I've done a little bit of everything. That includes siding in it's various forms. But until tackling 'the giant', they've always been straight jobs.
This is my own house, and I took my time to build the giant. I started in the fall of 2011 and any I'd add to it time I had free and it was over 40 degrees. Fortunately it was a warm winter and I finished in the early spring of 2012. You will see from the before picture that this was a surface in need of a creative solution. The house was built in 1907 and the enclosed stairway was added some time later by someone who gave no thought to integrating the design with the rest if the house. Putting clapboards on to match the rest of the house would not really have made it look like it belonged. I had seen several examples of cedar siding art over the years that gave me the idea to do something different. On my website I've created a gallery to show other people's works as well.
I decided to tackle the project in 2 stages. First I created a sampler of traditional shingle patterns so I could get my head around this project. That's the vertical rectangle on the left side of the wall. That left me with a trapezoid shape. The second stage was finding something that worked in that shape. I sketched a number of ideas, but the one that worked best was to make it look like a stairway (surprise surprise). Not sure why I thought of a giant, but once I did, it amused me enough to want to create it.
I'm not an artist, but I have studied enough to know what I had to do. I worked with a graphic program to create perspective with vanishing points. In this case one plane is parallel to the viewer: the "wall" in back of the giant (on his left) and the near edge of the stairs. The stair treads and risers as well as the wall that has the arched door has a vanishing point to the left of the house.
Once I had a design I liked, I overlaid a grid on it and blew up and printed up each section. I nailed a story board to the left and used a roofing square to transfer my design on to the wall as I went. This is a bit tricky since each layer you add covers the layout design and you get to draw it again and again.
I would not recommend a project like this if you have never shingled before. It can be very confusing and you have to remember that the most important aspect is not how it looks, but that it sheds water properly. On several occasions, I'd reach a point where I realized there was insufficient overlap and had to redo a row. Two or three times I was able to work around this by sliding a piece of aluminum in place.
I'd be willing to bet that when most people draw a picture they visualize it from the top down. If you're like me, you'll find creating picture in shingles as very unnerving, because the only way you can do a project of this nature is from the bottom up. Just take a deep breath and try again and don't let it intimidate you. I wanted to go slow, so I did all the cuts with a utility knife, a small hand saw, and a coping saw. Of course power tools would go faster, but what really took the most time was thinking each step through. After I finished the project, I found examples of people who cut their pieces in the shop pinning them to a board and then bringing their lay out board to the site.
For a project of this size and scale, I highly recommend using scaffolding. Also it helped a lot to have my wife standing back and overseeing the process. Besides the fact she has a much better artistic eye than I do, I didn't want to climb up and down from the scaffolding to inspect my work, and she caught many a mistake that was more visible from 20 feet away than from 2 feet away.
I got more positive comments from my friends about this work than anything else I've done, but the best part is seeing it every day from my workshop.
You can find other examples of siding art along with helpful links at the website I created to showcase the giant at
http://www.tagyerit.com/ShingleArt/ (http://www.artshingles.com)
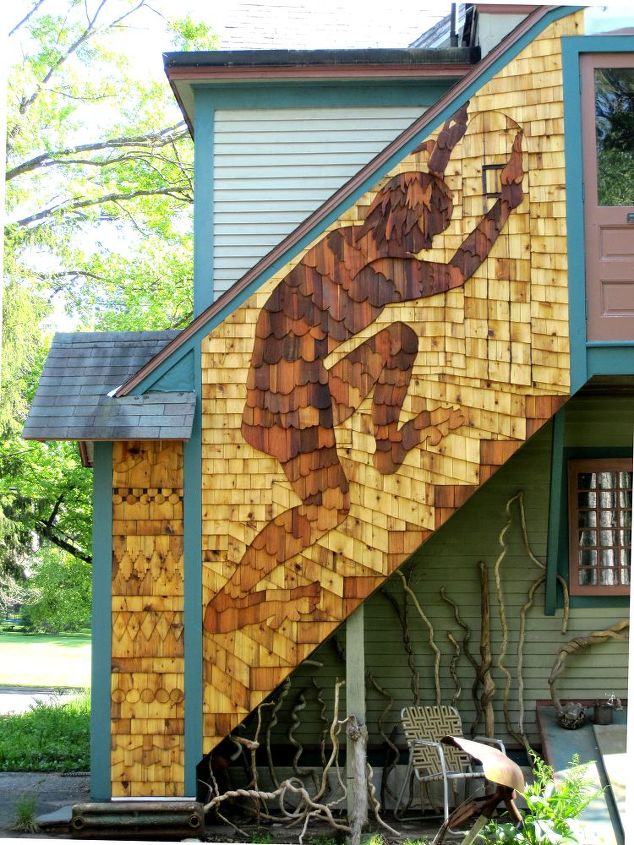
The Giant at the Back Door with siding sampler
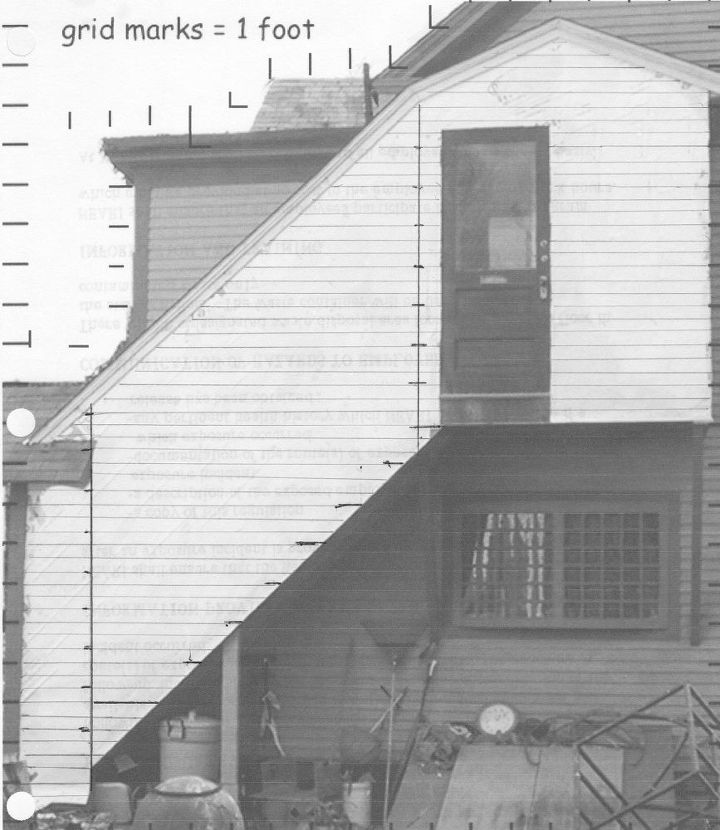
This is the before picture. The door you see at the top of the stairs is actually a window that opens at the top works like a dutch door, with the bottom permanently fastened. The space to the right awaits my next design this fall.
Want more details about this and other DIY projects? Check out my blog post!
Comments
Join the conversation
2 of 45 comments
-
Hi Andre, I would imagine in theory, that a contractor familiar with cedar shingling, could do something. Not sure how they would know to price it, unless they've done it before. For that matter, I wouldn't know what to charge, but then again, I only do it for my own amusement. Best of luck. Let me know if you figure something out.
-
Awesome!


Frequently asked questions
Have a question about this project?