


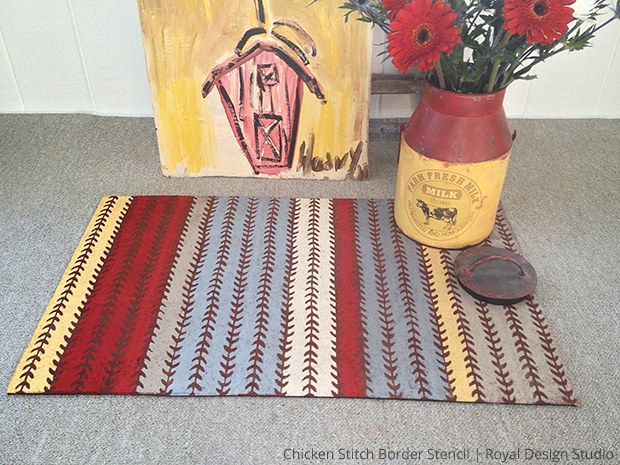
DIY Stenciled Chicken Tracks Door Mat

What's more all-American country style than a farmhouse with a chicken coop and eggs for breakfast? And when the feathered friends are walking around in a garden of prairie flowers, their tracks make for the cutest pattern.
Supplies to make this project:
Royal Design Studio's Chicken Stitch Border stencil
Royal Design Studio's Stencil brushes
Flat doormat like the ecomat rugs from Apache Mills available at Menards or Home Depot
Paint in colors your choice for stripes - I used Chalk Paint by Annie Sloan and Benjamin Moore & Dutch Boy latex paints
Painters tape
Paper towel
Look for a doormat or rug with a flat surface. If you cannot find a doormat, you can paint on floorcloth (here is a tutorial for painting on floorlcoth). If you use floorcloth, you can make it stick to the floor for safety - Martha Stewart has a great tip that uses caulk to make rugs non-slip. I found a doormat with a flat surface for just $7 at Home Depot. If the design of the rug is not your style, don't worry as you're going to paint on it. In fact, if it's not your style, you won't feel guilty about painting over it!
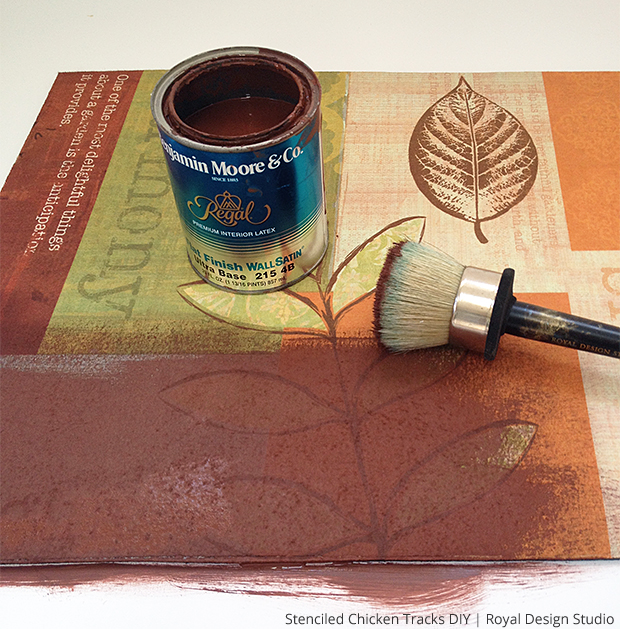
For the first step, paint the entire rug with the color you want your chicken tracks to be. I chose to use a dark brown Benjamin Moore latex paint left over from a wall painting project years ago. You too may have partial cans of paint left over from projects around your home. If you use those paints, your rug will tie in with the colors already used around your home. Cool trick, huh! You can paint the stencil with one color, or choose a variety of paint colors to make stripes.
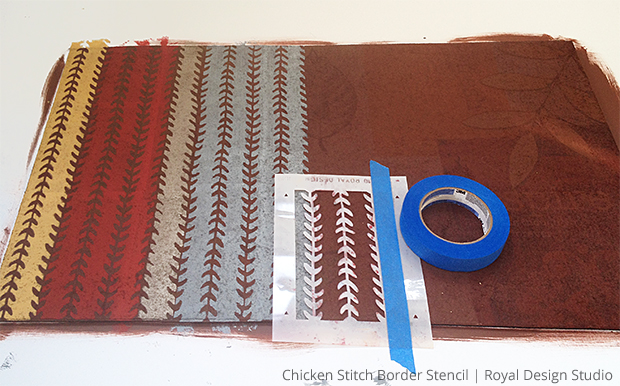
Once your first coat of paint dries (my doormat sucked up a ton of paint so it took a while to dry), start stenciling your first stripe with the Chicken Stitch Border stencil. You can paint all your stripes the same width or vary the widths. If you're painting stripes with more than one color, it helps to tape off parts of the stencil. You could tape up the middle of a chicken track as I did to make "fringy stripes" or you could tape up the middle of the striped area to get a look as shown below.
Comments
Join the conversation
2 of 3 comments
-
Such a cool idea
-
Funky design!


Frequently asked questions
Have a question about this project?
How will the paint stand up to washing ina machine ?